
2. Organization
2.1. Introduction
2.2. Organizations

2.3. Create Operation
2.3.1. Goal
Process
Realm data for the Organization and Administrator user will be registered to Keycloak.
The Organization data will be registered to the relational database (MariaDB, MySQL, etc).
A directory for the Organization will be created to the Exastro IT Automation peristent volume.
A user for the Organization will be registered to GitLab.
2.3.2. Pre-requisites
Conditions
After installing the system, the user must be able to log in to the Keycloak management console
The user must have the following information required by the System management.
Management console URL
System administrator User ID
System administrator Password
The following applications must be installed
curl
git
jq
2.3.3. Create Organization
Features
Create
From the menu, select .

This will display the Organization list. Press the Create button and create a new Organization.

Input information for the new Organization and press the Register button.

表 2.33 Organization creation input items.¶ Input area
Item name
Description
Organization standard information settings
Organization ID
Specify an unique ID for the Organization.
This ID specified will be used to link systems.
Organization name
Specify a name for the Organization.
Resource plan
Specify the Resource plan that will be linked to the Organization.
If shortened, the default resource plans will be specified.
For more information regarding Resource plans, see Resource plans.
Organization administrator settings
Username
Specify a username for the Organization administrator.
Password
Specify an initial password for the Organization administrator.
email
Specify an E-mail address for the Organization administrator.
Name
Specify a name for the Organization administrator.
Last name
Specify a last name for the Organization administrator.
Activate
Specify whether the Organization function should be active or not.
When creating, make sure this is set to Active.
Exastro IT AutomationOption settings
Install driver
Specify which drivers to install.
CI/CD for IaC
For more information regarding the driver, see the following document.
Exastro OASE
MongoDB is required in order to install Exastro OASE. The user must input configurations in order to connect to MongoDB.
・ Document Store : "mongodb" is fixed.
・ Automatic pay-out : Tick the checkbox if the user is using the MongoDB configured when installing the system If not, untick the checkbox and input a Python connection string.
・ Python connection string :Input the Python connection string for the MongoDB the user wants to use. The MongoDB account must have root role or similar permissions.
Example: mongodb://username:password@hostname:27017/
For more information regarding the driver, see the following document.
Terraform CLI driver
For more information regarding the driver, see the following document.
Terraform Cloud/EP driver
For more information regarding the driver, see the following document.
Features
Create
Create Organization
Create an Organization using Rest API.The usable Parameters are as following.For more information, see ../../reference/api/system_manager/platform-api.表 2.34 Organization creation parameters¶ Item
Description
Editable
Default value/Selectable setting value
Organization ID
Specify an ID for the Organization.Can contain Half width alphanumeric characters, numbers, hyphen and underscore.Maximum 36 characters.※The first character must be a non-capitalized alphanumeric letter.※The ID cannot match reserved phrases (More information further down).Yes
org001
Organization name
Specify a name for the OrganizationMaximum 255 characters.Yes
org001-name
Organization manager's username
Specify a username for the Organization manager (Login ID).
Yes
admin
Organization manager's email
Specify an E-mail for the Organization manager.
Yes
admin@example.com
Organization manager's firstName
Specify a name for the Organization manager.
Yes
admin
Organization manager's lastName
Specify a last name for the Organization manager.
Yes
admin
Organization manager's initial password
Specify the initial password for the Organization manager.
Yes
password
options.sslRequired
Specify whether to use SSL connection or not.
Yes
external (default): If fixed to Private IP Address, the user will be able to conenct to Keycloak without SSL.none: Not SSL settings.all: Asks for SSL for all IP addresses.(Cannot be selected as the internal API uses HTTP to access.)optionsIta.drivers
Set to True to install the target driver. Set to False if not installing.MongoDB is needed in order to install Exastro OASE. This item is not available if the system does not have MongoDB ("MONGO_HOST" environment variable is empty)Yes
Specify true/false for the following driver keys. Configure whether to install the driver for when creating workspaces or not. Can be ommited.ci_cd: CI/CD for IaCoase: Exastro OASEterraform_cloud_ep: Terraform Cloud/EP driverterraform_cli: Terraform CLI driverExample:"optionsIta": {"drivers": {"ci_cd": true, "oase": true, "terraform_cli": false, "terraform_cloud_ep": true}}optionsIta.services.document_store.name
Required if the optionsIta.drivers' Exastro OASE is active.The value is fixed to "mongodb".No
mongodb
optionsIta.services.document_store.owner
Required parameter if the optionsIta.drivers' Exastro OASE is active.Set to True if using the MongoDB configured when installing the system. If the user is specifying a different MongoDB, set to False. optionsIta.services.document_store.connection_string becomes a required item.Yes
true or false
optionsIta.services.document_store.connection_string
Required parameter if the optionsIta.drivers' Exastro OASE is active.Input MongdoDB's Python connection string.Yes
Example: mongodb://username:password@hostname:27017/
警告
BASE64_BASIC=$(echo -n "KEYCLOAK_USER:KEYCLOAK_PASSWORD" | base64)
BASE_URL=http://exastro-suite-mng.example.local

curl -X 'POST' \
  "${BASE_URL}/api/platform/Organizations" \
  -H 'accept: application/json' \
  -H "Authorization: Basic ${BASE64_BASIC}" \
  -H 'Content-Type: application/json' \
  -d '{
  "id": "org001",
  "name": "org001-name",
  "Organization_managers": [
    {
      "username": "admin",
      "email": "admin@example.com",
      "firstName": "admin",
      "lastName": "admin",
      "credentials": [
        {
          "type": "password",
          "value": "password",
          "temporary": true
        }
      ],
      "requiredActions": [
        "UPDATE_PROFILE"
      ],
      "enabled": true
    }
  ],
  "plan": {},
  "options": {},
  "optionsIta": {
    "drivers": {
      "terraform_cloud_ep": true,
      "terraform_cli": true,
      "ci_cd": true,
      "oase": true
    },
    "services": {
      "document_store": {
        "name": "mongodb",
        "owner": false,
        "connection_string": "mongodb://username:password@hostname:27017/"
      }
    }
  }
}'
2.3.4. Organization list
Follow the steps below.
From the menu, select .
- This will display the Organization list where users can see all created Organizations.

- The user can press any Organization to see more detailed information.

BASE64_BASIC=$(echo -n "Specify System administrator's user name: Specify System administrator's Password" | base64)
BASE_URL=Specify the System administrator's site URL

curl -k -X GET \
  -H "Content-Type: application/json" \
  -H "Authorization: basic ${BASE64_BASIC}" \
  -d  @- \
  "${BASE_URL}/api/platform/Organizations"
Item |
Item contents |
|---|---|
data.id |
Organization ID |
data.name |
Organization name |
data.optionsIta.drivers |
Status of the driver
true:Active false:Not active
|
data.Organization_managers |
Organization administrator information |
data.active_plan.id |
Corresponding Plan ID when information was fetched |
data.plans |
Plan information configured by Organization |
data.enabled |
Organization status
true:Active false:Not active
|
data.status |
Organization creation status
See later in this document for more information regarding Statuses.
|
status value |
Description |
|---|---|
Organization Create Start |
The Organization creation process has started (Status information registered) |
Realm Create Complete |
Platform Organization realm registered |
Client Create Complete |
Platform application default settings complete |
Client Role Setting Complete |
Platform application role initial settings complete |
Service Account Setting Complete |
Platform service account settings complete |
Organization User Create Complete |
Platform Organization user registration complete |
Organization User Role Setting Complete |
Platform Organization user role settings complete |
Organization DB Create Complete |
Platform Organization DB creation complete |
Organization DB Update Complete |
Platform Organization information DB updated |
IT Automation Organization Create Complete |
IT Automation Organization created and initialized |
Organization Plan Create Complete |
Platform Organization plan settings complet |
Realm Enabled Complete |
Platform Organization activated |
Organization Create Complete |
Organization successfully created. |
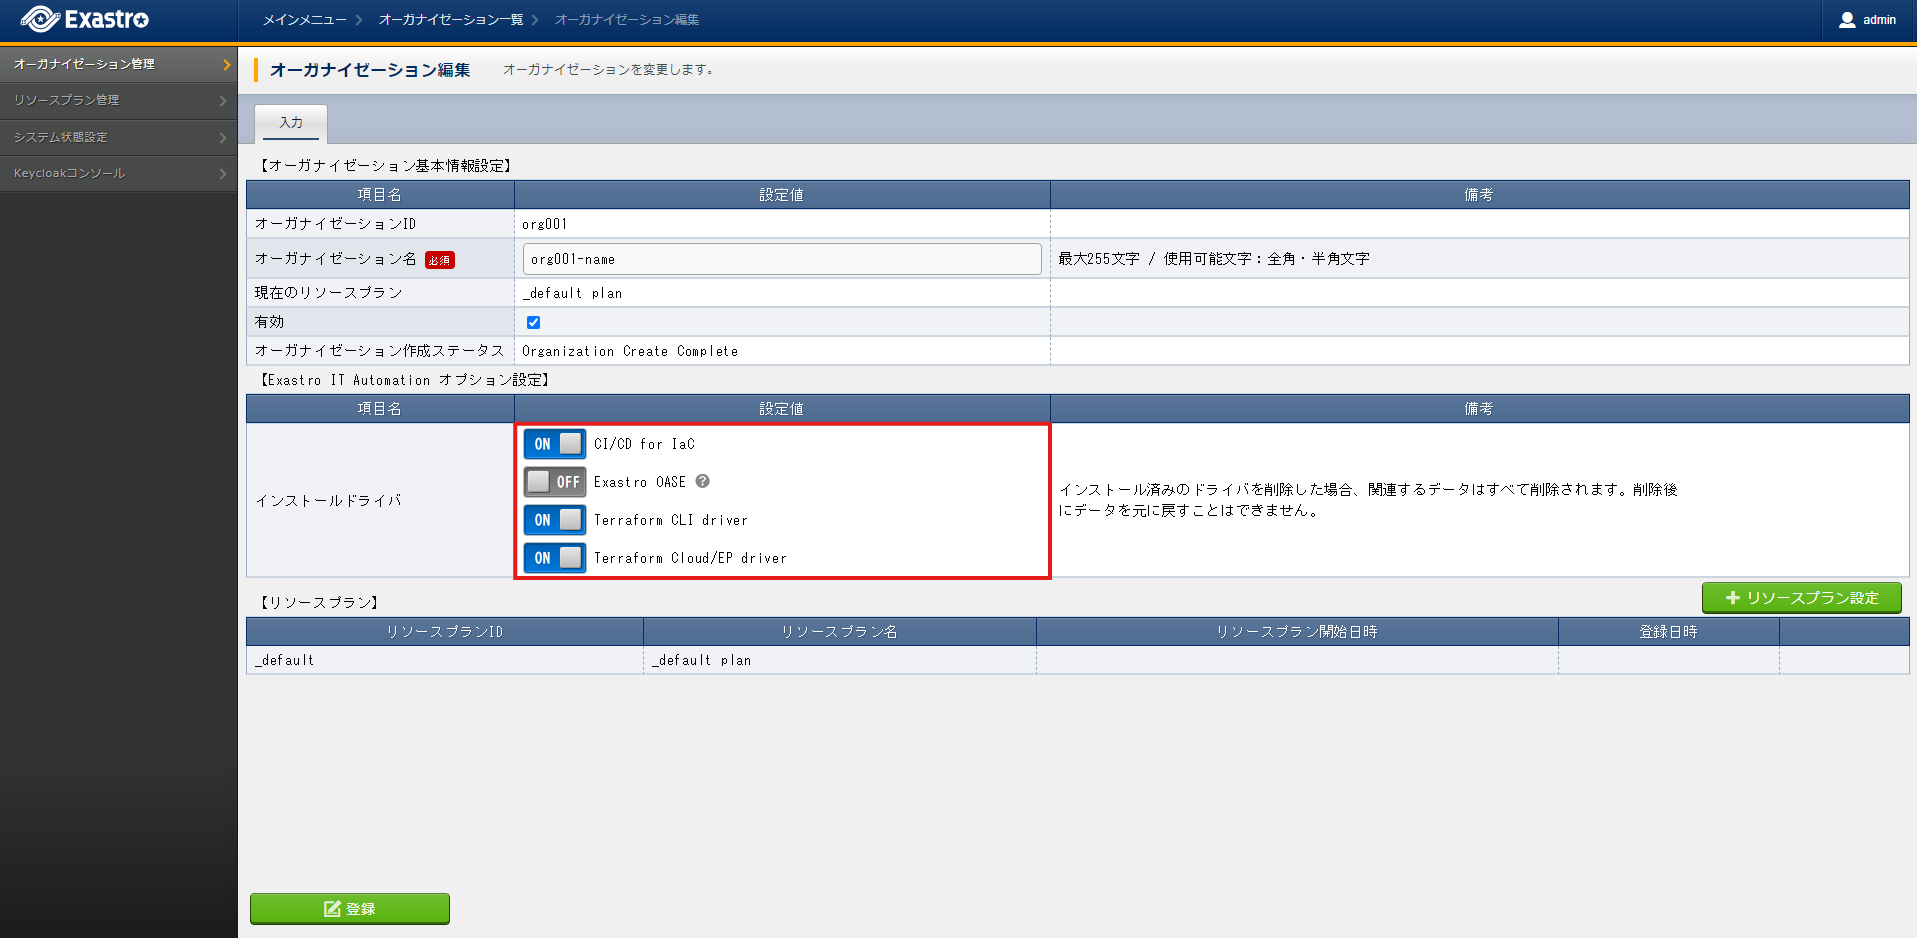
2.3.5. Edit Organization
From the menu, select .
- This will display the Organization list. Press the Edit button on the line with the desired Organization.

- Users can edit the name of the Organization.

Tip
The Organization ID cannot be changed. - Switch the for desired drivers to ON in order to install them.Users can switch them to OFF to uninstall drivers.Check that there are no problems with the contents and press the Register button.
- If uninstalling any drivers, Input delete in the deletion confirmation page and press Yes, delete button.
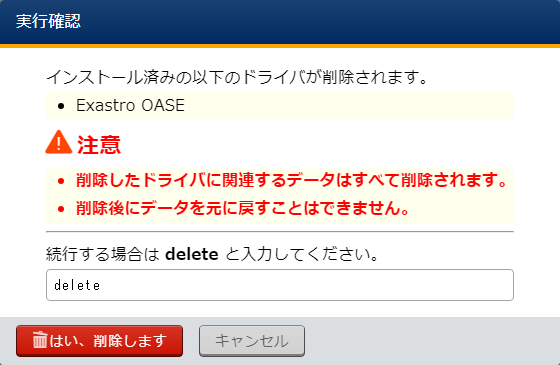
警告
Uninstalling a driver will also automatically delete all related data. Said data cannot be restored. - Press the Resource plan settings button to link resource plans to the Organization.Select the desired Resource plan ID from the pulldown menu, specify a start date and press the Apply button.

- The Resource plan will be added to the Organization line.Check that there are no problems with the contents and press the Register button.

- In order to remove resource plans from the Organization, press Release button to release it from the Organization.

- In the release confirmation page, input the Resource plan ID and press the Yes, release button.

- Released resource plan lines will be greyed out.Check that there are no problems with the contents and press the Register button.


Tip
- Edit Organization
Item |
Description |
Editable |
Default value/Selectable setting value |
|---|---|---|---|
Organization name |
Specify a name for the Organization
Maximum 255 characters.
|
Yes |
org001-name |
enabled |
Select whether the Organization should be usable or not.
|
No |
true |
optionsIta.driver |
Specify which driver to install/uninstall.
|
Yes
|
true or false |
optionsIta.services.document_store.name |
Required parameter if the optionsIta.drivers' Exastro OASE is active. Not required if Exastro OASE is already active.
The value is fixed to "mongodb".
|
No |
mongodb |
optionsIta.services.document_store.owner |
Required parameter if the optionsIta.drivers' Exastro OASE is active. Not required if Exastro OASE is already active.
Set to True if using the MongoDB configured when installing the system. If the user is specifying a different MongoDB, set to False. optionsIta.services.document_store.connection_string becomes a required item. optionsIta.services.document_store.connection_string is input required.
|
Yes (Not editable if a value is already configured) |
true or false |
optionsIta.services.document_store.connection_string |
Required parameter if the optionsIta.drivers' Exastro OASE is active.Not required if Exastro OASe is already active and there are no changes to the value.
Input MongdoDB's Python connection string.
|
Yes |
Example: mongodb://username:password@hostname:27017/
|
警告
BASE64_BASIC=$(echo -n "Specify System administrator's user name: Specify System administrator's Password" | base64)
BASE_URL=Specify the System administrator's site URL
ORG_ID=Specify the ID of the Organization that will be fetched


curl -k -X 'PUT' \
  -H "Content-Type: application/json" \
  -H "Authorization: basic ${BASE64_BASIC}" \
  -d  @- \
  "${BASE_URL}/api/platform/Organizations/${ORG_ID}" \
  << EOF
{
  "name": "name of org1",
  "enabled": true,
  "optionsIta": {
    "drivers": {
      "terraform_cloud_ep": true,
      "terraform_cli": true,
      "ci_cd": true,
      "oase": true
    }
  }
}
- Confirm already configured Organization resource plan
BASE64_BASIC=$(echo -n "Specify System administrator's user name: Specify System administrator's Password" | base64)
BASE_URL=Specify the System administrator's site URL
ORG_ID=Specify the ID of the Organization that will be fetched

curl -k -X GET \
    -H "Content-Type: application/json" \
    -H "Authorization: basic ${BASE64_BASIC}" \
    -d  @- \
    "${BASE_URL}/api/platform/${ORG_ID}/plans"
- Configure Resource plan to Organization
BASE64_BASIC=$(echo -n "Specify System administrator's user name: Specify System administrator's Password" | base64)
BASE_URL=Specify the System administrator's site URL
ORG_ID=Specify the ID of the Organization that will be linked

curl -k -X POST \
    -H "Content-Type: application/json" \
    -H "Authorization: basic ${BASE64_BASIC}" \
    -d  @- \
    "${BASE_URL}/api/platform/${ORG_ID}/plans" \
    << EOF
{
    "id": "plan-standard",
    "start_datetime": "2022-12-01 00:00:00"
}
EOF
- Release Resource plan from Organization
BASE64_BASIC=$(echo -n "Specify System administrator's user name: Specify System administrator's Password" | base64)
BASE_URL=Specify the System administrator's site URL
ORG_ID=Specify the ID of the Organization that will be released
START_DATETIME=Specify when the Resource plan will be released.(Format: yyyy-mm-dd hh:mm:ss)

curl -k -X DELETE \
    -H "Content-Type: application/json" \
    -H "Authorization: basic ${BASE64_BASIC}" \
    "${BASE_URL}/api/platform/${ORG_ID}/plans/`echo ${START_DATETIME} | sed 's/ /%20/g;s/:/%3A/g'`"
2.3.6. Delete Organization
From the menu, select .
- This will display the Organization list. Press the Delete button on the line of the desired Organization.

- A confirmation window will pop up asking if the user really wants to delete the Organization. If yes, input the platform/The ID of the Organization that will be deleted and press the Yes, delete button.

 BASE64_BASIC=$(echo -n "Specify System administrator's user name: Specify System administrator's Password" | base64)
 BASE_URL=Specify the System administrator's site URL
 ORG_ID=Specify the ID of the Organization that will be deleted

curl -k -X DELETE \
  -H "Authorization: basic ${BASE64_BASIC}" \
  "${BASE_URL}/api/platform/Organizations/${Organization_ID}"
警告
2.4. Access Organization
http[s]://{Exastro Platform management URL}:{Exastro Platform management port}/{Organization ID}/platform/
# Helm chart version
http://exastro-suite-mng.example.local:30081/org001/platform/

# Docker Compose version (RHEL environment)
http://exastro-suite-mng.example.local:81/org001/platform/

# Docker Compose版 (Non-RHEL environment)
http://exastro-suite-mng.example.local:30081/org001/platform/
2.5. Other restrictions/Remarks
2.5.1. Organization ID reserved phrases
master
platform
account
account-console
admin-cli
broker
realm-management
security-admin-console
*-workspaces
system-*-auth
2.5.2. Re-creating Organizations
./exastro-platform/tools/create-Organization.sh --retry
./exastro-platform/tools/create-Organization.sh ./exastro-platform/tools/create-Organization.sample.json