
7. Conductor
7.1. Introduction
This document aims to explain the Exastro IT Automation's Conductor function and how to operate it.
7.2. Conductor overview
7.4. ITA Conductor procedure
7.4.1. Jobflow
- Register/confirm device information (Ansible common)
- Register/confirm operation (Basic console)
- Register Movement from ITA driver
- Confirm Movement (Basic console)
- Register Conductor's interface information
- Register Conductor
- Confirm Conductor
- Execute Conductor
- Confirm Conductor results
- Confirm Conductor history
- For more information regarding registering "Device information", see "Ansible common Device list".
- For more information regarding registering "Operations", see "Basic console - Operation list".
- For more information regarding registering "Movements", see the different drivers' manuals.
- The directory paths shared between the movements when the Conductor is executed.In order to deliver information between Movements, the user can use a shared directory path."Ansible driver" can be used for shared targets.For more information regarding "Ansible driver", see "Ansible Driver".
- Workflows executed with "Conductor call" have their own shared directory paths.(Movements that strides over the workflows are not shared)
7.5. Function/Operation description
7.5.1. Conductor interface information
In the "Conductor confirmation" menu` menu.
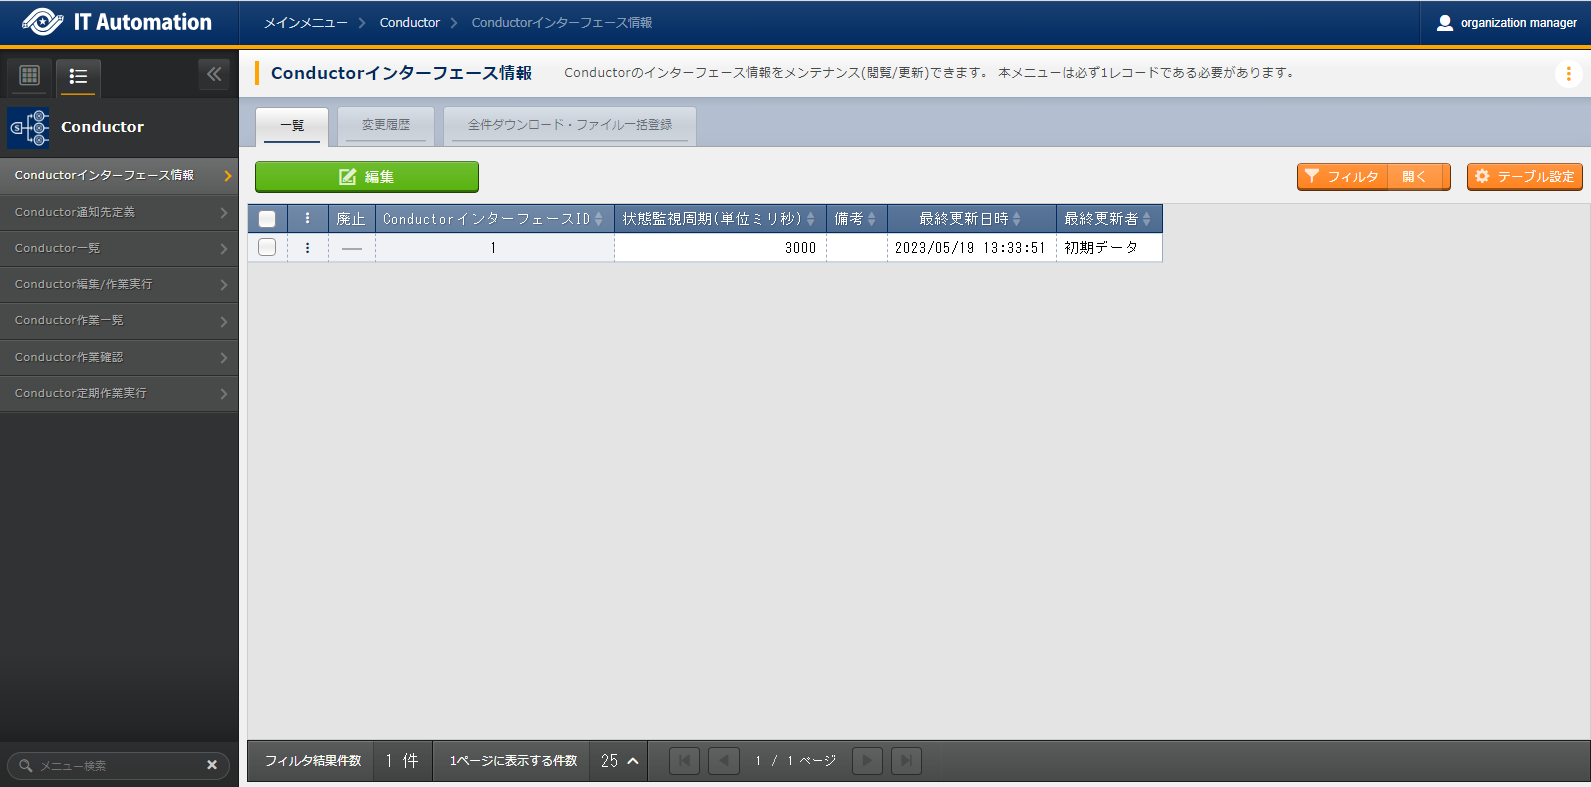
図 7.1 Conductor interface information
See the following for more information regarding the .
7.5.2. Conductor notification definition
The menu allows users to configure definitions regarding notifications from Conductor executions.
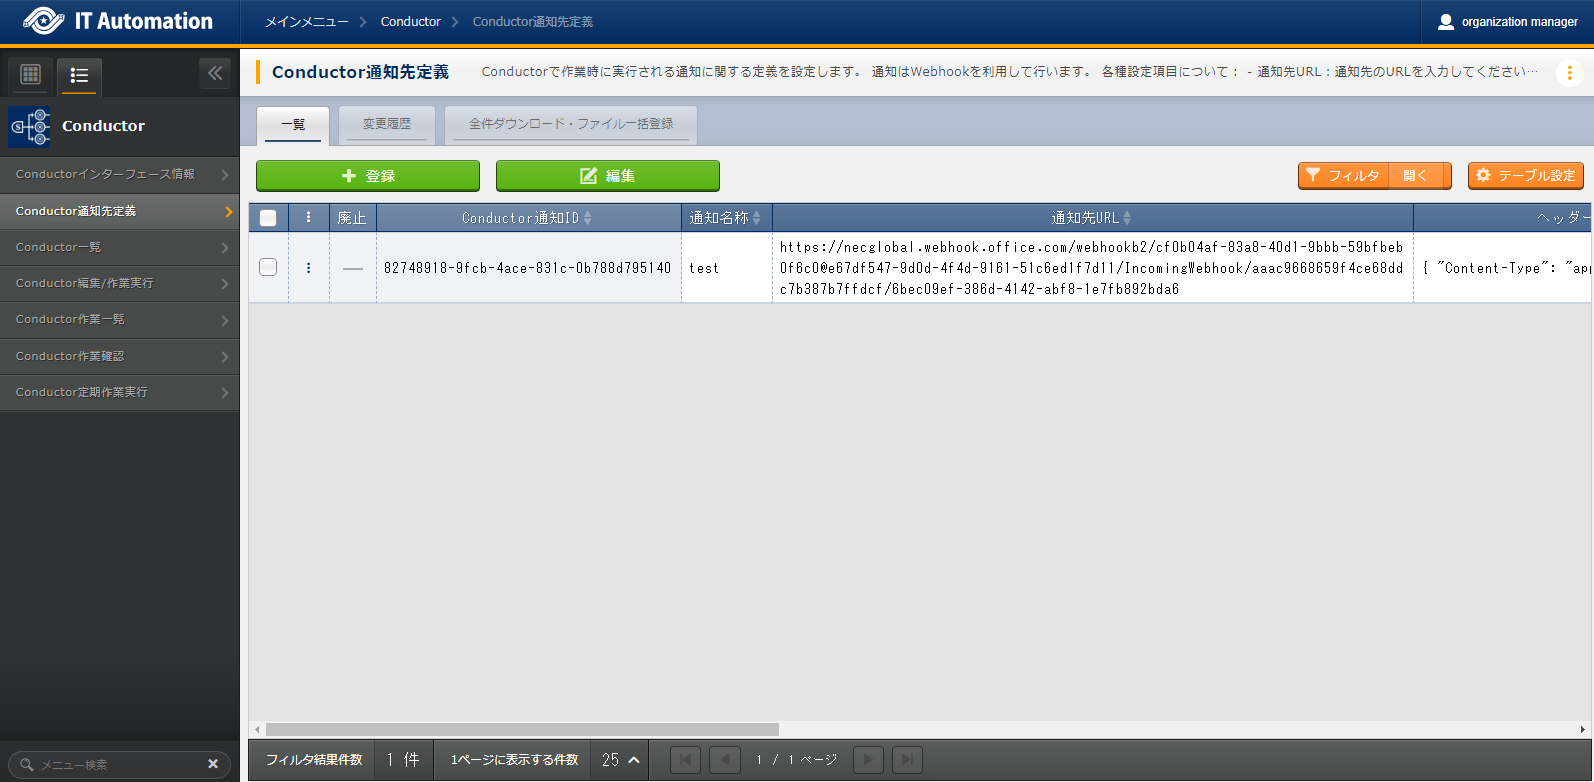
図 7.2 Conductor notification definition
See the following for more information regarding the .
表 7.3 "List" submenu¶ Item
Description
Input required
Input method
Conductor notification ID
Automatically given by the system. Cannot be edited.
Automatic
Notification name
Input a notification name.
○
Manual
Notification destination URL
Input a URL for the notification destination.
○
Manual
Header
Input a HTTP header in JSON format.
○
Manual
Message
Enter message according to service specifications.
○
Manual
PROXY URL
Enter URL if PROXY setting is needed.
○
Manual
PROXY PORT
Enter PORT if PROXY setting is needed.
○
Manual
Confirmation URL
Enter FQDN used in input variable for confirmation URL
○
Manual
Start time
Enter to stop notifications.
○
Manual
End time
Enter to stop notifications.
○
Manual
Remarks
Free description field.
ー
Manual
※For more information regarding ITA variables that can be used in messages, see the following.
表 7.4 Conductor notification destination definition ITA variables.¶ ITA original variable
Variable specification contents
__CONDUCTOR_INSTANCE_ID__
Conductor instance ID
__CONDUCTOR_NAME__
Conductor instance name
__STATUS_ID__
Status ID
__OPERATION_ID__
Operation ID
__OPERATION_NAME__
Operation name
__EXECUTION_USER__
Execution user
__PARENT_CONDUCTOR_INSTANCE_ID__
Parent instance ID
__PARENT_CONDUCTOR_NAME__
Parent Conductor name
__TOP_CONDUCTOR_INSTANCE_ID__
Top Conductor instance ID
__TOP_CONDUCTOR_NAME__
Top Conductor name
__ABORT_EXECUTE_FLAG__
Emergency stop flag
__REGISTER_TIME__
Registration time
__TIME_BOOK__
Reservation time
__TIME_START__
Start time
__TIME_END__
End time
__NOTICE_NAME__
Notification log
__NOTE__
Remarks
__JUMP_URL__
Conductor operation confirmation page URL(Use URL for confirmation)
※The status IDs and names are as following.※The output contents of the Confirmation URL uses the "Confirmation URL(FQDN )" input contents and outputs it in the following format.Example: If the Confirmation URL(FQDN) value is set to "http://localhost:38000". http://localhost:38000/org002/workspaces/workspace1/ita/?menu=conductor_confirmation&conductor_instance_id=X
7.5.3. Conductor history
- The menu allows users to view and discard registered conductors.
|Click the Details button in the and move to the Conductor edit/execution page.
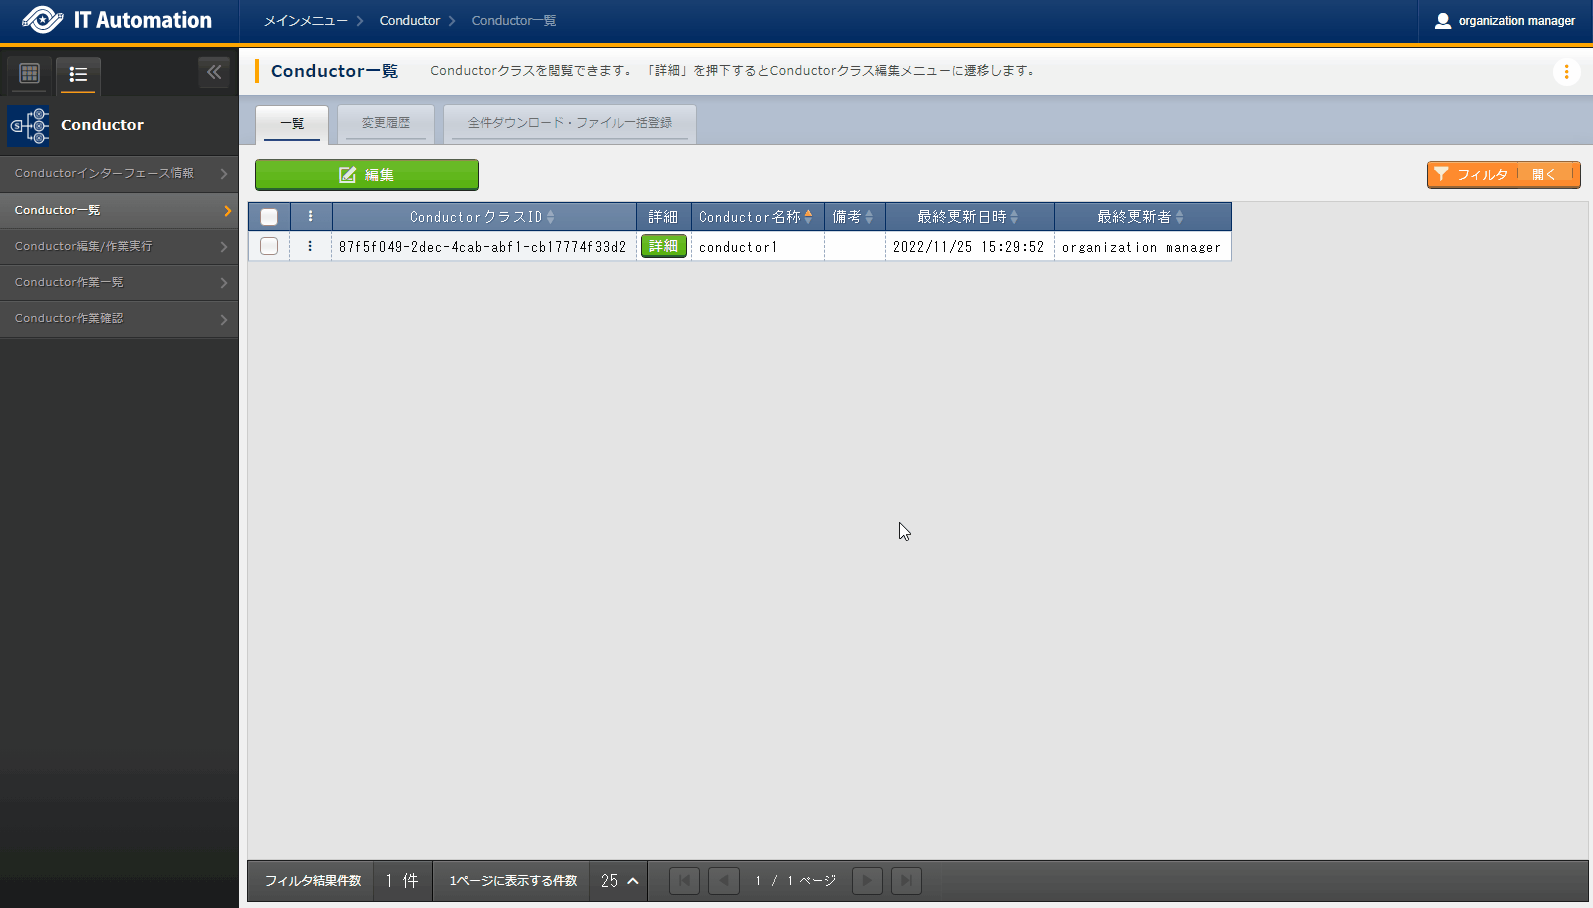
図 7.3 "Conductor history" menu
7.5.4. Conductor edit/execution
7.5.4.1. "Edit" mode
- Allows users to register Conductor names and jobflow parts (Nodes).
- The detailed information displayed on the page depends on the selected Node.
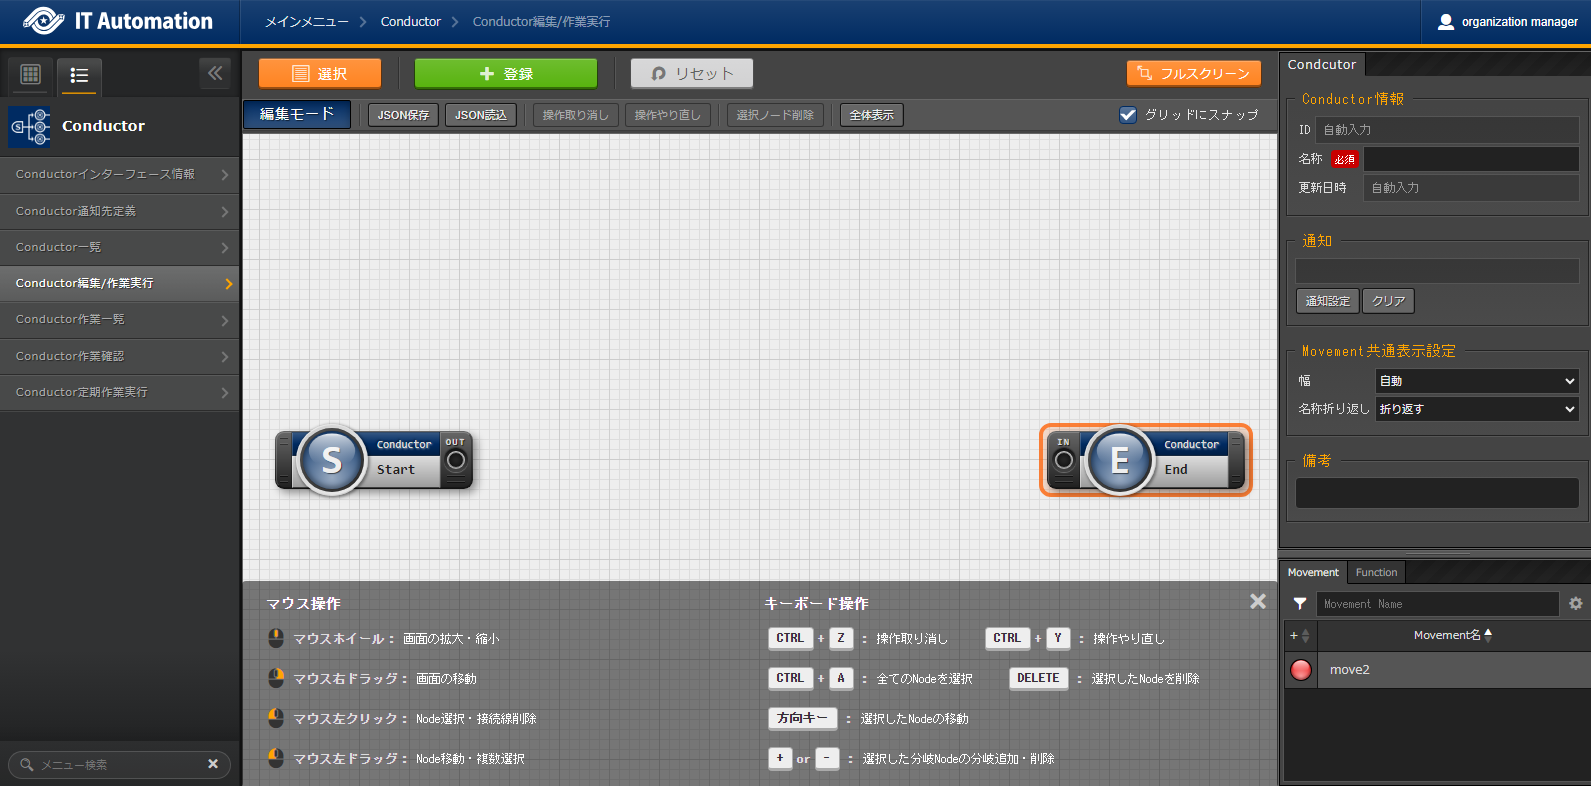
図 7.4 Conductor Edit/Execute menu (Edit mode)
7.5.4.1.1. Node list
- The bottom right part of the page displays available Nodes.
- They are configured from the following tabs.
- Movement tab
- Registrated Movement name list
- Function tab
- Conductor end
- Conductor pause
- Conductor call
- Conditional branch
- Parallel branch
- Parallel merge
- Status File branch
- For more information regarding the different nodes, see below.
- The different nodes have the following restrictions.
- All the "IN/OUT" parts must be conencted.

図 7.5 NodeRestrictions (Correct example: Parallel branch)
- If Parallel merge is used, the user must also use Parallel branch.

図 7.6 NodeRestrictions(Bad example: Parallel branch)
- Flows branched with Conditional branches cannot be merged to Parallel merge.

図 7.7 NodeRestrictions(Bad example: Conditional branch)
- The following Nodes cannot be connected to the same node: Parallel branch, Conditional branch, Parallel merge, Conductor pause.

図 7.8 NodeRestrictions(Bad example: Continued use)
- It is not possible to specify an updating Conductor with a Conductor call and then update it.
- The user can add nodes by dragging and dropping them from the bottom right of the screen.
- When selecting Nodes, the "Remarks" field in the "Detailed information" section in the top of the page can be used to contain descriptions and comments about the Nodes.
- The "Remarks" field and its' contents does not have any effect on the execution.
- After setting a Node, click the +Register button and register a Conductor.
7.5.4.1.2. Node detailed information
- The upper left are of the page displays detailed information regarding the selected node.
- The name of the tab changes depending on the selected node.
- When no Node is selected (Conductor tab)
- Displayed when nothing is selected.
- The items found in the tab are as following.
- Clicking the Notification settings button displays the "Notification settings" pop-up window.

図 7.9 Conductor notification settings pop-up window
表 7.5 "Conductor" tab¶ Item
Description
Input required
Input method
Restrictions
ID
Unique ID automatically given by the system.
-
Automatic
-
Name
Input a name for the Conductor.
○
Manual
-
Update date/time
Automatically updated when the selected Conductor is updated.
-
Automatic
-
Notification
Select the executing notification.Users can select multiple notifications.The notifications registered in "Conductor notification definition " can be used.-
Checkbox
-
Movement shared display settings
Configure display settings (node width and Movement name display format) related to the Movement nodes.
-
List selection
-
Remarks
Free description field. Can be used for descriptions and comments regarding the Conductor.
-
Manual
-
- Selecting Movement
- Is displayed when a Node is selected in the "Movement" tab in the "Node list ".
- The name of the tab corresponds to the selected Movement's orchestrator name (Example: Ansible Legacy Role).
- The items found in the tab are as following.
表 7.6 Orchestrator name (Ansible Legacy Role) tab¶ Item
Description
Input required
Input method
Restrictions
Movement ID
Displays the ID of the selected Movement.
-
Automatic
-
Name
Displays the name of the selected Movement.
-
Automatic
-
Skip
Tick the checkbox in order to skip the Movement. This parameter can be changed in the "Conductor execute" menu.
-
Manual
-
Individual Operation
Click the Select Operation and select an Operation from the displayed list.The name of the selected Operation is displayed.-
Select
-
Remarks
Free description field. Can be used for descriptions and comments regarding the Node.
-
Manual
-
"Remarks" field when selecting Nodes
- The "Remarks" field is displayed when a Node is selected in the "Function" tab in the "Movement" tab in the Node list.
- The items found in the tab are as following.
表 7.7 Node selection tab¶ Item
Description
Input required
Input method
Restrictions
Remarks
Free description field. Can be used for descriptions and comments regarding the Node.
-
Manual
-
Selecting Conductor call
- This is displayed when a "Conductor call" is selected in the "Function" tab in the "Node list ".
- The items found in the tab are as following.
表 7.8 "Conductor call" tab¶ Item
Description
Input required
Input method
Restrictions
Skip
Skips the target if the checkbox is ticked.This parameter can be changed in the "Conductor execute" menu.-
Radio button
-
Called Conductor
Click the Select Conductor and select an Conductor from the displayed list.The name of the selected Conductor is displayed.-
Select
-
Individual Operation
Click the Select Operation and select an Operation from the displayed list.The name of the selected Operation is displayed.-
Select
-
Selecting Conditional branch
- Displayed if a "Conditional branch" is selected in the "Function tab" in the "Node list".
- The items found in the tab are as following.
表 7.9 "Conditional branch" tab¶ Item
Description
Input required
Input method
Restrictions
Conditional branch settings
Configures a branch. Click Add branch /Delete branch to add or delete branches. Max 6 branches can be added.
-
Select
-
case
Configures a branch depending on the results of a Movement or a called conductor.
Users can change the conditions by dragging and dropping.
The default statuses are as following.
case1
Success
Other
Error, Emergency stop, Preparation error, Unexpected error, Skip, Warning.
-
Select
-
Selecting Parallel branch
- Displayed if a "Parallel branch" is selected in the "Function tab" in the "Node list".
- The items found in the tab are as following.
表 7.10 "Parallel branch" tab¶ Item
Description
Input required
Input method
Restrictions
Parallel branch settings
Configures a branch. Click the Add branch / Delete branch to add or delete branches.The default number is 2 branches. The minimum number of branches is 2.-
Select
-
Selecting Parallel Merge
- Displayed if a "Parallel merge" is selected in the "Function tab" in the Node list".
- The items found in the tab are as following.
表 7.11 "Parallel Merge" tab¶ Item
Description
Input required
Input method
Restrictions
case
Configures a branch. Click the Add merge / Delete merge to add or delete branches.The default number is 2 branches. The minimum number of branches is 2.-
Select
-
Selecting Conductor end
- Displayed if a "Conductor end" is selected in the "Function tab" in the Node list".
- The items found in the tab are as following.
表 7.12 "End" tab¶ Item
Description
Input required
Input method
Restrictions
End status
Displays a status depending on the process.- Success (Default value)- Warning- ErrorIf there are multiple processed end nodes, the priority of which the status will be displayed are as following.Priority: Success < Warning < Error-
Select
-
Selecting Status file branch(Status file branch tab)
- Displayed if a "Status file branch" is selected in the "Function tab" in the Node list".
- The items found in the tab are as following.
表 7.13 "Status file branch" tab¶ Item
Description
Input required
Input method
Restrictions
Status file settings
Configures a conditional branch based on the Movement's status file.Click the Add condition / Delete condition to add or delete branches.|The default branch is "if" and "else".
-
Select
-
Remarks
Free description field. Can be used for descriptions and comments regarding the Node.
-
Manual
-
注釈
Referenced status files- The status files referenced are the "MOVEMENT_STATUS_FILE" file under the Movements' operation result directory.
- If there is no status file to refer, the "else" side is processed.
- If the contents of the status file consists of multiple lines (newlined code included), values after the newline will not be used.
Example) Status file with newlines1 23 4
In this file, "1" will be valued.表 7.14 Status file ITA original variable¶ ITA original variable
Variable specified contents
Restrictions
__movement_status_filepath__
Path for the "MOVEMENT_STATUS_FILE" under the result directory.
※
"Node" tab
Displayed if a Node is selected in the "Function" tab in the "Movement" tab in the Node list.
Allows users to allign nodes within the grid.
Drag and drop nodes in the seletion area or select multiple nodes by holding shift and clicking them in order to select multiple Nodes.
The items found in the tab are as following.
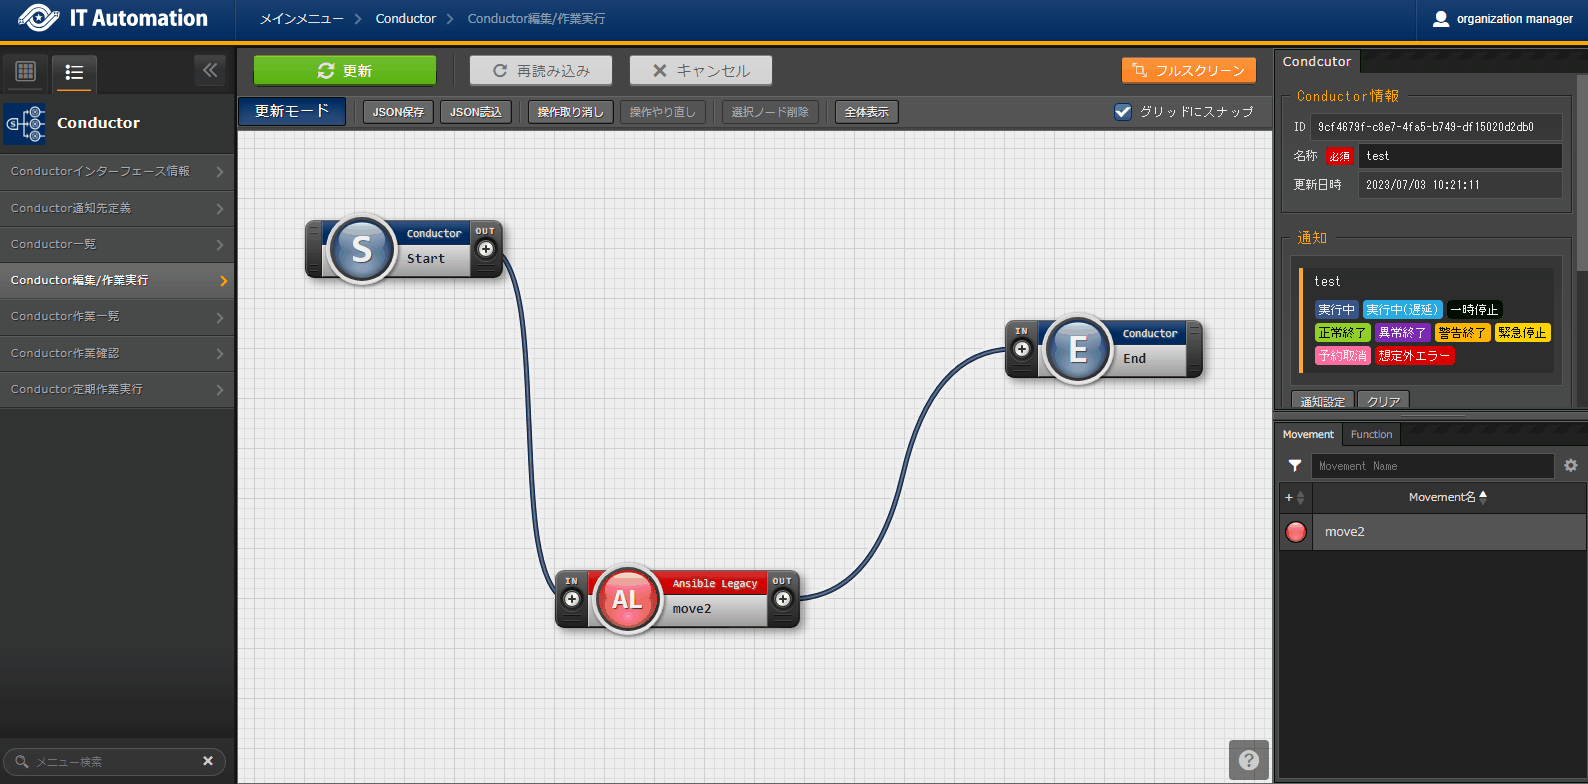
図 7.10 Node allignment
表 7.15 "Node" tab¶ Item
Description
Input required
Input method
Restrictions

Aligns the selected nodes to the left
-
Select
-

Aligns the selected nodes to the center vertically
-
Select
-

Aligns the selected nodes to the right.
-
Select
-

Aligns the selected nodes to the top
-
Select
-

Aligns the selected nodes to the horizontally
-
Select
-

Aligns the selected nodes to the bottom
-
Select
-

Aligns the selected nodes vertically with equally spacing in-between them
-
Select
-

Aligns the selected nodes horizontally with equally spacing in-between them
-
Select
-
- The actions that can be performed in the "Conductor edit/execute" menu are as following.
Item |
Description |
New |
Update |
Remarks |
|
|---|---|---|---|---|---|
EDIT |
VIEW |
EDIT |
|||
Save JSON |
e current Conductor in JSON format. |
〇 |
|||
Load JSON |
Loads Conductor configuration information from JSON format. |
〇 |
|||
Cancel |
Cancels the previous action. |
〇 |
〇 |
||
Redo |
Redoes the canceled action. |
〇 |
〇 |
||
Delete node |
Deletes the selected Node. |
〇 |
〇 |
||
Register |
Starts a registration. |
〇 |
〇 |
||
Reset |
Returns the conductor to the default state |
〇 |
|||
Edit |
Changes the mode to EDIT mode. |
〇 |
〇 |
||
Diverse |
|
〇 |
〇 |
||
Update |
Saves the edited contents. |
〇 |
|||
Reload |
Cancels the edit and returns the conductor to before the edit started. |
〇 |
|||
Cancel |
Cancels the edit and returns to View mode. |
〇 |
|||
Snap to grid |
Ticking this item snaps all the nodes to the grid. |
〇 |
〇 |
||
7.5.4.2. "View" mode
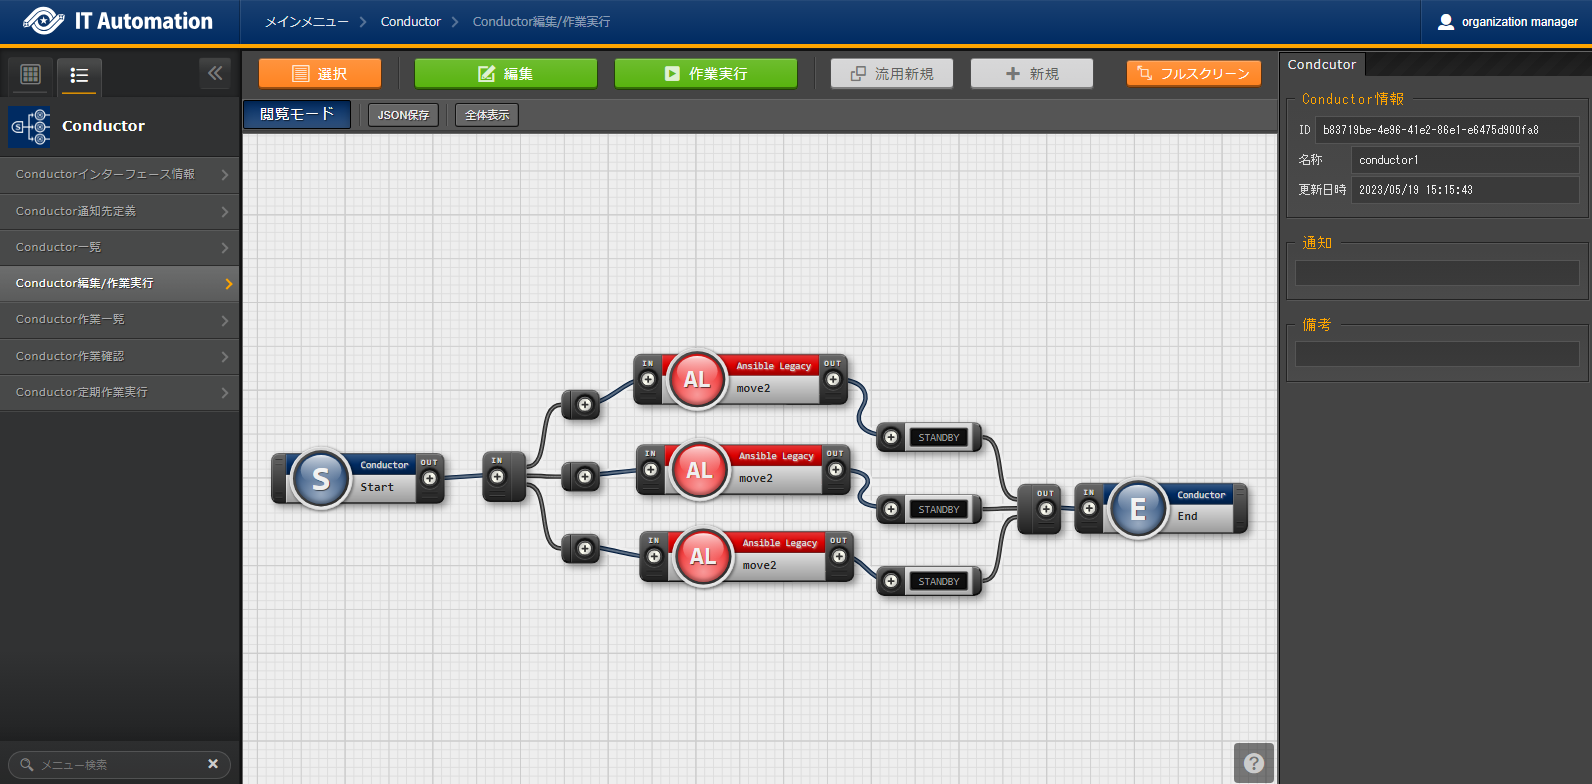
図 7.11 "Conductor edit/execute" menu("View" mode)
Item |
Description |
|---|---|
Select |
Allows users to view registered Conductors. |
Edit |
Allows users to edit registered Conductors. |
Execute |
Allows users to execute the selected Conductor. |
Diverse |
Allows users to copy registered Conductors and register new ones. |
New |
Allows users to create new Conductors. |
7.5.4.3. "Update" mode
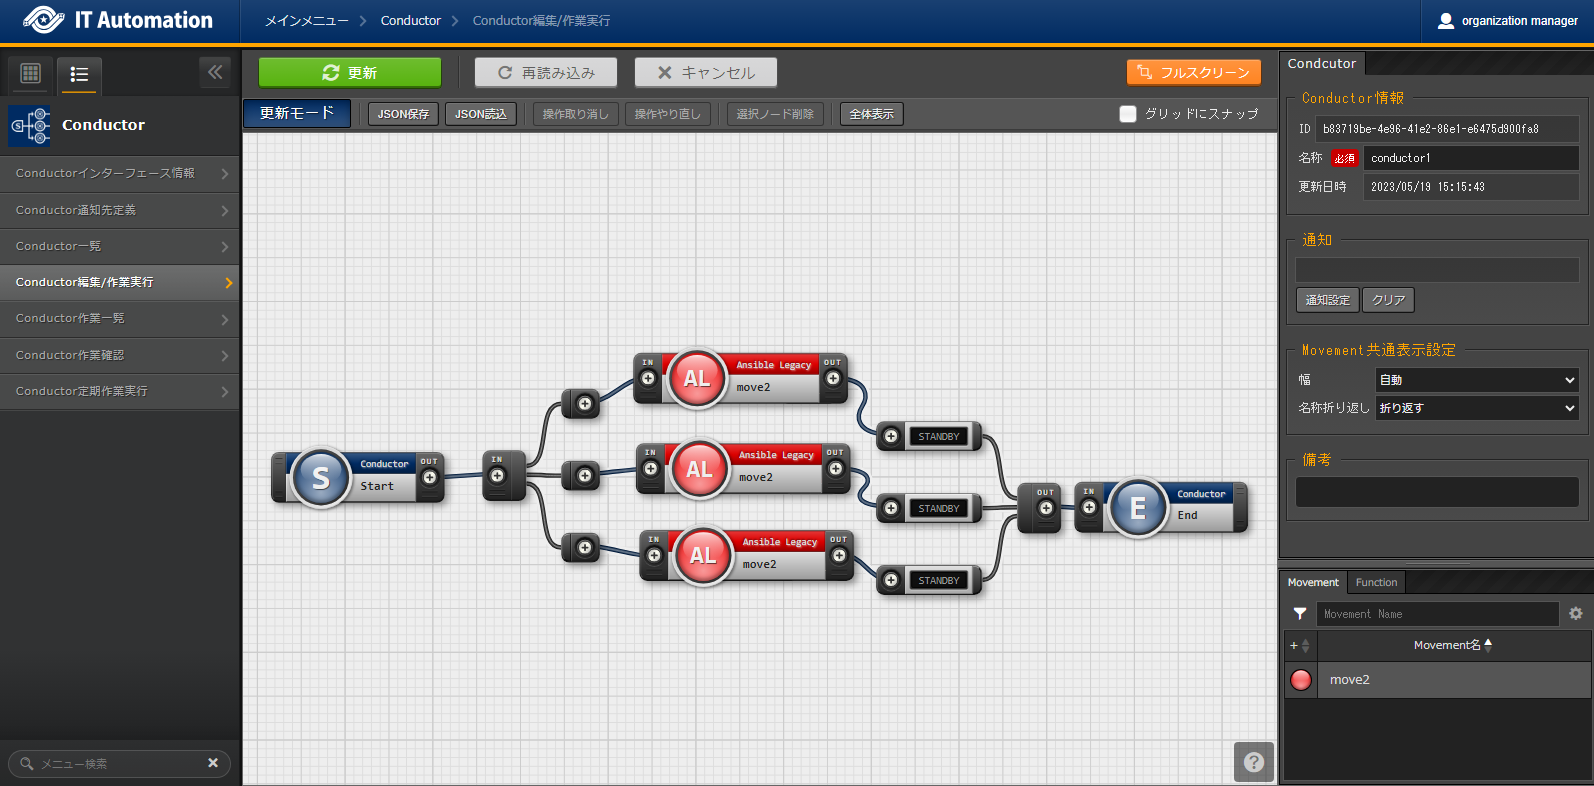
図 7.12 "Conductor edit/execute" menu("Edit" mode)
Item |
Description |
|---|---|
Update |
Saves the edited contents. |
Reload |
Discards the edited contents and returns the registered contents. |
Cancel |
Returns the Conductor the before the Edit button was clicked. |
Full screen |
Changes the browser to full screen mode.
※This button changes to Exit full screen when in full screen mode
|
Full display |
Changes the display to inlude all the nodes. |
7.5.4.4. Conductor execute
- Clicking the Select Operation displays all the operations registered in .※See "Basic console - Operation list" for more information.
Selecting an Operation and clicking the Execute button moves the user to the where the operation will be traced.
- Input a schedule date in the "Schedule" field and click the:guilabel:Execute button. This will create a reservation. The registered information can be seen in Conductor history.※It is not possible to input a date earlier than the current time/date.
- Users can change the setting values for "Movement", "Conductor call Operation" and "Skip".※Editing any data regsitered in the Conductor edit page will not be reflected. Only executions can be performed.
The users who have access to the executed Conductors are the one who belonged to the roles who had access to the selected Operation.
The shared itms in the "Execution settings" are as following.
Item |
Description |
Input required |
Input method |
Restrictions |
|---|---|---|---|---|
Execution Conductor |
Displays the selected Conductor. |
- |
Automatic |
|
Operation |
Click the Select Operation button and select an Operation. |
○ |
Select |
|
Schedule |
Specifies the scheduled execution date. |
- |
Manual |
It is not possible to input a date earlier than the current date/time. |
Execution |
Executes the registered Conductor. |
○ |
Button |
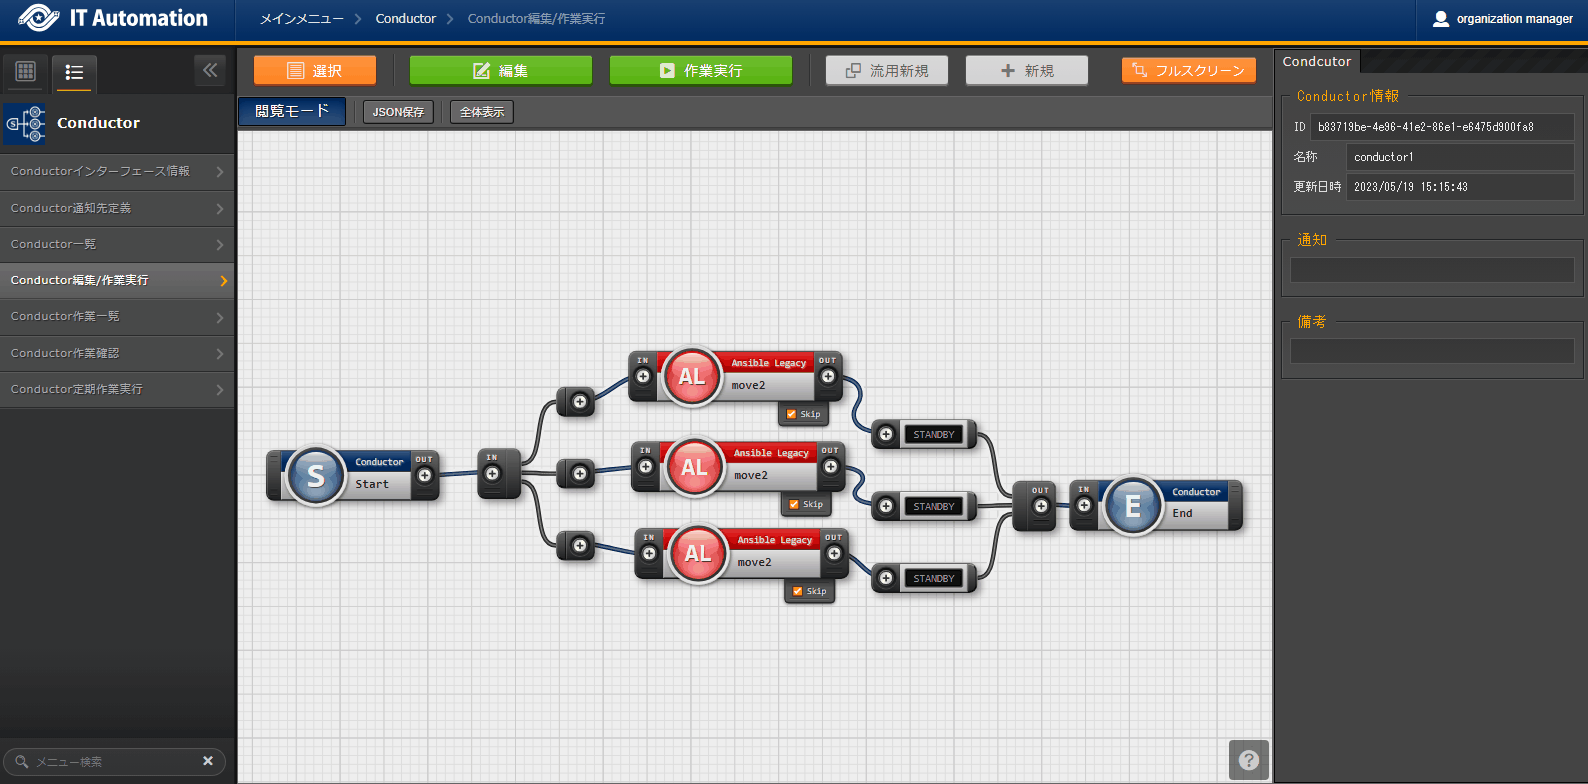
図 7.13 Execution
Tip
7.5.5. Conductor history
- In the [Conductor history] page, users can manage already executed Conductors.Specify the desired conditions and click the Filter button to display a list of executed Conductors.Clicking the Details button in the Display field moves the user to Conductor confirmation.Clicking the Input data file(zip) button compiles all the Movement input files (*) under the executed Conductor and downloads it for the user.Clicking the Result data file(zip) button compiles the execution logs and the error logs and downloads it for the user.※If the Conductor is multitiered, the last Movement are also included.
7.5.6. Conductor confirmation
- Clicking the execution status circle for Conductors with the status "Executing" or later moves the user to the driver's "Status confirmation" menu where they can see more detailed inforamtion regarding the status.
- Clicking the Details button in "Conductor history" opens up the a display where the selected Conductor status is monitored.Users can then delete reservations, resume pauses and call an Emergency stop depending on the situation.※After selecting "Movement" and "Conductor Call" nodes, Operation information confirmation is displayed on the right side of the screen where the user can move to the "Operation information confirmation" menu.
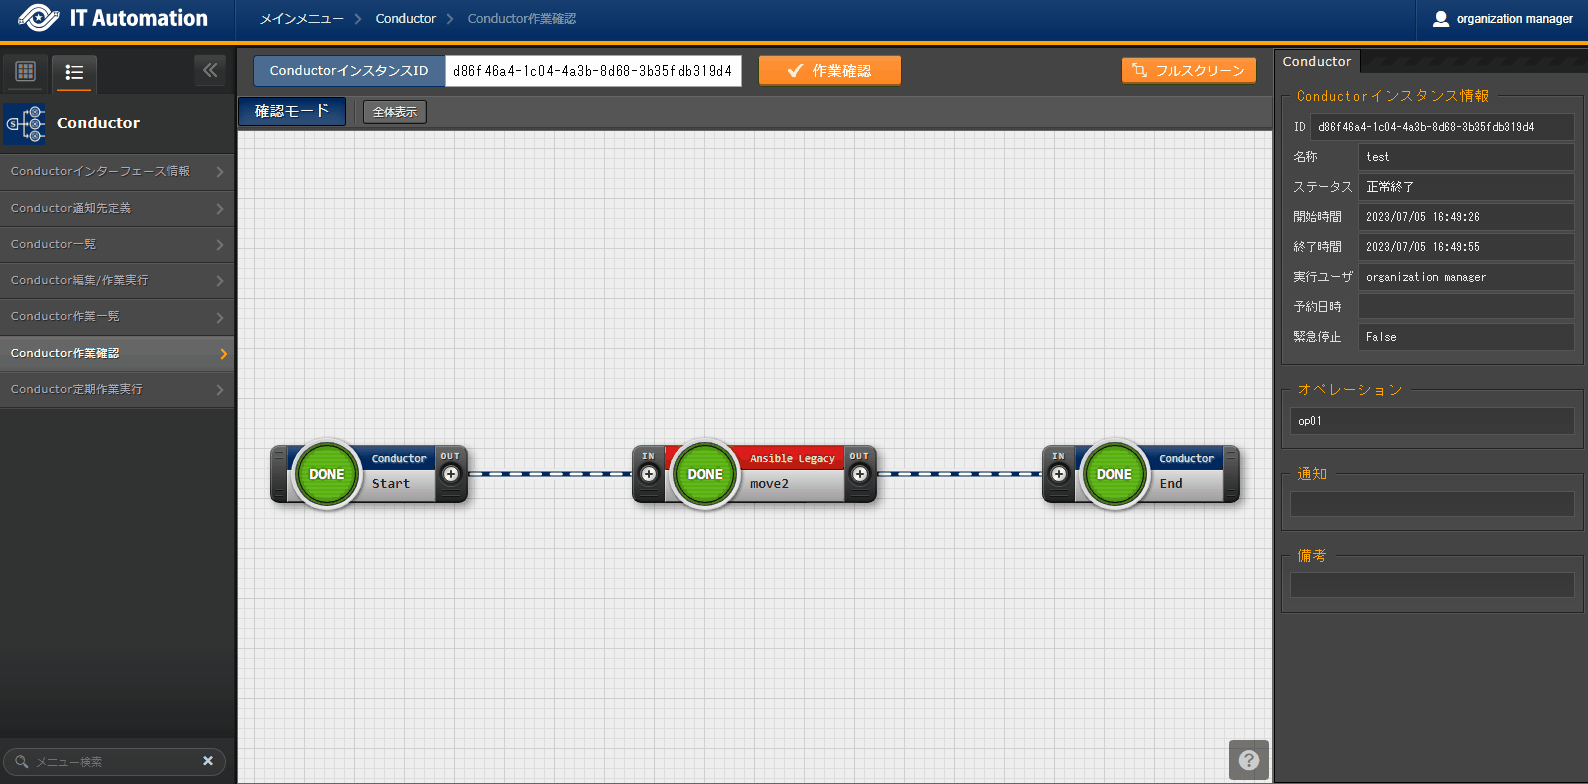
図 7.14 Conductor execution
Tip
- If the selected Conductor has a reservation date configured and is not executed, the Delete reservation button will be displayed.
- Clicking the Delete reservation button changes the status in the " Conductor history" menu to "Reservation deleted" and can no longer be executed.
- The shared items in the are as following.
Item |
Description |
Input required |
Input method |
Restrictions |
|---|---|---|---|---|
Resume |
Clicking the triangle icon in the "Couductor pause" Node resumes it. |
- |
Button |
|
Emergency stop |
Stops executing Conductors. |
- |
Button |
|
Delete reservation |
Removes Conductor execution reservations. |
- |
Button |
Is only displayed if the Conductor has a reservation date configured and not executed. |
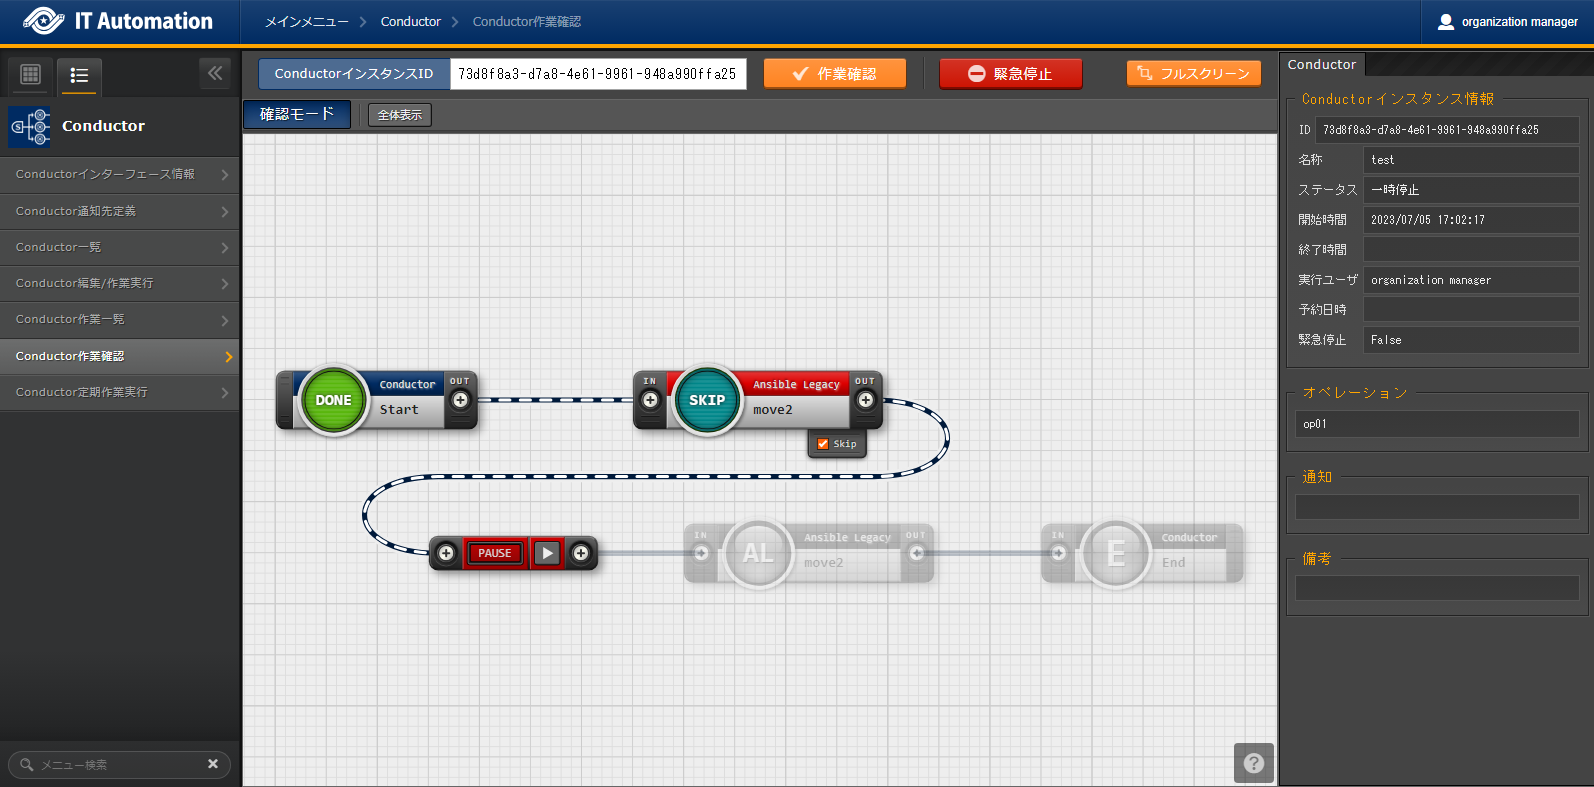
図 7.15 Conductor executing /Conductor Pause status
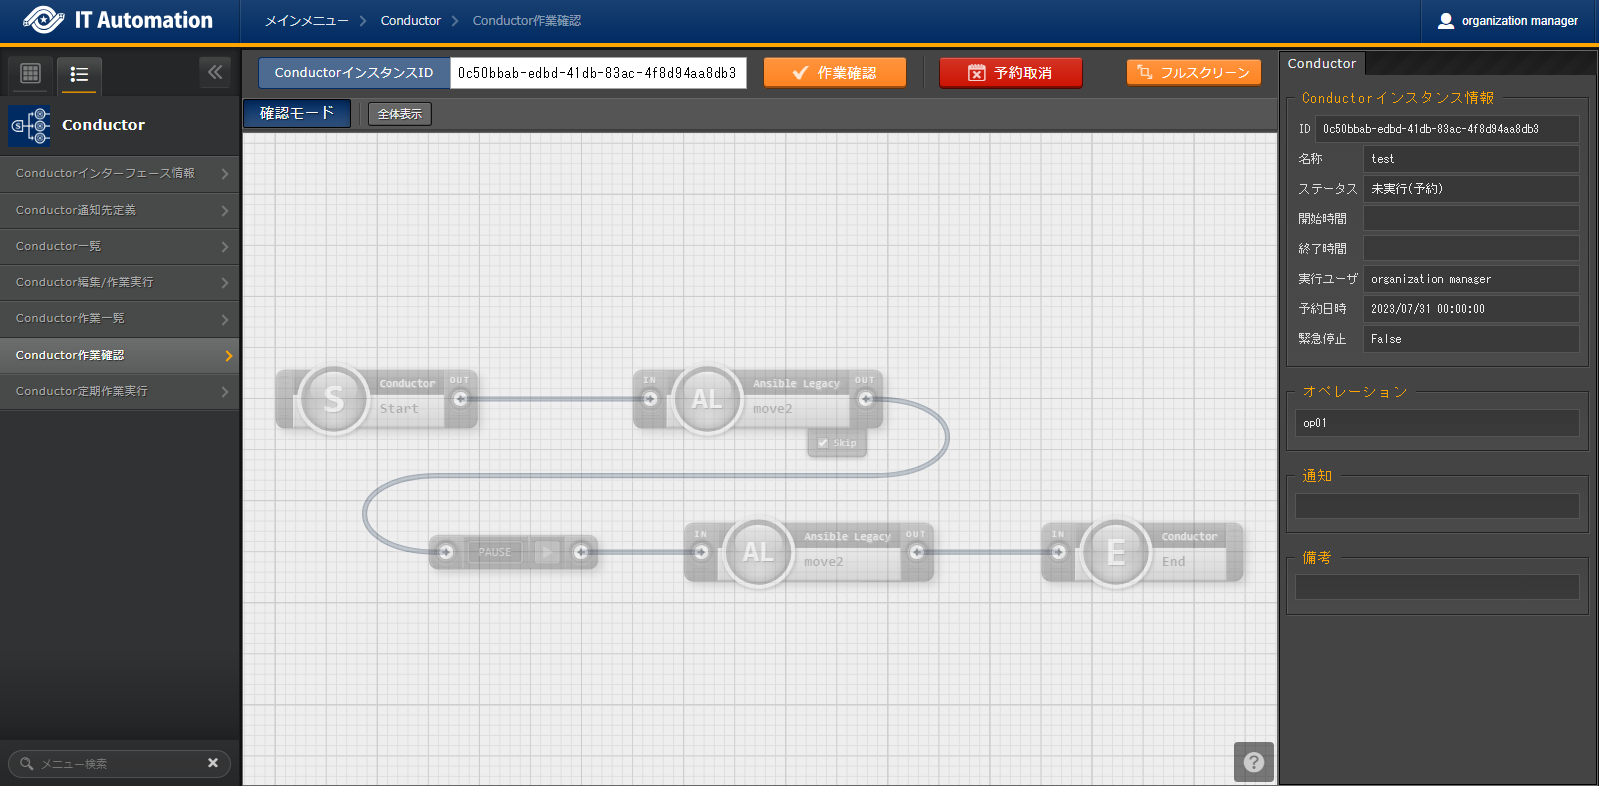
図 7.16 Reserved Conductor execution (Not executed)
The are in the upper left part of the screen displays detailed information.
If a Node is selected, the area will display detailed information regarding the Node.
"Conductor" tab
Dispalyed when no Node is selected.
The items found in the tab are as following.
表 7.21 "Conductor" tab¶ Item
Description
Conductor instance information
ID
Unique ID automatically given by the system.
Name
Displays the name of the executing Conductor.
Status
Displays the status of the executing Conductor. The displayed statuses are as following.
・Not executed
・Not executed (Reserved)
・Executing
・Executing(Delayed)
・Pause
・Success
・Error
・Warning
・Emergency stop
・Reservation deleted
・Unexpected error
Start time
Displays the start time of the execution.
End time
Displays the end time of the execution.
Execution user
Displays the user who executed the Conductor.
Reservation date/time
Displays the execution date/time of reserved Conductors.
Emergency stop
Displays "True" if the Conductor as beenstopped with the "Emergency stop" function. Displays "False" for everything else.
Operation
Displays the name of the operation
Remarks
Free description field. Can be used to contain descriptions and comments.
"Node" tab
Is displayed when a Node is selected.
The items found in the tab are as following.
表 7.22 "Node" tab¶ Item
Description
Node instance information
ID
Unique ID automatically given by the system.
Type
Displays the type of the selected Node.
Node ID
Displays the Node ID on the Conductor structure information (JSON format).
Status
Displays the status of the executing Conductor. The displayed statuses are as following.
・Not executed
・Executing
・Executing(Delayed)
・Pause
・Success
・Error
・Unexpected error
・Emergency stop
・Pause
・Preparation error
・Skip complete
・Warning
St file
Displays the Status file values if the selected Node is a Movement.
Start time
Displays the start time of the execution.
End time
Displays the end time of the execution.
Individual operation
- Displays the name of the operation if an
Operation has been specified to the M
ovement.
Remarks
Free description field. Can be used to contain descriptions and comments.
7.5.7. Conductor scheduled execution
The allows users to manage Conductor operations that are regularly executed on a schedule.
- Clicking the Operation history button in the moves the user to theConductor history menu.
Click the Register button to register a scheduled execution.
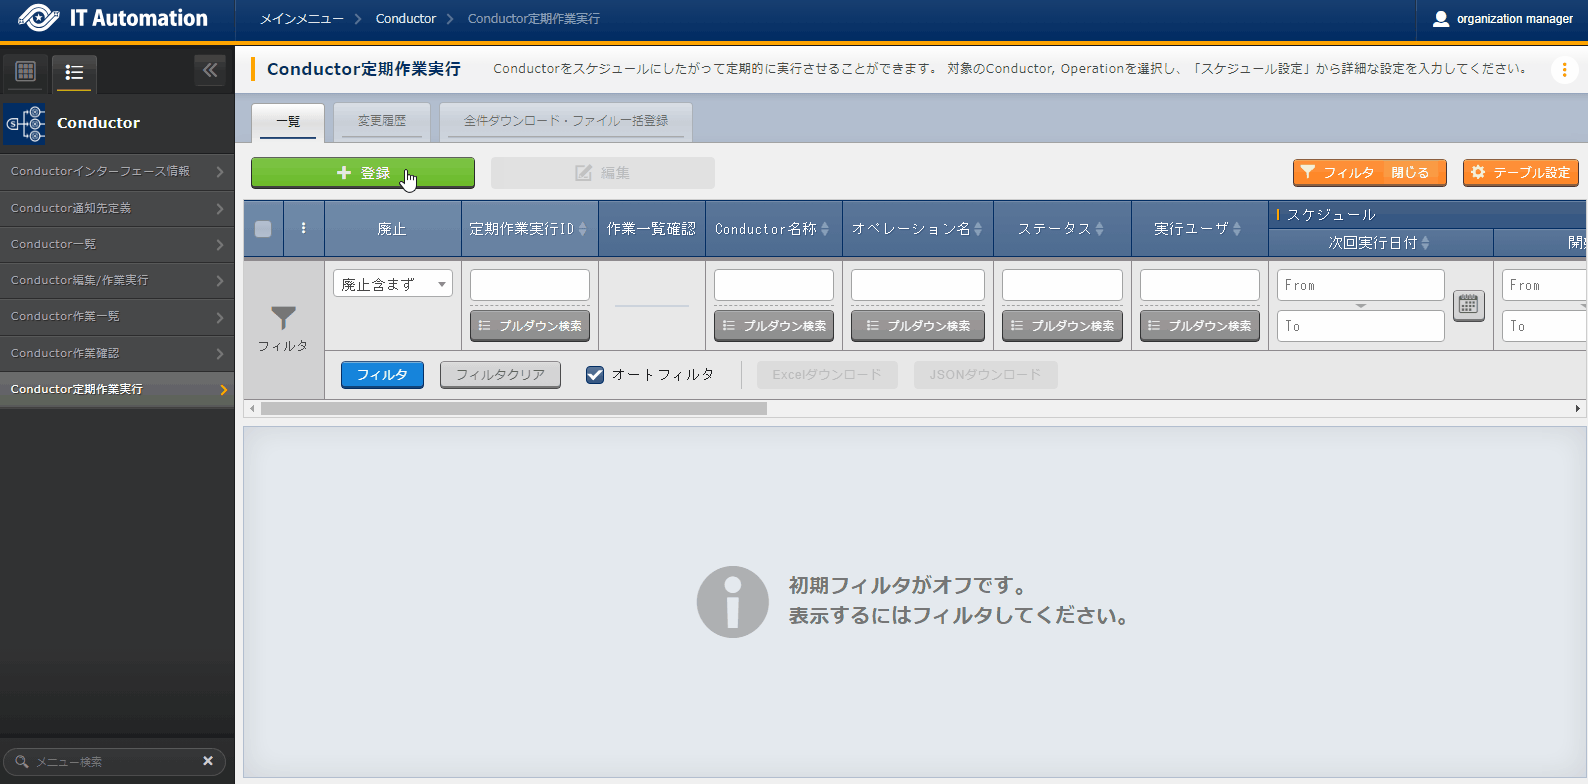
図 7.17 Conductor scheduled execution
For more a more detailed schedule, click the Schedule settings button to display a window where they can be configured.
図 7.18 Conductor scheduled execution Schedule settings
Status name |
Description |
|---|---|
Preparing |
Status displayed immediately after registration The status will automatically change to "Operating" when the backyard updates the "Next execution date". |
Operating |
Status displayed when the conductor is operating normally. The system automatically registers the conductor to "Conductor history" based on the registered "Conudctor interval time settings" value and updates the "Next execution date" based on the schedule settings. |
Success |
Status displayed when "Next execution date" passes the "End date". No further Conductors will be registered. |
Mismatch error |
Status displayed when the Schedule settings contains an invalid value |
Link error |
Status displayed when the registration to "Conductor history" fails. Similarly to the "Operating" status, the system automatically registers a conductor to the "Conductor history" and updates the "Next execution date". If the that registration fails, the status will keep displaying "Link error". |
Unexpected error |
|
Conductor discarded |
Status dispalyed when the registered Conductor has been discarded. Restoring the discarded Conductor will change the status to "Preparing". |
Operation discarded |
Status dispalyed when the registered Operation has been discarded. Restoring the discarded Operation will change the status to "Preparing". |
- After a schedule is registered, the status change to "Preparing" The Backyard will update the "Next execution date" based on the schedule and change the status to "Operating".
.(Conductors with the status (Operating) or (Link error) are registered to the Conductor history before the time configured in the "Conductor interval time settings" and are updates the "Next execution date" based on the schedule settings.
- The Conductor interval time settings allows users to decide how many minutes the registration will happen before the "Next execution date" in "Management console - System settings".
Tip
7.6. Appendix
7.6.1. Conductor notification definition
7.6.1.1. Conductor notification definition setting example
Item |
Setting value |
|---|---|
Notification name |
test |
Header (CURLOPT_HTTPHEADER) |
[ "Content-Type: application/json" ] |
Message(CURLOPT_POSTFIELDS) |
{"text": "Notification name:__NOTICE_NAME__, <br> Conductor name: __CONDUCTOR_NAME__, <br> Con ductor instance ID:__CONDUCTOR_INSTANCE_ID__, <br>Status ID: __STATUS_ID__, Operation URL: __JUMP_URL__, <br> "} |
PROXY / URL (CURLOPT_PROXY) |
|
PROXY / PORT (CURLOPT_PROXYPORT) |
|
Operation confirmation URL(FQDN) |
|
Other |
|
Start time |
|
End time |
図 7.19 Teams notification display example
Item |
Setting value |
|---|---|
Notification name |
test2 |
Notification destination(CURLOPT_URL) |
Input the notification destination's Slack Webhook URL. |
Header(CURLOPT_HTTPHEADER) |
[ "Content-Type: application/json" ] |
Message(CURLOPT_POSTFIELDS) |
{"text": "Notification name:__NOTICE_NAME__, <br> Conductor name: __CONDUCTOR_NAME__, <br> Con ductor instance ID:__CONDUCTOR_INSTANCE_ID__, <br>Status ID: __STATUS_ID__, Operation URL: __JUMP_URL__, <br> "} |
PROXY / URL (CURLOPT_PROXY) |
|
PROXY / PORT (CURLOPT_PROXYPORT) |
|
Operation confirmation URL(FQDN) |
|
Other |
|
Start time |
|
End time |

図 7.20 Slack notification display example
Notification name |
Notification sample |
|---|---|
Notification destination(CURLOPT_URL) |
|
Header(CURLOPT_HTTPHEADER) |
[ "Content-Type: application/json" ] |
Message(CURLOPT_POSTFIELDS) |
{"text": "Notification contents"} |
PROXY / URL (CURLOPT_PROXY) |
|
PROXY / PORT (CURLOPT_PROXYPORT) |
8080 |
Operation confirmation URL(FQDN) |
|
Other |
{"CURLOPT_TIMEOUT":"10"} |
Start time |
2020/01/01 00:00:00 |
End time |
2020/01/01 00:00:00 |
Remarks |
Free description field |
7.6.1.2. Notification log output example
7.6.1.2.1. Notification log structure
[
 {
     "conductor_status_id": "XXX",
     "exec_time": "YYYY/MM/dd HH:ii:ss",
     "result": [
         {
             "notice_name": "XXX",
             "notice_info": [
                 XXX
             ],
             "status_code": "XXX",
             "response.headers": {
                   "XXX": "XXX"
               },
             "response.text": "XXX"
         }
     ]
  }
]
7.6.1.2.2. Example) Notification execution log (Success)
[
    {
        "conductor_status_id": "3",
        "exec_time": "2023/07/05 16:29:50",
        "result": [
            {
                "notice_name": "test",
                "notice_info": [
                    "3",
                    "4",
                    "5",
                    "6",
                    "7",
                    "8",
                    "9",
                    "10",
                    "11"
                ],
                "status_code": 200,
                "response.headers": {
                    "XXX": "XXX"
                },
                "response.text": "1"
            }
        ]
    }
]
7.6.1.2.3. Example) Notification execution log (Error)
[
    {
        "conductor_status_id": "3",
        "exec_time": "2023/07/05 19:46:06",
        "result": [
            {
                "notice_name": "test",
                "notice_info": [
                    "3",
                    "6"
                ],
                "status_code": 400,
                "response.headers": {
                    "XXX": "XXX"
                },
                "response.text": "Invalid webhook URL",
                "err_type": "HTTPError"
            }
        ]
    }
]