
1. Menu export/import
1.1. Introduction
1.2. Menu export/import overview
Menu export/import
Functions
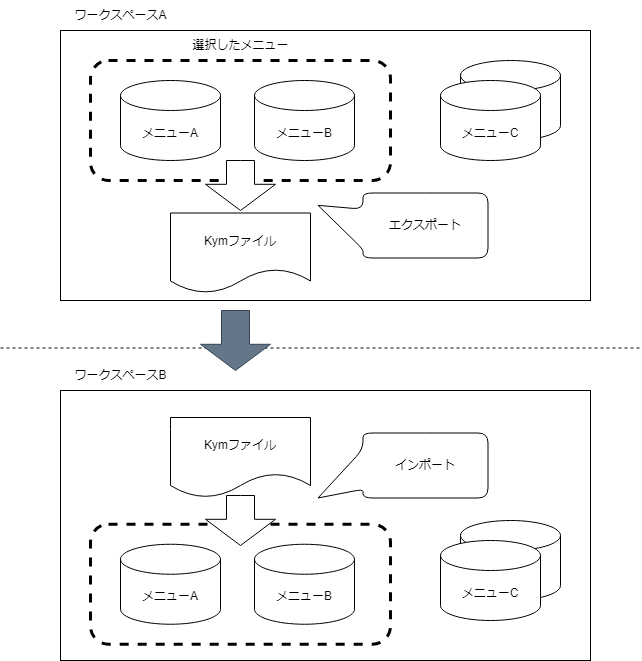
Modes
Export environment
Time specified
History
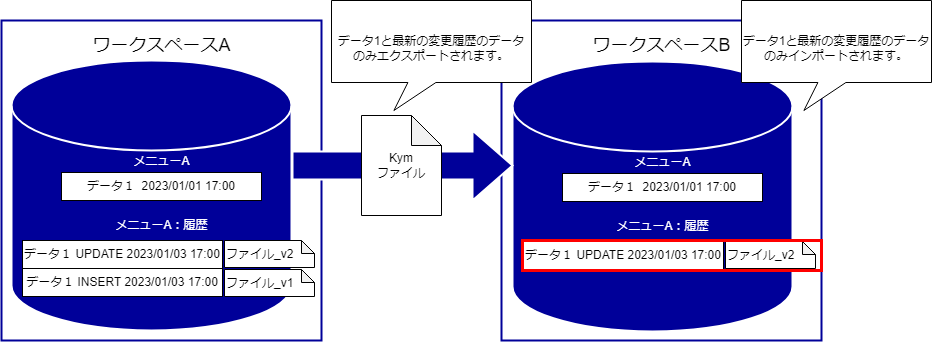
Example
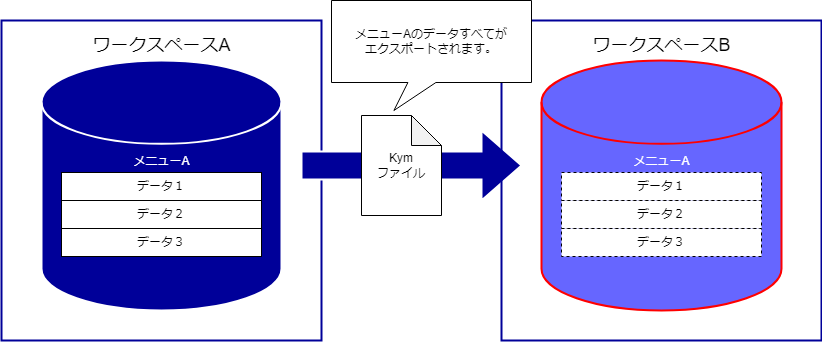
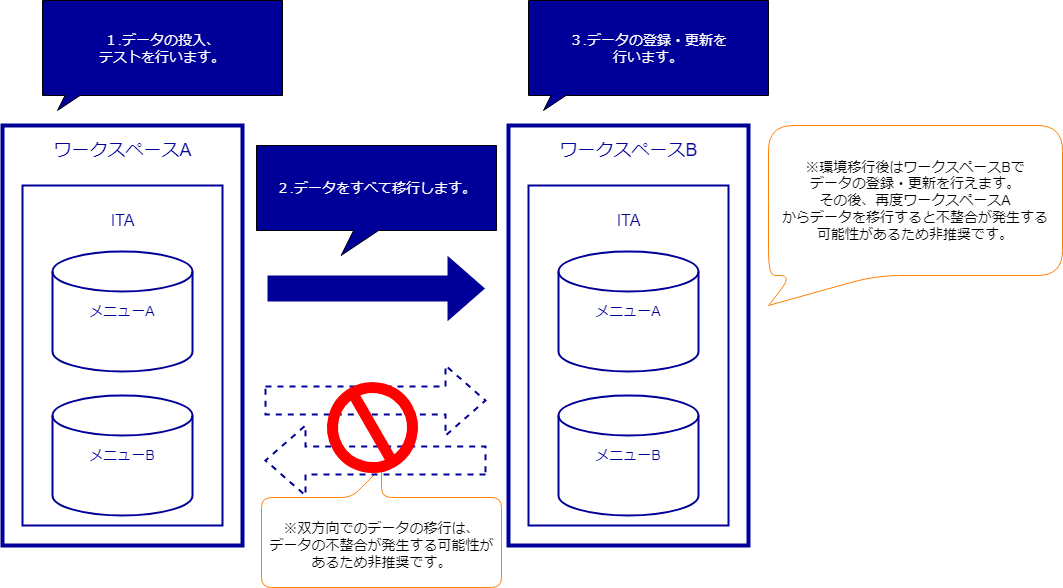
Use the Export environment mode to export all the data from Workspace A.
Import the exported data to Workspace B.
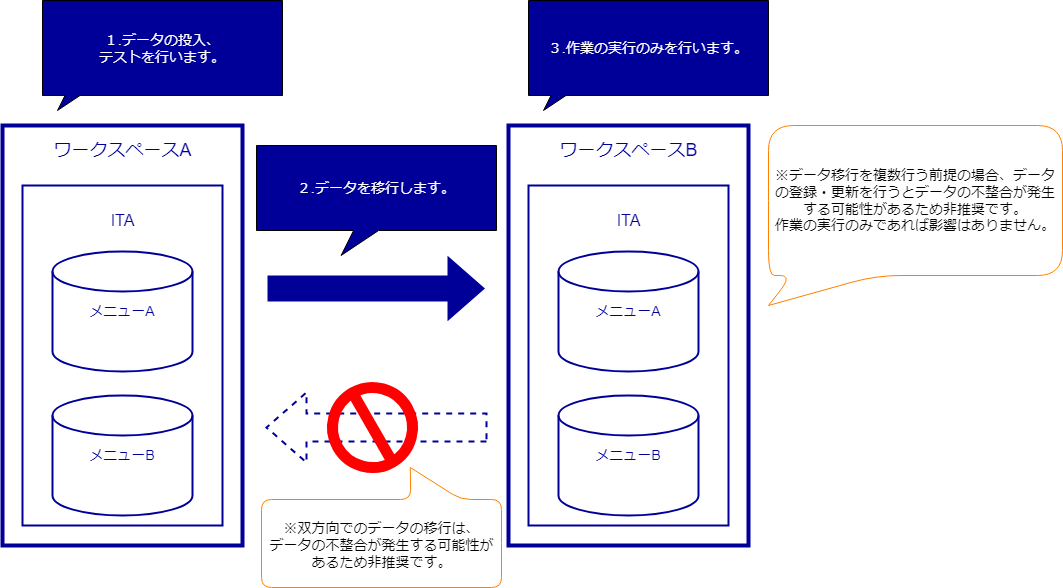
Use the Export environment mode to export all the data from Workspace A.
Import the exported data to Workspace B.
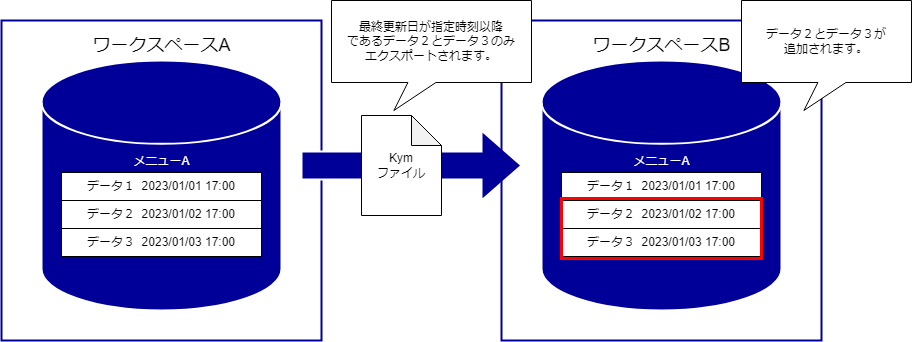
Use the Time specified export mode to export data from Workspace A to Workspace B whenever the data in Workspace A has been updated.
1.3. Export/Import environment compatibility
Environment differences (ITA versions and installed drivers)
警告
Case |
Environment A version |
Environment A driver |
Environment B version |
Environment B driver |
Environment differences
(Version/Driver)
|
Environment A→Environment B
Import compatibility
|
Remarks |
|---|---|---|---|---|---|---|---|
A |
2.5.X |
CI/CD for IaC
OASE
|
2.5.X |
CI/CD for IaC
OASE
|
No environment differences |
〇 |
|
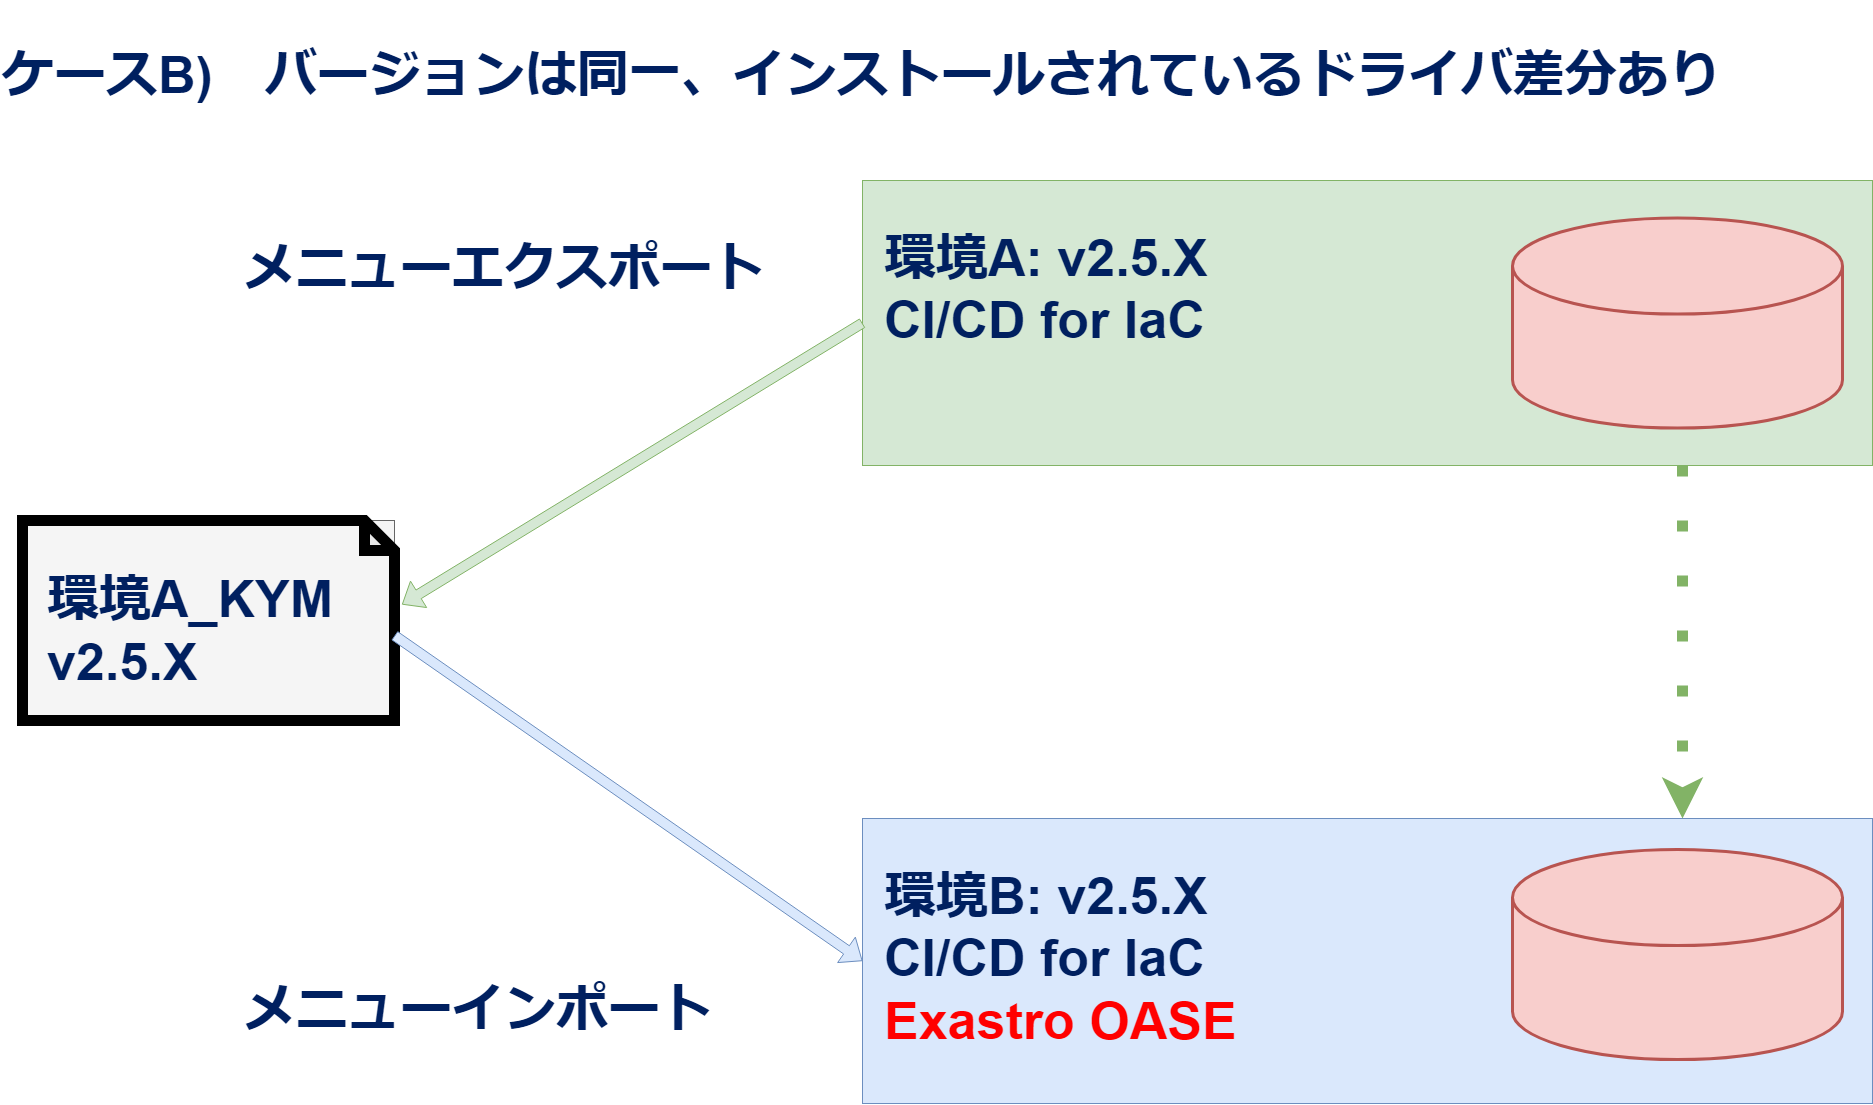
B |
2.5.X |
CI/CD for IaC
|
2.5.X |
CI/CD for IaC
OASE
|
Difference in drivers |
〇 |
|
C |
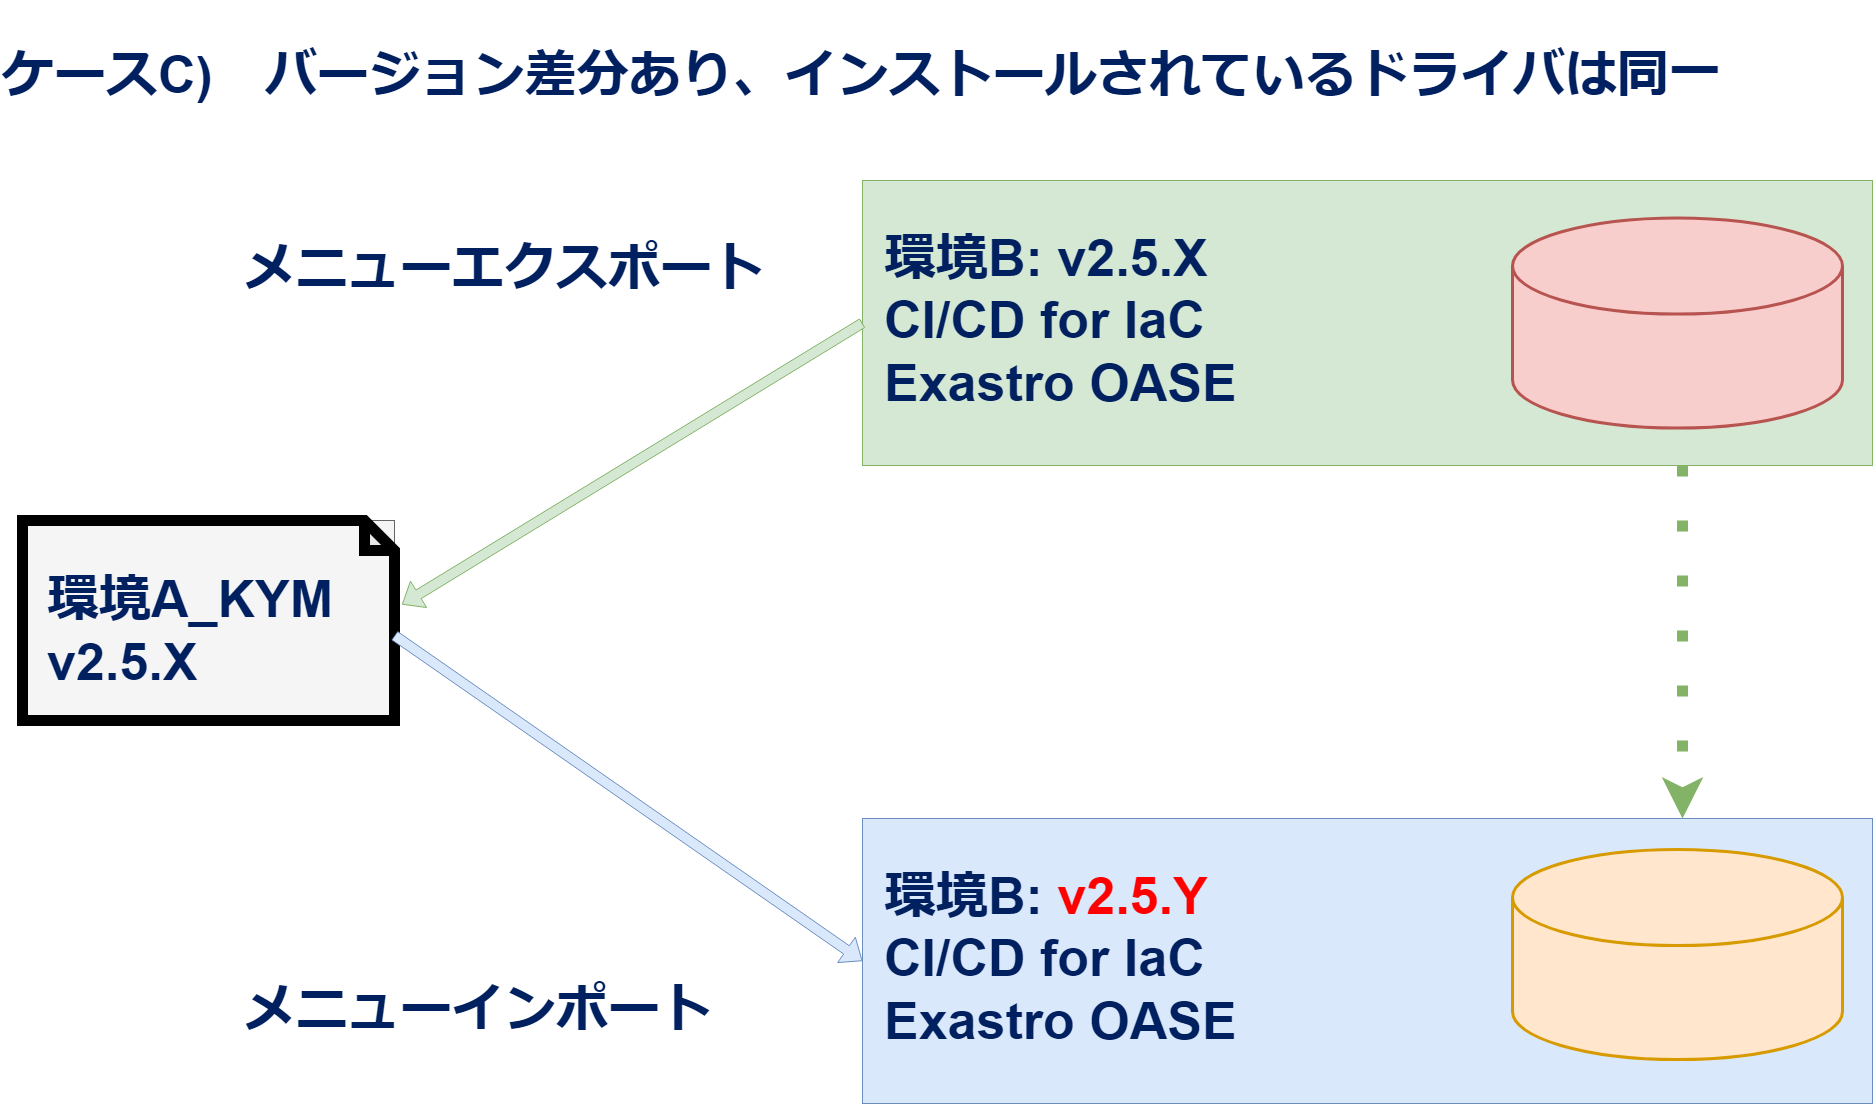
2.5.X |
CI/CD for IaC
OASE
|
2.5.Y |
CI/CD for IaC
OASE
|
Difference in version |
〇 |
|
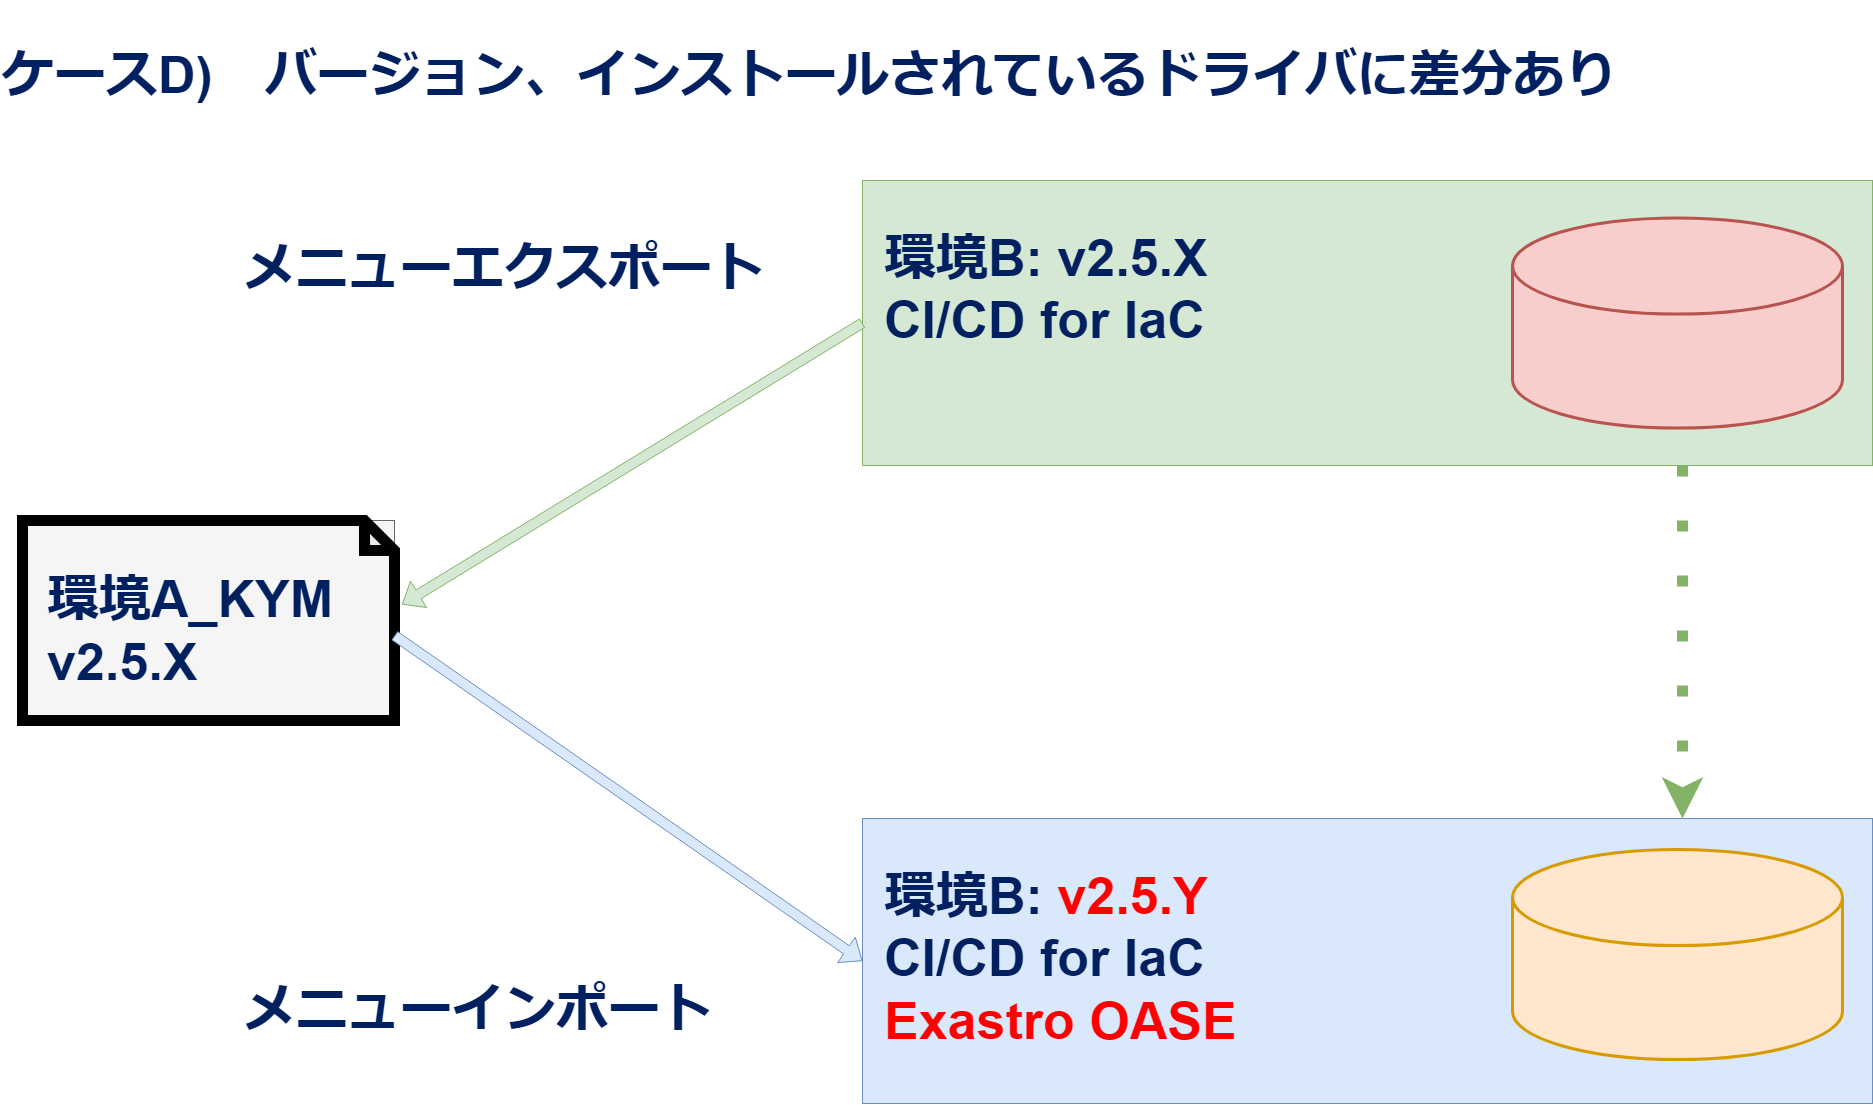
D |
2.5.X |
CI/CD for IaC
|
2.5.Y |
CI/CD for IaC
OASE
|
Difference in version (A:2.5.X < B:2.5.Y)
Difference in drivers
|
〇 |
|
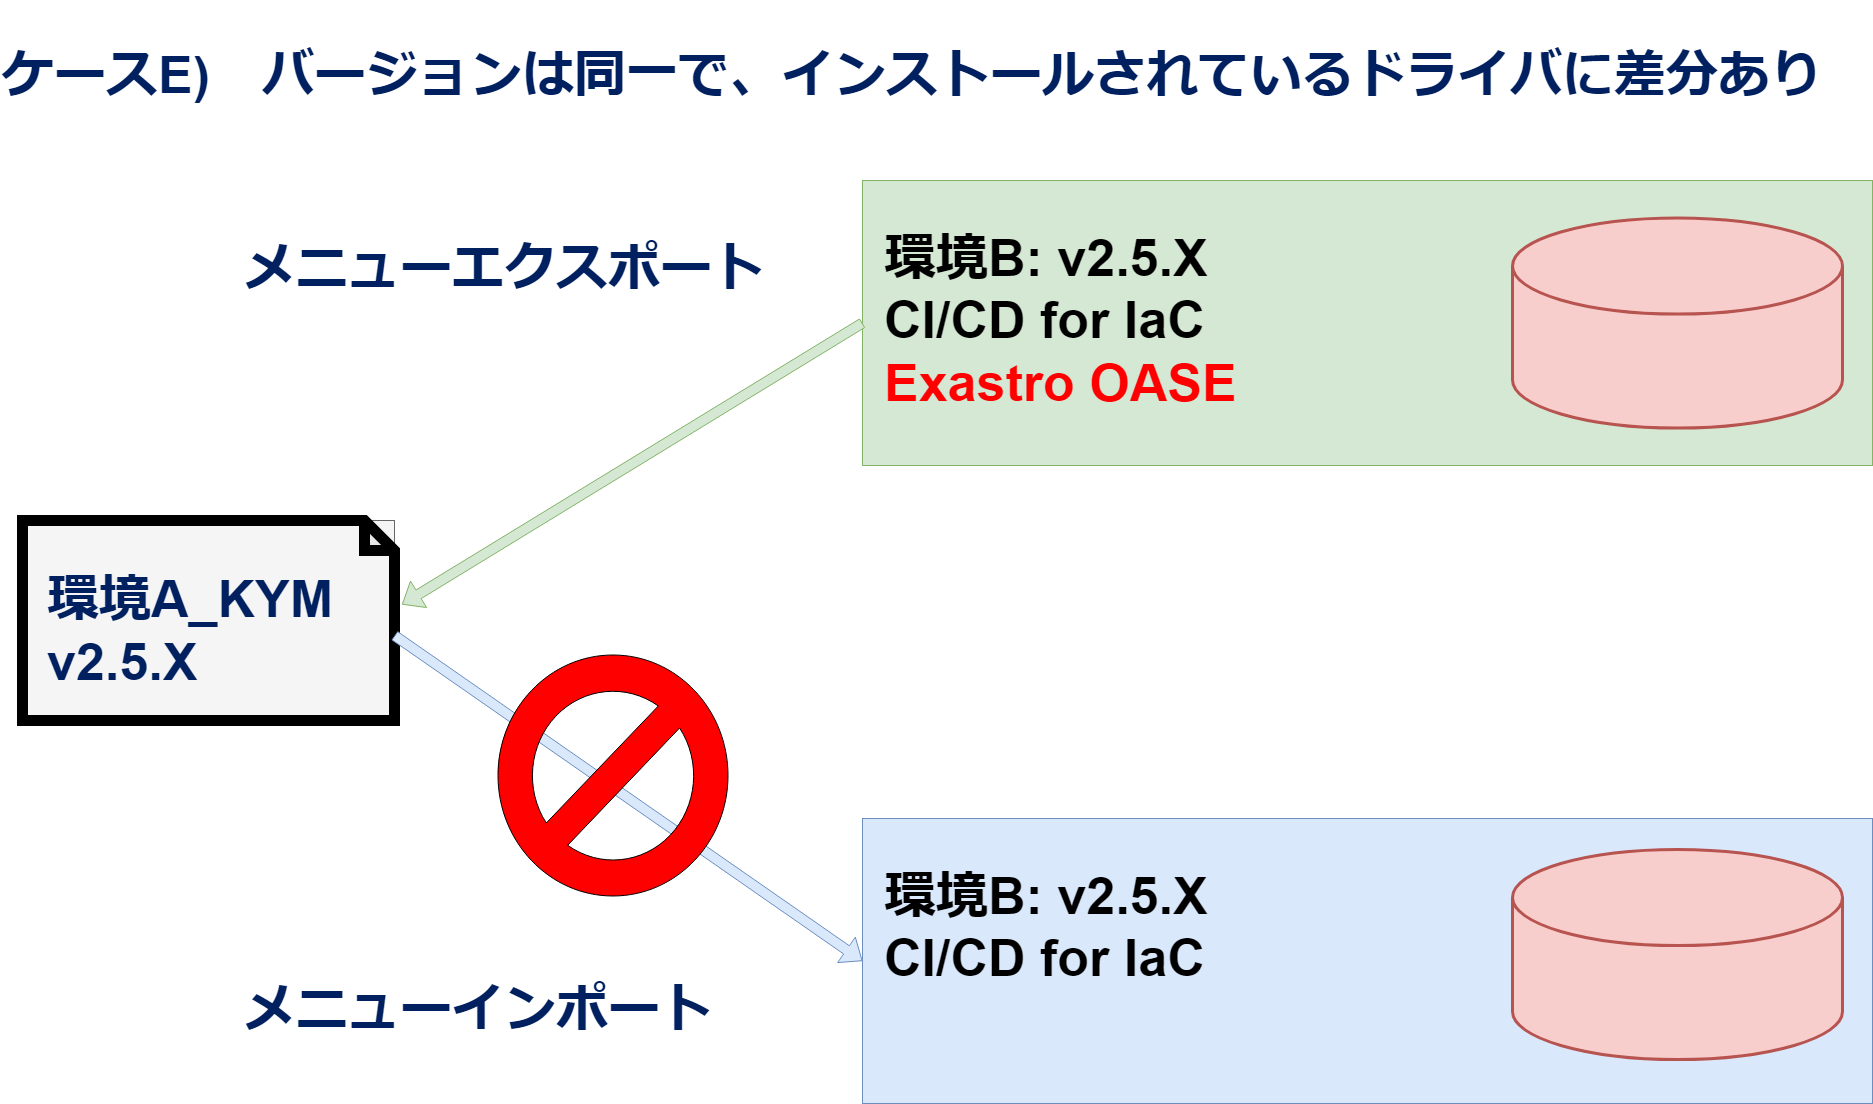
E |
2.5.X |
CI/CD for IaC
OASE
|
2.5.X |
CI/CD for IaC
|
Difference in drivers |
△※ |
|
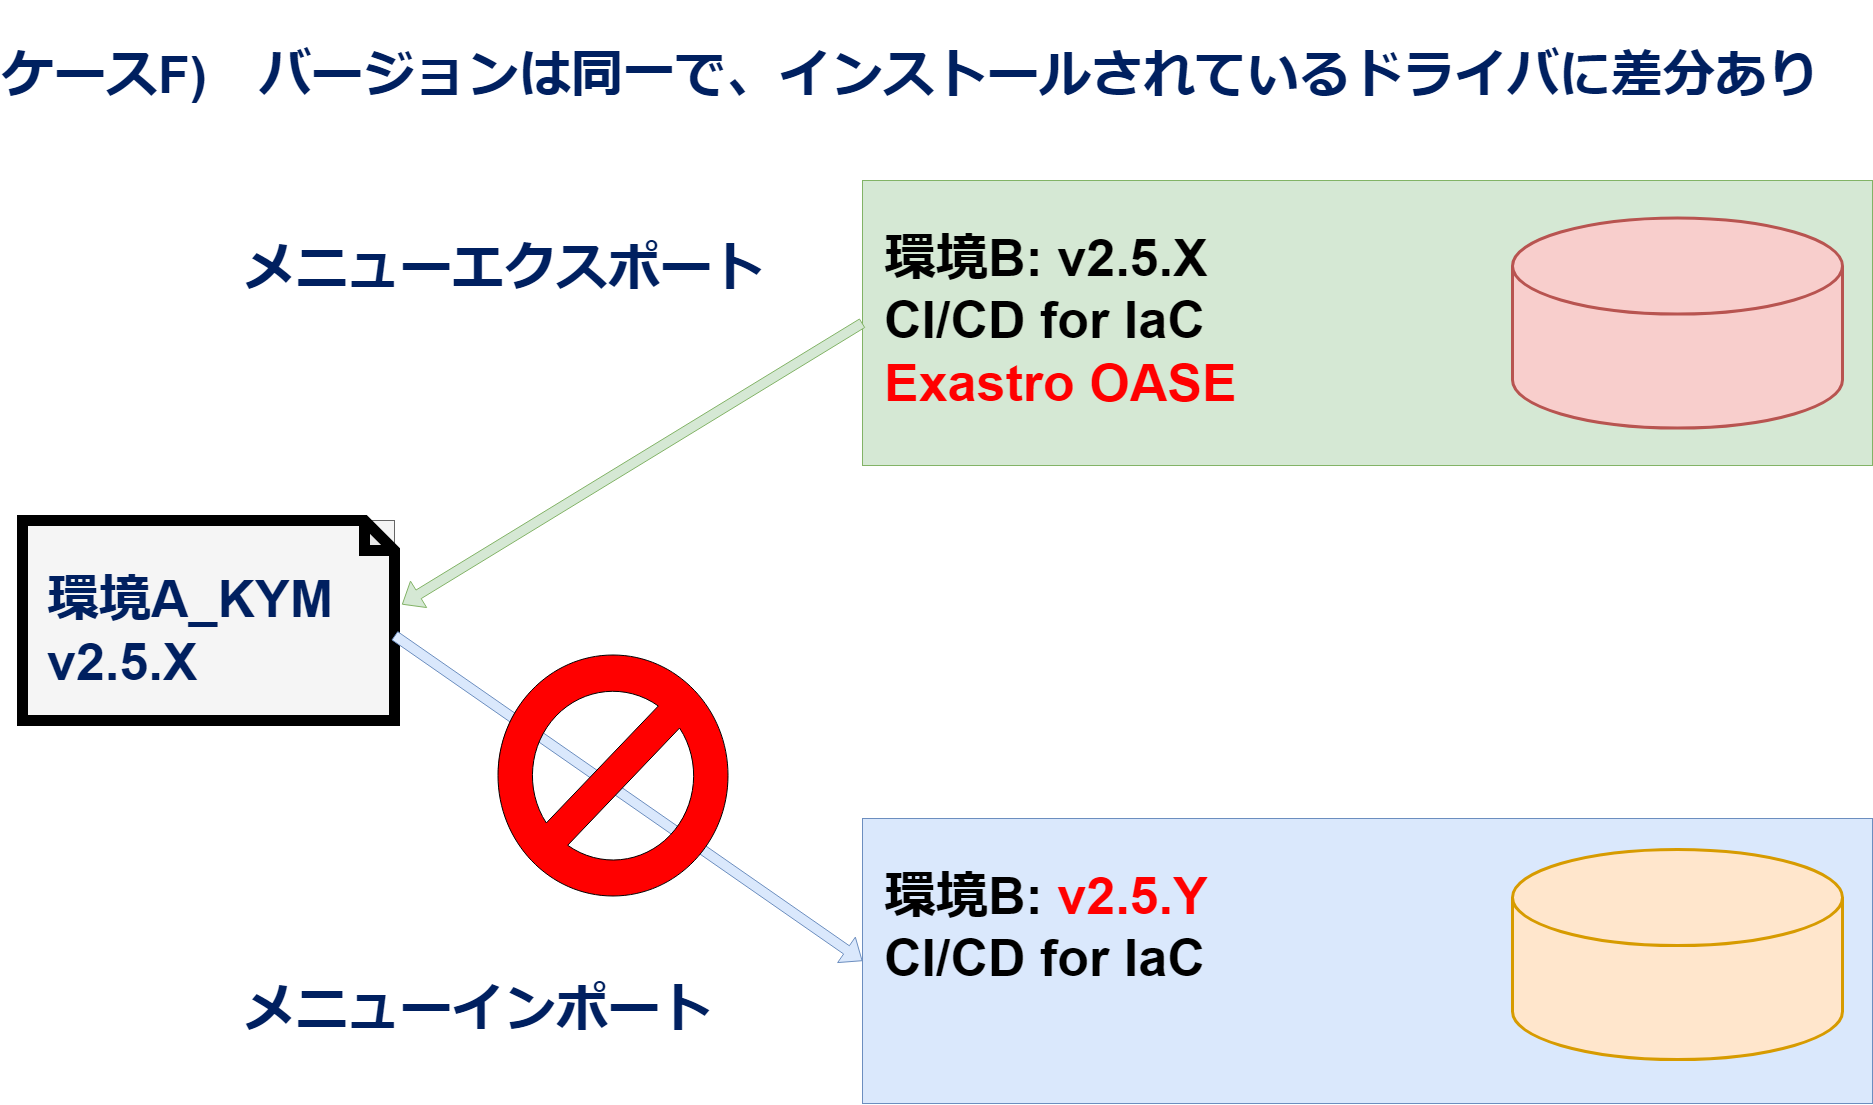
F |
2.5.X |
CI/CD for IaC
OASE
|
2.5.Y |
CI/CD for IaC
|
Difference in version (A:2.5.X < B:2.5.Y)
Difference in drivers
|
△※ |
|
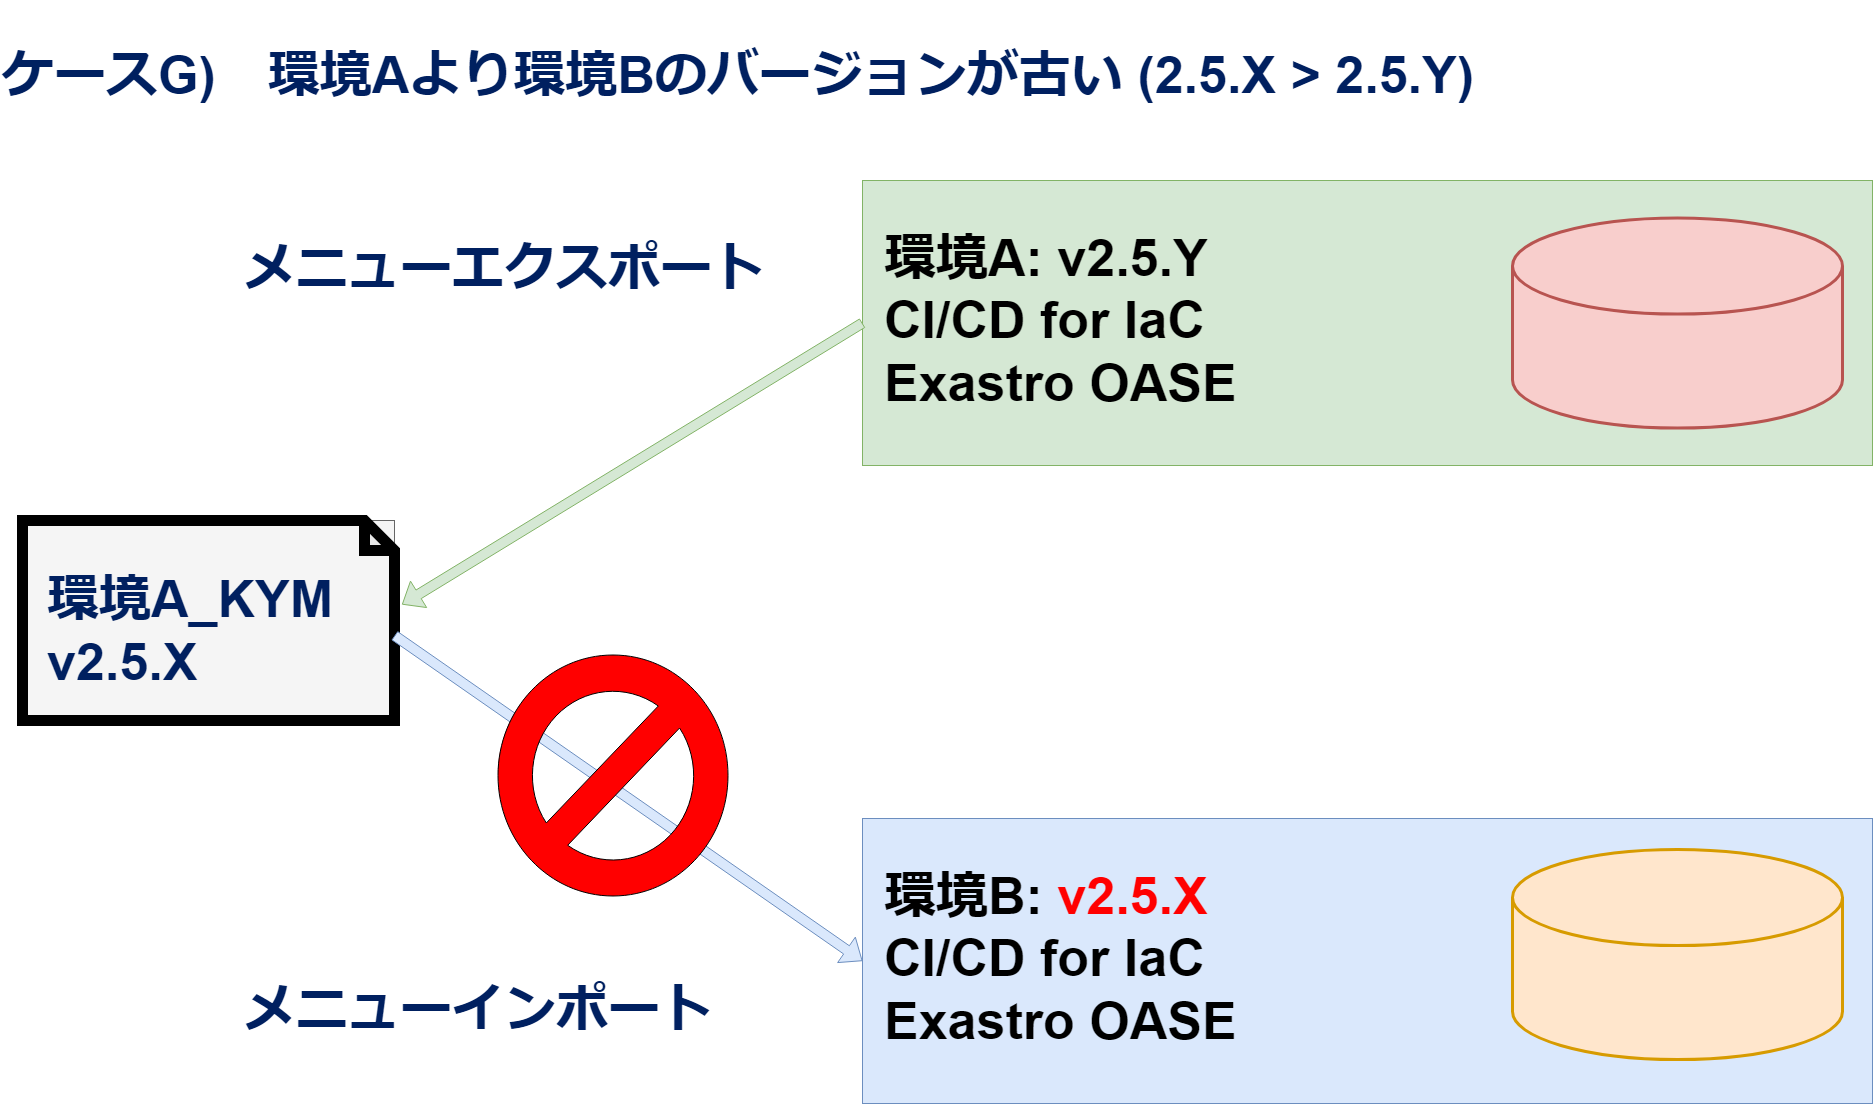
G |
2.5.Y |
CI/CD for IaC
OASE
|
2.5.X |
CI/CD for IaC
OASE
|
Difference in version (A:2.5.Y > B:2.5.X)
|
× |
|
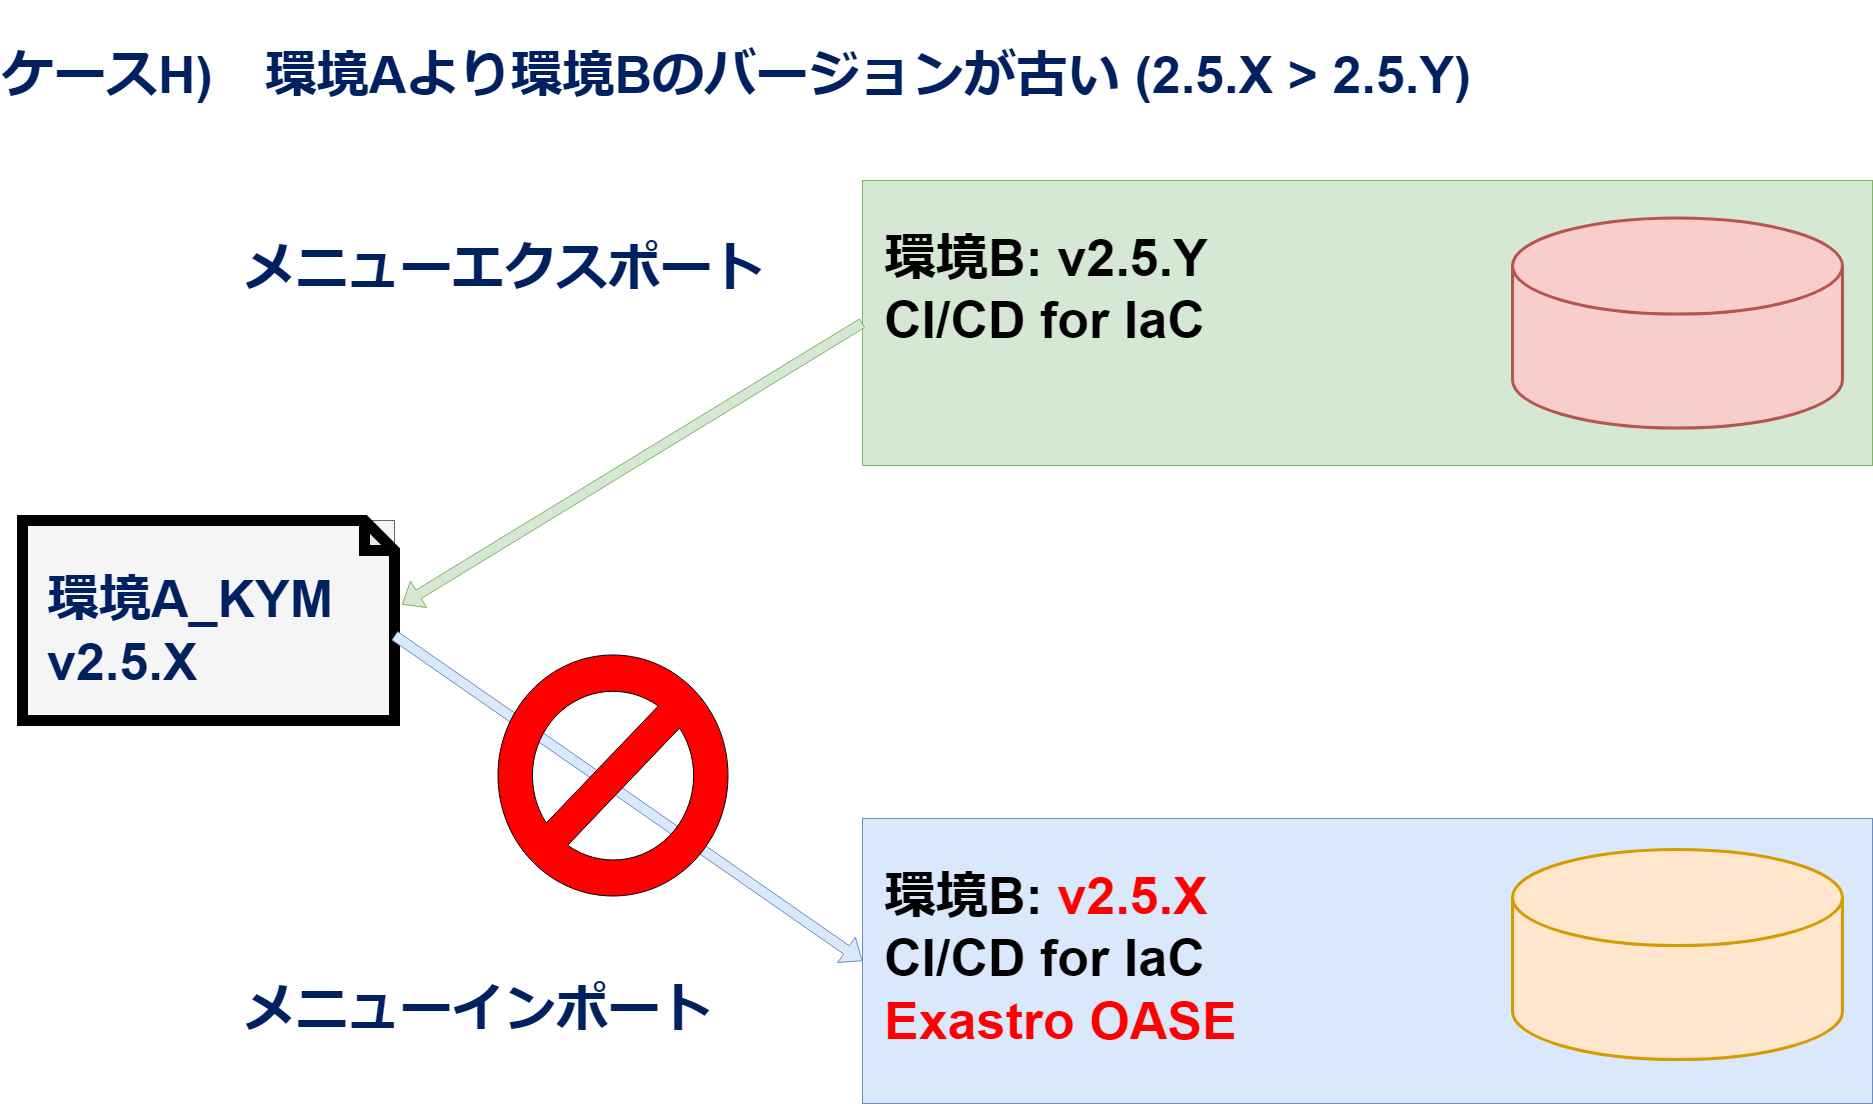
H |
2.5.Y |
CI/CD for IaC
|
2.5.X |
CI/CD for IaC
OASE
|
Difference in version (A:2.5.Y > B:2.5.X)
Difference in drivers
|
× |
|
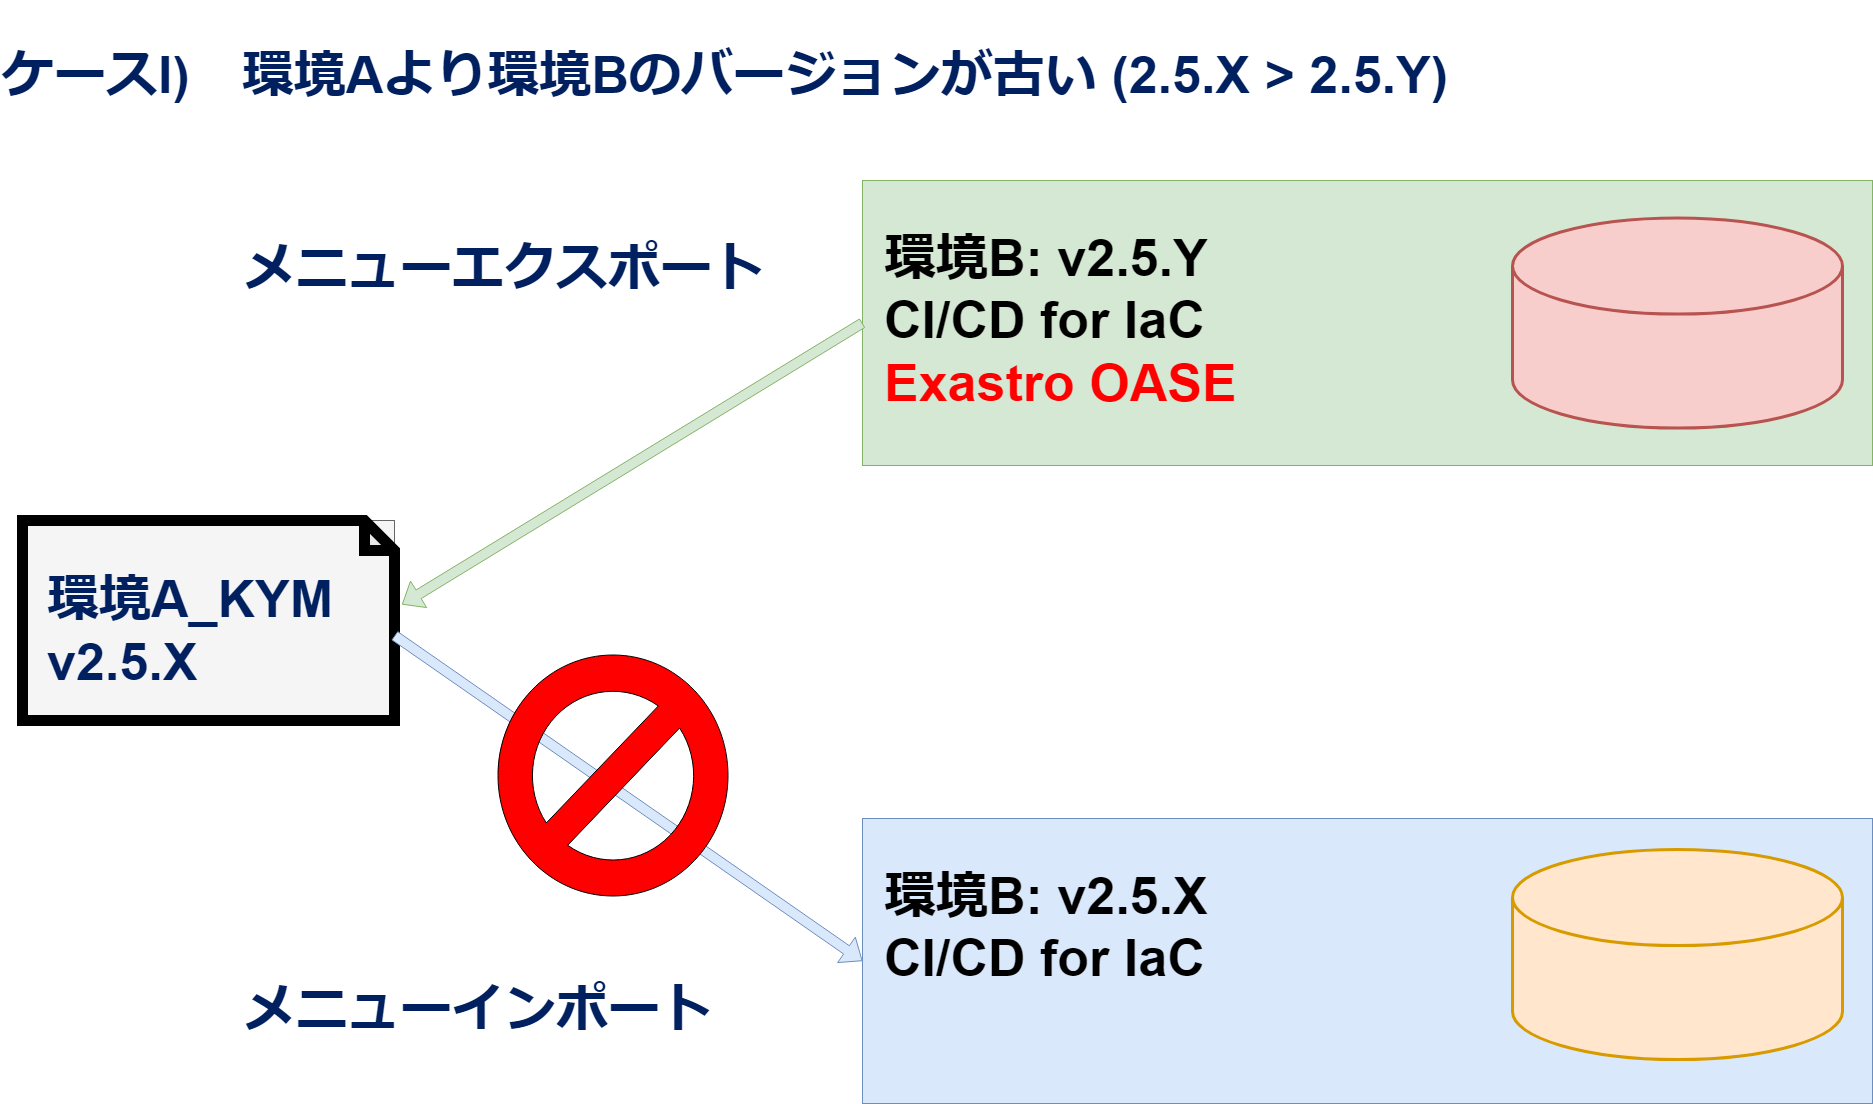
I |
2.5.Y |
CI/CD for IaC
OASE
|
2.5.X |
CI/CD for IaC
|
Difference in version (A:2.5.Y > B:2.5.X)
Difference in drivers
|
× |

警告
警告
1.5. Functions/Operation
Menu export
注釈
No |
Menu group |
Menu/Page |
|---|---|---|
1 |
Export/Import |
Export menu |
2 |
Import menu |
|
3 |
Menu export/import management |
|
4 |
Excel bulk export |
|
5 |
Excel bulk import |
|
6 |
Excel bulk export/import management |
|
7 |
Conductor |
Conductor edit/execution |
8 |
Conductor operation history |
|
9 |
Conductor confirmation |
|
10 |
Conductor instance list |
|
11 |
Conductor Node instance list |
|
12 |
Parameter sheet creation |
Create/define parameter sheet |
13 |
Parameter sheet creation history |
|
14 |
Selection 1 |
|
15 |
Selection 2 |
|
16 |
Compare | Execute comparison |
|
17 |
Ansible-Legacy |
Operation target host |
18 |
Substitute value management |
|
19 |
Execute |
|
20 |
Operation status |
|
21 |
Operation management |
|
22 |
Ansible-Pioneer |
Operation target host |
23 |
Substitute value management |
|
24 |
Execute |
|
25 |
Operation status |
|
26 |
Operation management |
|
27 |
Ansible-LegacyRole |
Operation target host |
28 |
Substitute value management |
|
29 |
Execute |
|
30 |
Operation status |
|
31 |
Operation management |
|
32 |
Terraform-Cloud/EP |
Execute |
33 |
Operation status |
|
34 |
Operation management |
|
35 |
Substitute value management |
|
36 |
Link Terraform management |
|
37 |
Terraform-CLI |
Execute |
38 |
Operation status |
|
39 |
Operation management |
|
40 |
Substitute value management |
|
Name |
Description |
|---|---|
Exportevnrionment |
Overwrites all existing data when importing. |
Timespecified |
Inserts and overwrites data input after the specified time based onthe unique items(ID, No, etc) from each menus when importing. |
Name |
Description |
|---|---|
Include deleted information |
Exports all data including data with the "deleted" status. |
Exclude deleted information |
Does not export data with the "deleted" status. |
No |
Menu/Page |
Description |
|---|---|---|
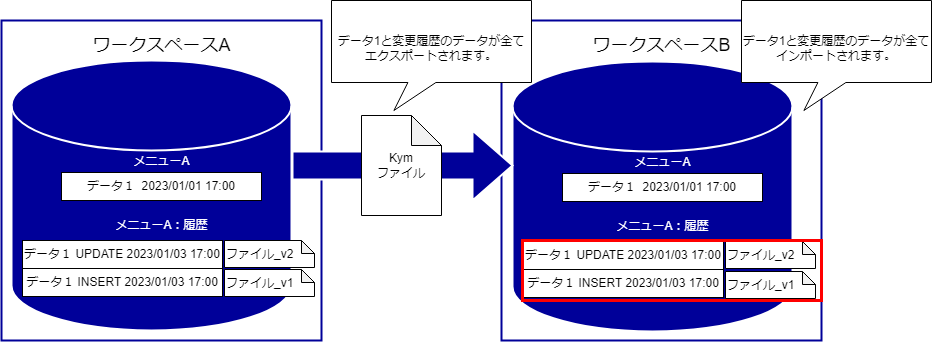
1 |
With history |
Exports records with their history included. |
2 |
Without history |
Exports records without their history. |
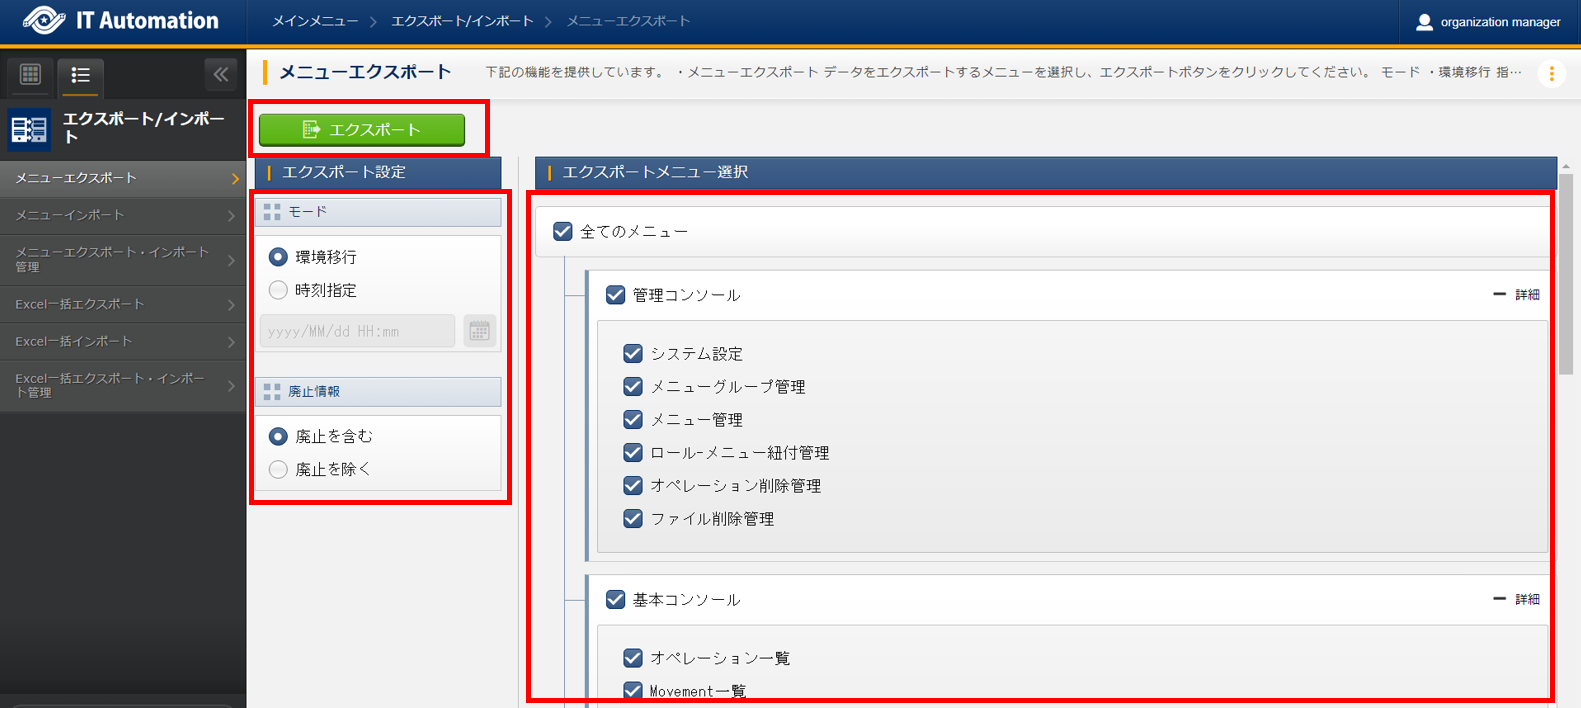
図 1.83 Export Menu page(1)
注釈
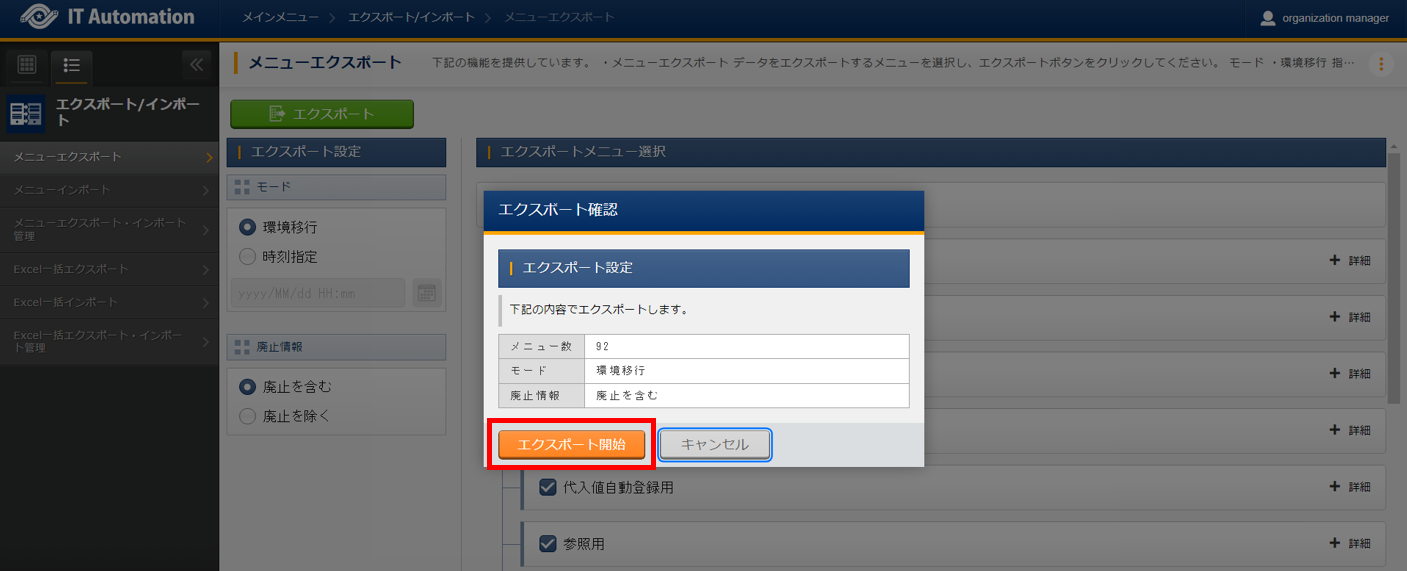
図 1.84 Export Menu page(2)
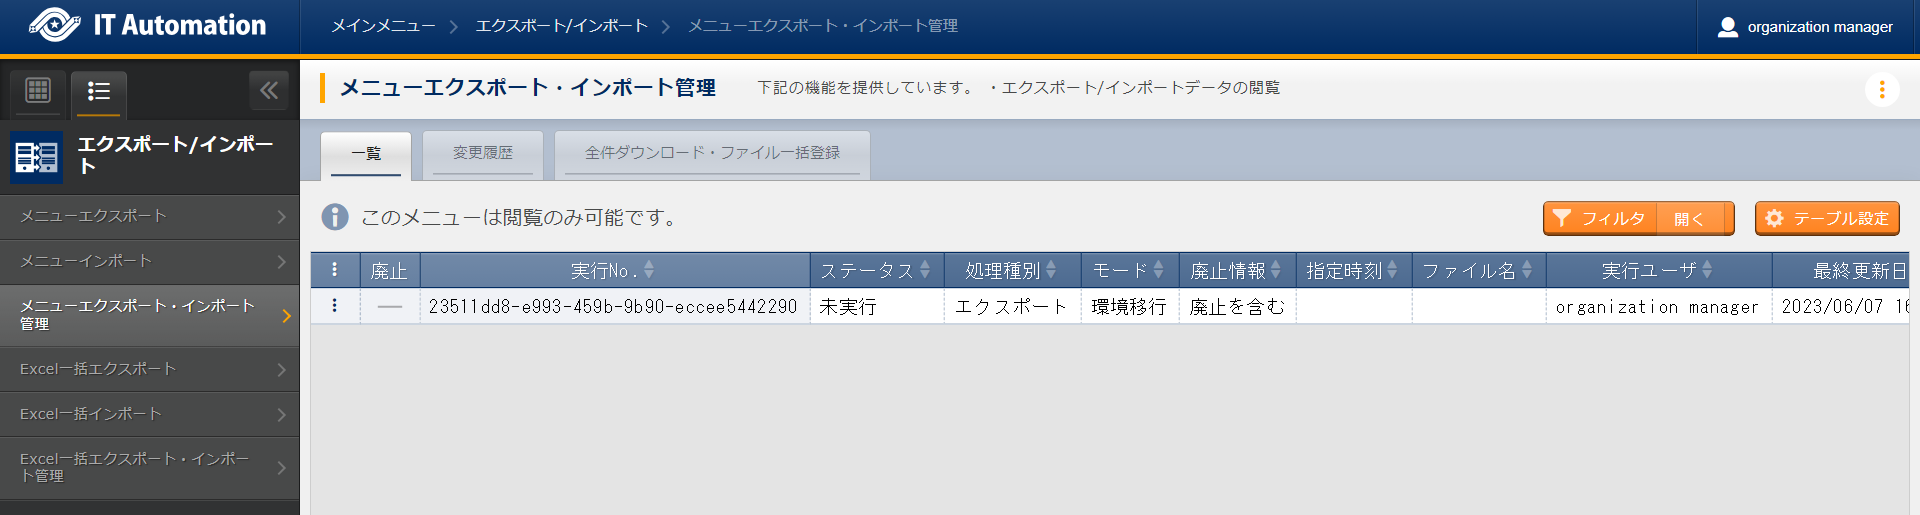
図 1.85 Menu export/import management page
Import menu
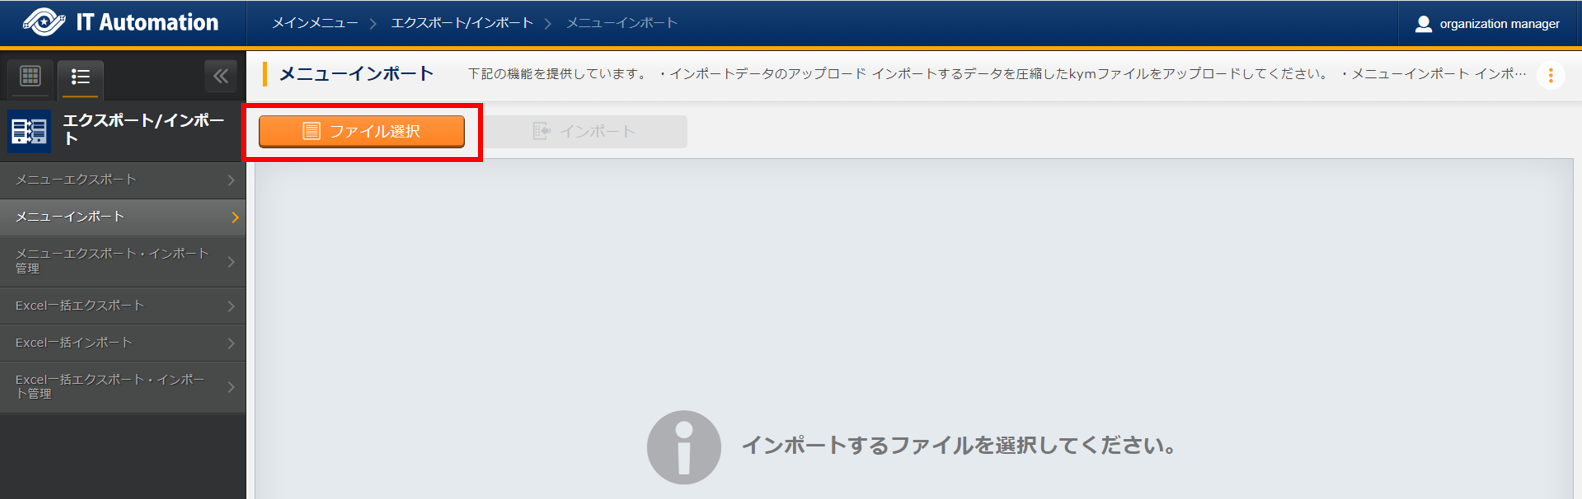
図 1.86 Import menu page(1)
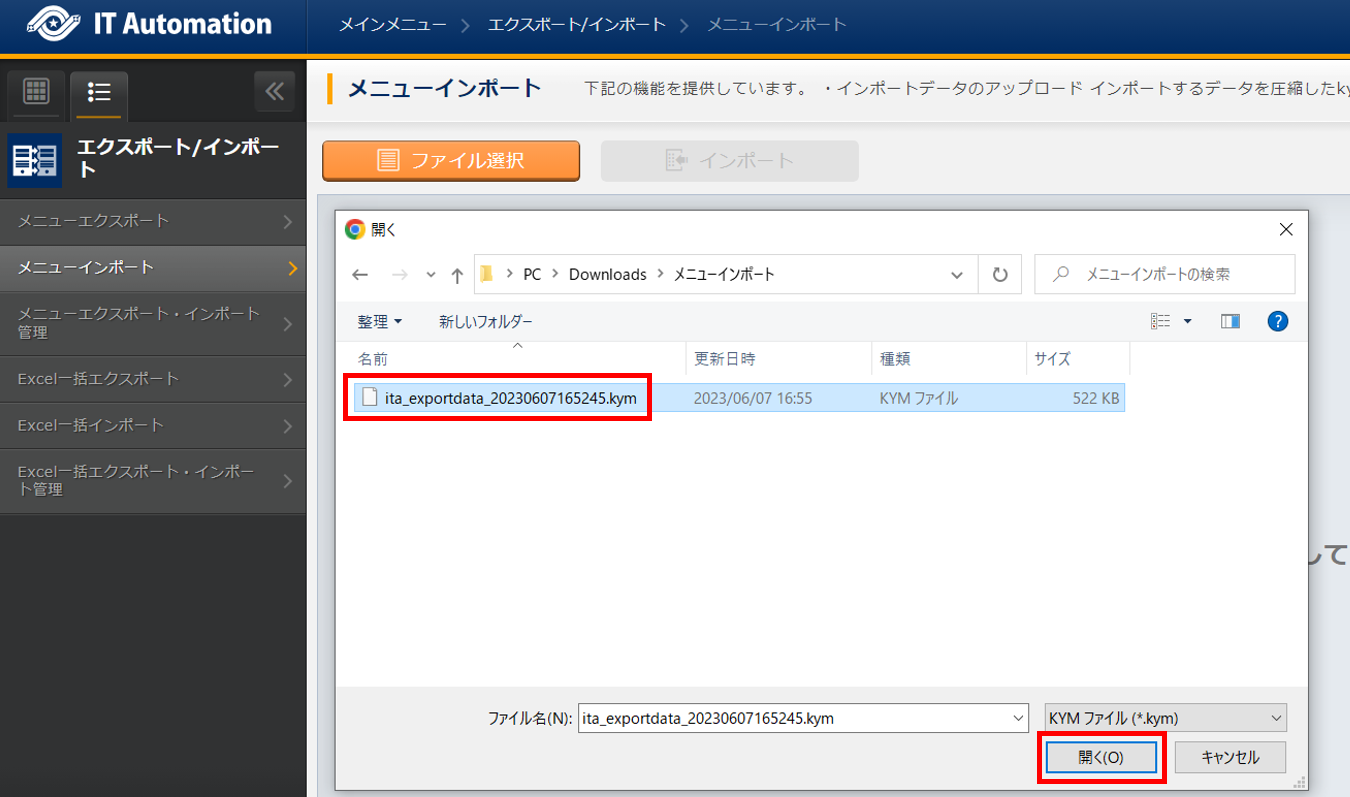
図 1.87 Import menu page(2)
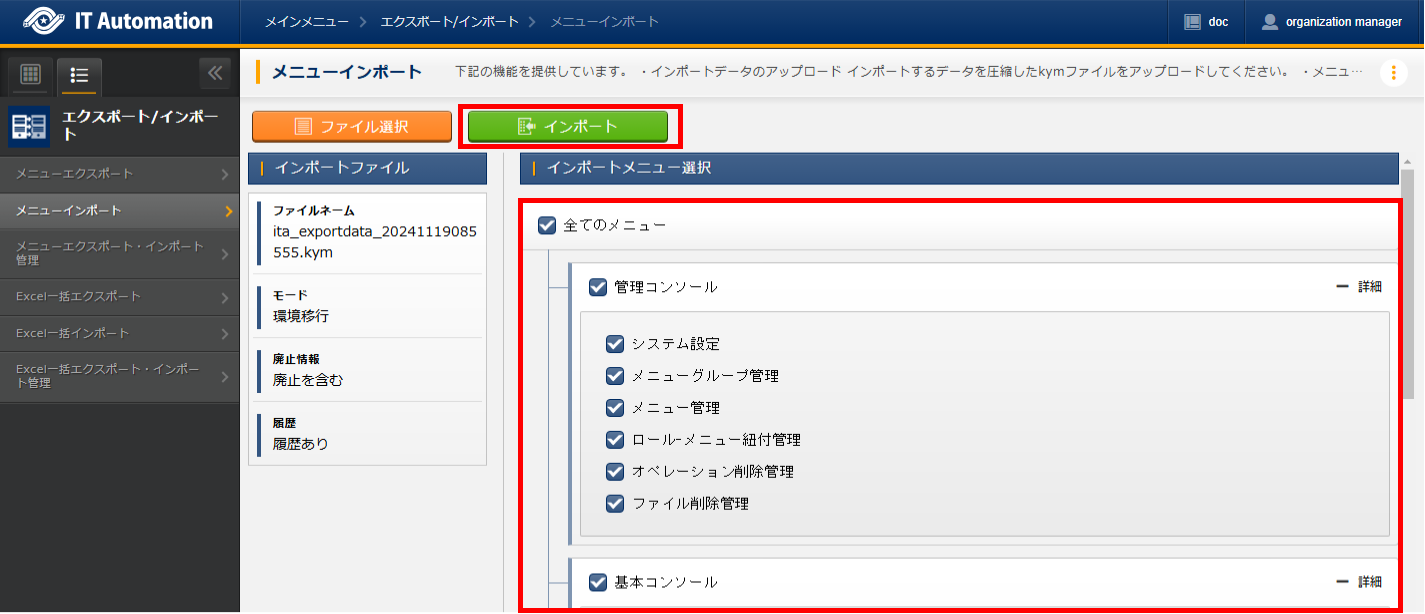
図 1.88 Import menu page(3)
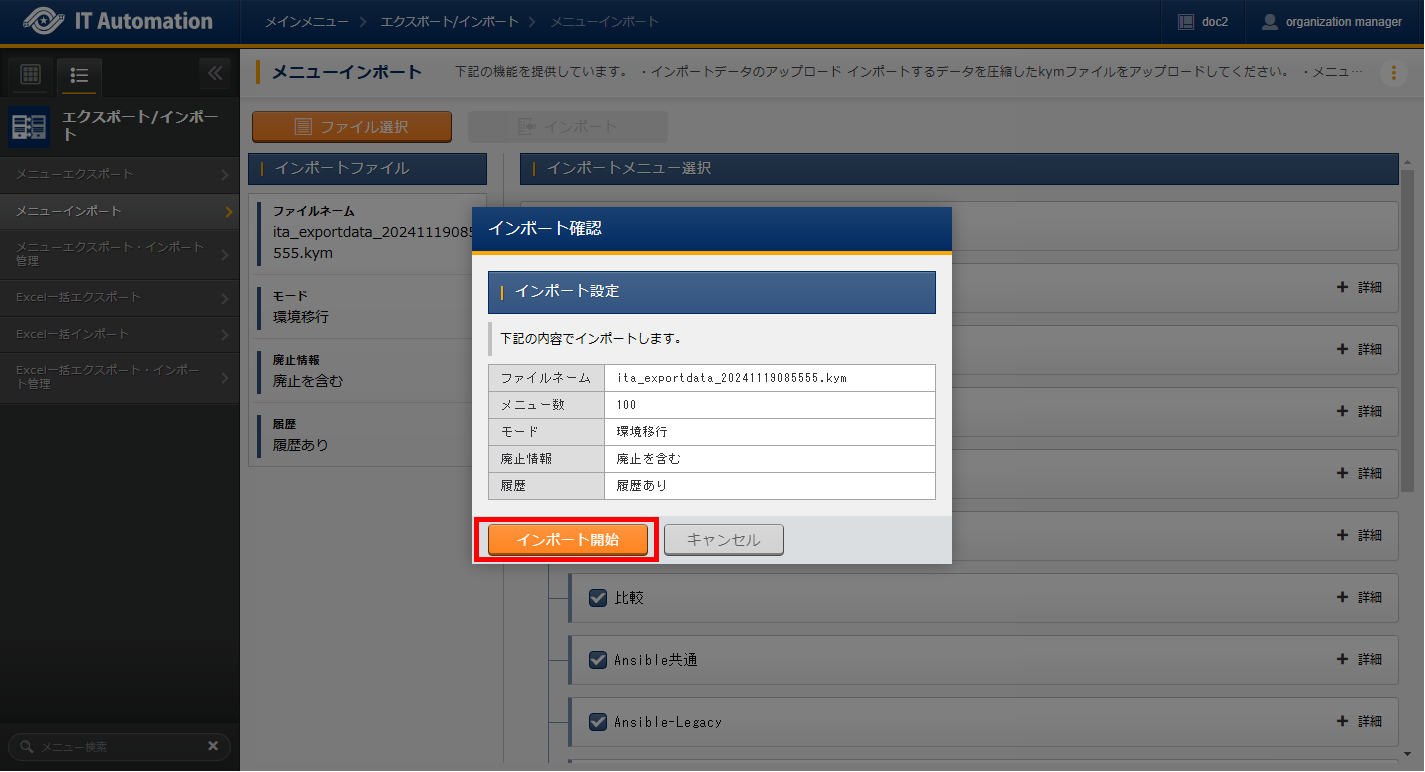
図 1.89 Import menu page(4)
警告
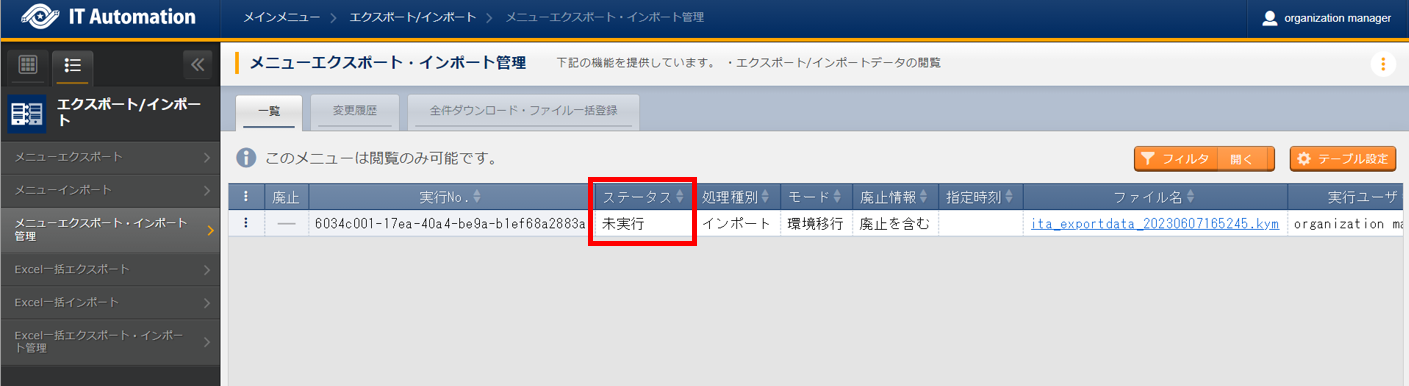
図 1.90 Menu export/import management page
Menu export/import management page
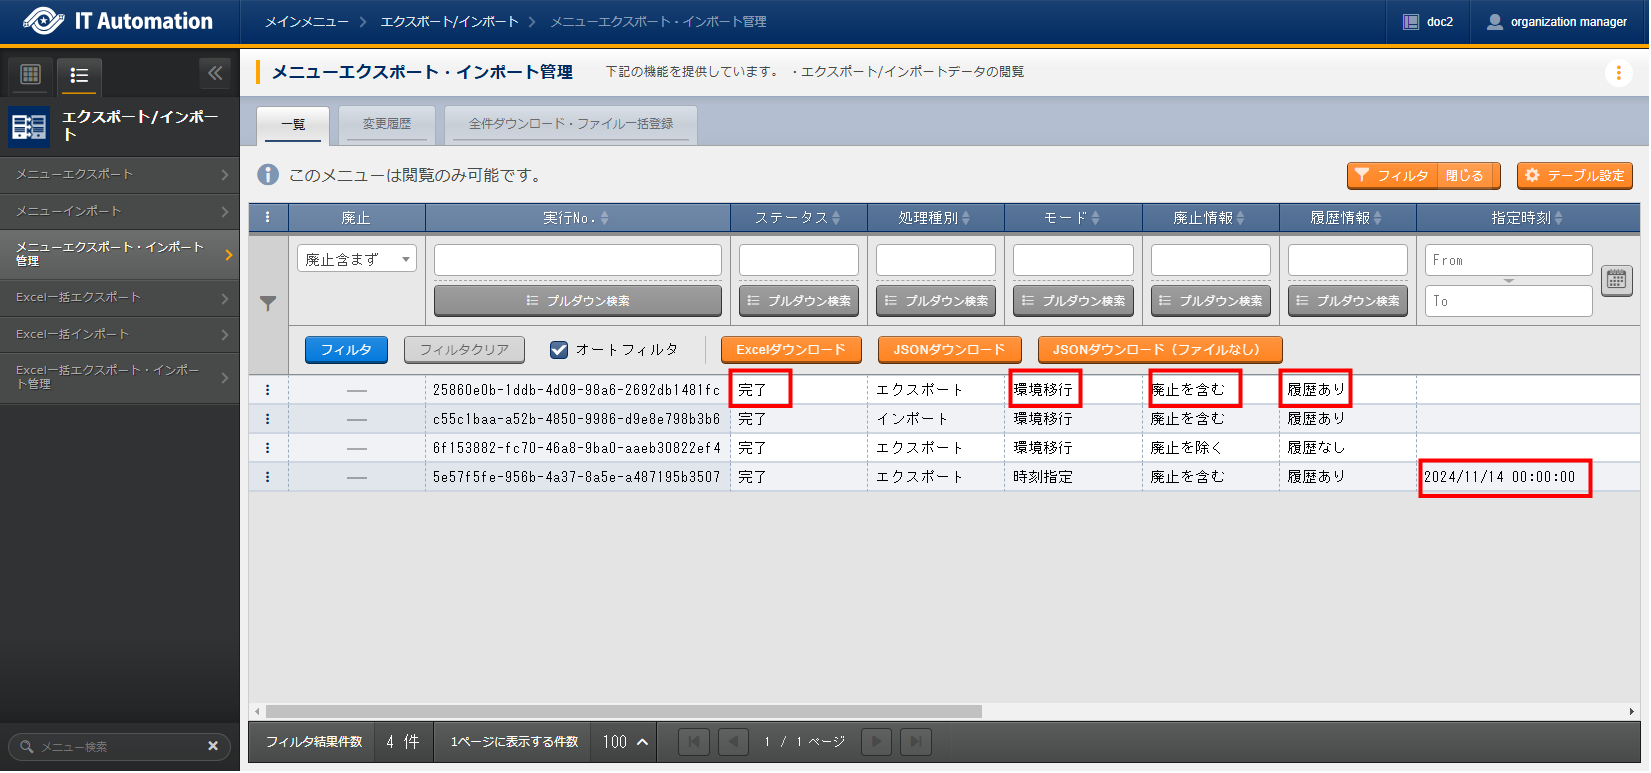
図 1.91 Menu export/import management page
Item |
Description |
|---|---|
|
An Unique Id is automatically given. |
Status |
The status changes to the following in order. 〔Not executed〕, 〔Executing〕, 〔Complete〕.
If an error occurs, the status will display 〔Complete(Abnormal)〕
If the import status reaches 〔Complete(Abnormal)〕,
the data status will return before it was imported with a rollback.
|
|
Export ・・・Export menu
Import ・・・Import menu
|
Mode |
Displays either 〔Export environment〕 or 〔Time specified〕. |
Deletedinformation |
Displays either 〔Include deleted data〕or〔Exclude deleted data〕. |
History information |
Displays either "With history" or "Without history" |
specified |
Displays only if the mode is〔Time specified〕. |
File name |
For exports, this item will display the export data when the status hits 〔Completed〕.
Press the file name to download it.
For imports, the imported data will be displayed.
|
|
Displays the user which executed the export/import process.
|
Language |
Displays the display language of the login user when the import process was executed.
This item is automatically registered and cannot be edited.
|
|
Displays the link to the log-file if the export/import process status displays 〔Complete(Abnormal)〕
|
注釈
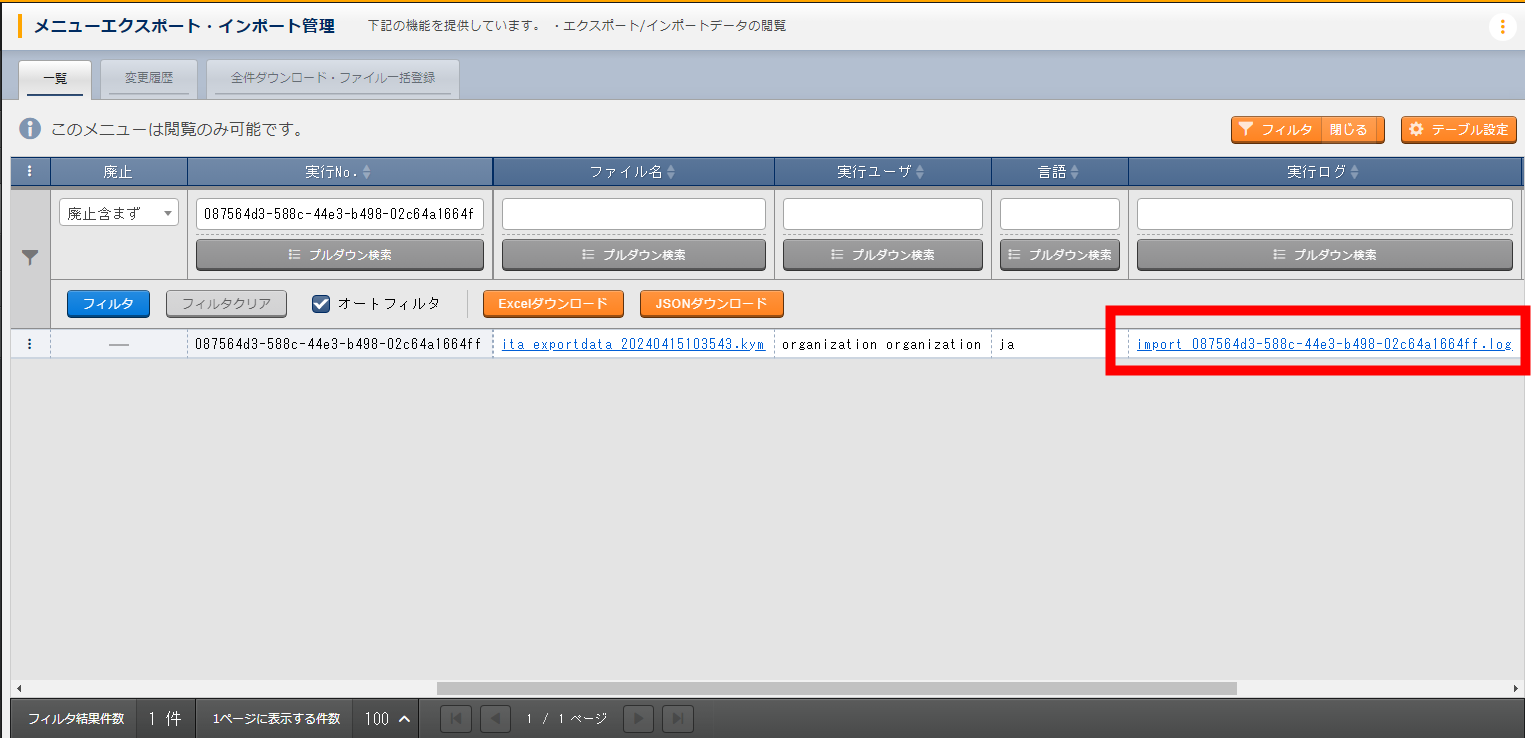
図 1.92 Menu export/import management page: Complete (Abnormal)
# import_9ceea0bd-b193-4245-b1e5-a2d3e93b8e49.log
No corresponding files withing the KYM files. (T_COMN_MENU_TABLE_LINK_DATA)