
3. Ansible-Pioneer
3.1. Introduction
3.2. Ansible-Pioneer overview
3.4. Ansible-Pioneer procedure
3.4.1. Ansible-Pioneer workflow
Workflow details and references
- Register OS typeFrom the menu, register the OS type of the target device.For more information, see OS type.
- Register connection information for the targetFrom the menu, register connection information for the target.For more information, see Device list.
- Register operation nameFrom the menu, register an Operation list.For more information, see Operation list.
- **Register Ansible Automation Controller host information (if needed) **From the menu, Register information for the Ansible Automation Controller host.For more information, see Ansible Automation Controller host list.
- Register Interface informationFrom the menu, select Ansible Core, Ansible Automation Controller or Ansible Execution Agent for the execution engine and register connection information for the execution engine serverFor more information, see Interface information.
- Register Execution environment definition template management(If needed)From the menu, Register the template file for the Execution environment definition file (execution-environment.yml) which is used to build the Execution environment by the ansible-builder within the Ansible Execution Agent.For more information, see ansible_execution_environment_definition_template_list and Using the Template file registered to Ansible common ▶ Execution environment definition template ` and :menuselection:"Execution Environment Parameter Definition" Parameter sheet`.Installing ITA registers a template file that allows users to add python module and ansible galaxy collections.
- Register "Execution environment parameter definition" parameter sheet. sheet(If needed)Register Parameters that will be embedded to the execution environment definition file (execution-environment.yml) template file registered in .For more information, see Using the Template file registered to Ansible common ▶ Execution environment definition template ` and :menuselection:"Execution Environment Parameter Definition" Parameter sheet`.Installing ITA registers , the with the parameters that embeds to the execution environment definition template file (execution-environment.yml) file is registered.
- Register Execution environment management (If needed)Register a link between the and the template file for the execution environment definition file (execution-environment.yml) registered inFor more information, see Execution environment management.Installing ITA registers a link between the and .
- Register Interactive typeFrom the menu, register an Interactive type.For more information, see Interactive type.
- Register Interactive fileFrom the menu, register an interactive file for the Interactive type OS type combination.For more information, see Interactive file colletion.
- **Register Global variables (if needed) **From the menu, register global variables to be used in the Playbook.For more information, see Global variable management.
- **Register Template files (if needed) **From the menu, register template files and template embedded variables to be used in the Playbooks.For more information, see Template management.
- **Register File material (if needed) **From the menu, register file materials and file embedded variables to be used in the Playbooks.For more information, see File management.
- **Register Unmanaged variables (if needed) **From the menu, register extracted variables which will not be displayed in 's .For more information, see Unmanaged target variable list.
- Register Interactive file to MovementFrom the menu, register a link between the Interactive file and Movement.For more information, see Movement-Interactive type link.
- Create parameter sheetFrom the menu, create a Parameter sheet which will have data registered to it that can configure settings for the target.For more information, see Parameter sheet creation function.
- Register data to Parameter sheetRegister data to the parameter sheet created in the previous step.For more information, see Parameter sheet creation function.
- Substitute value auto registration settingsFrom the menu, link the Movement variables with the Parameter sheet's item's setting values.For more information, see Substitute value auto registration settings.
- ExecuteFrom the menu, select the desired Movement and Operation and execute them.For more information, see Execute.
- Confirm execution statusFrom the menu,the status of all previously executed operations will be updated in realtime. Users can also monitor error logs and execution logs as well as stop them with an emergency stop.For more information, see Confirm execution status.
- Confirm execution historyFrom the menu, users can check the history of all previously executed operations..For more information, see Execution management.
3.5. Ansible-Pioneer Menu operation
3.5.1. Basic console
3.5.2. Ansible common
3.5.3. Ansible-Pioneer
OS type
- Maintains (view/register/edit/discard) target devices' OS types.

図 3.32 Submenu (OS type)
- Press the Register button to register an OS type.

図 3.33 Registration page (Movement list)
- The items found in the registration page are as following.
表 3.26 Registration page item list(OS type)¶ Item
Description
Input required
Input method
Restriction
Item number
Displays an automatically numbered string of 36 characters.
ー
Automatic
ー
OS type name
Input a name for the OS ty
〇
Manual
Maximum length 255 bytes
Device type
SV
Set to "True" if the target device is a Server device.
ー
List selection
ー
NW
Set to "True" if the target device is a Network device.
ー
List selection
ー
ST
Set to "True" if the target device is a Storage device.
ー
List selection
ー
Remarks
Free description field
ー
Manual
ー
Movement list
- Maintains (view.register/edit/discard) Movement information.
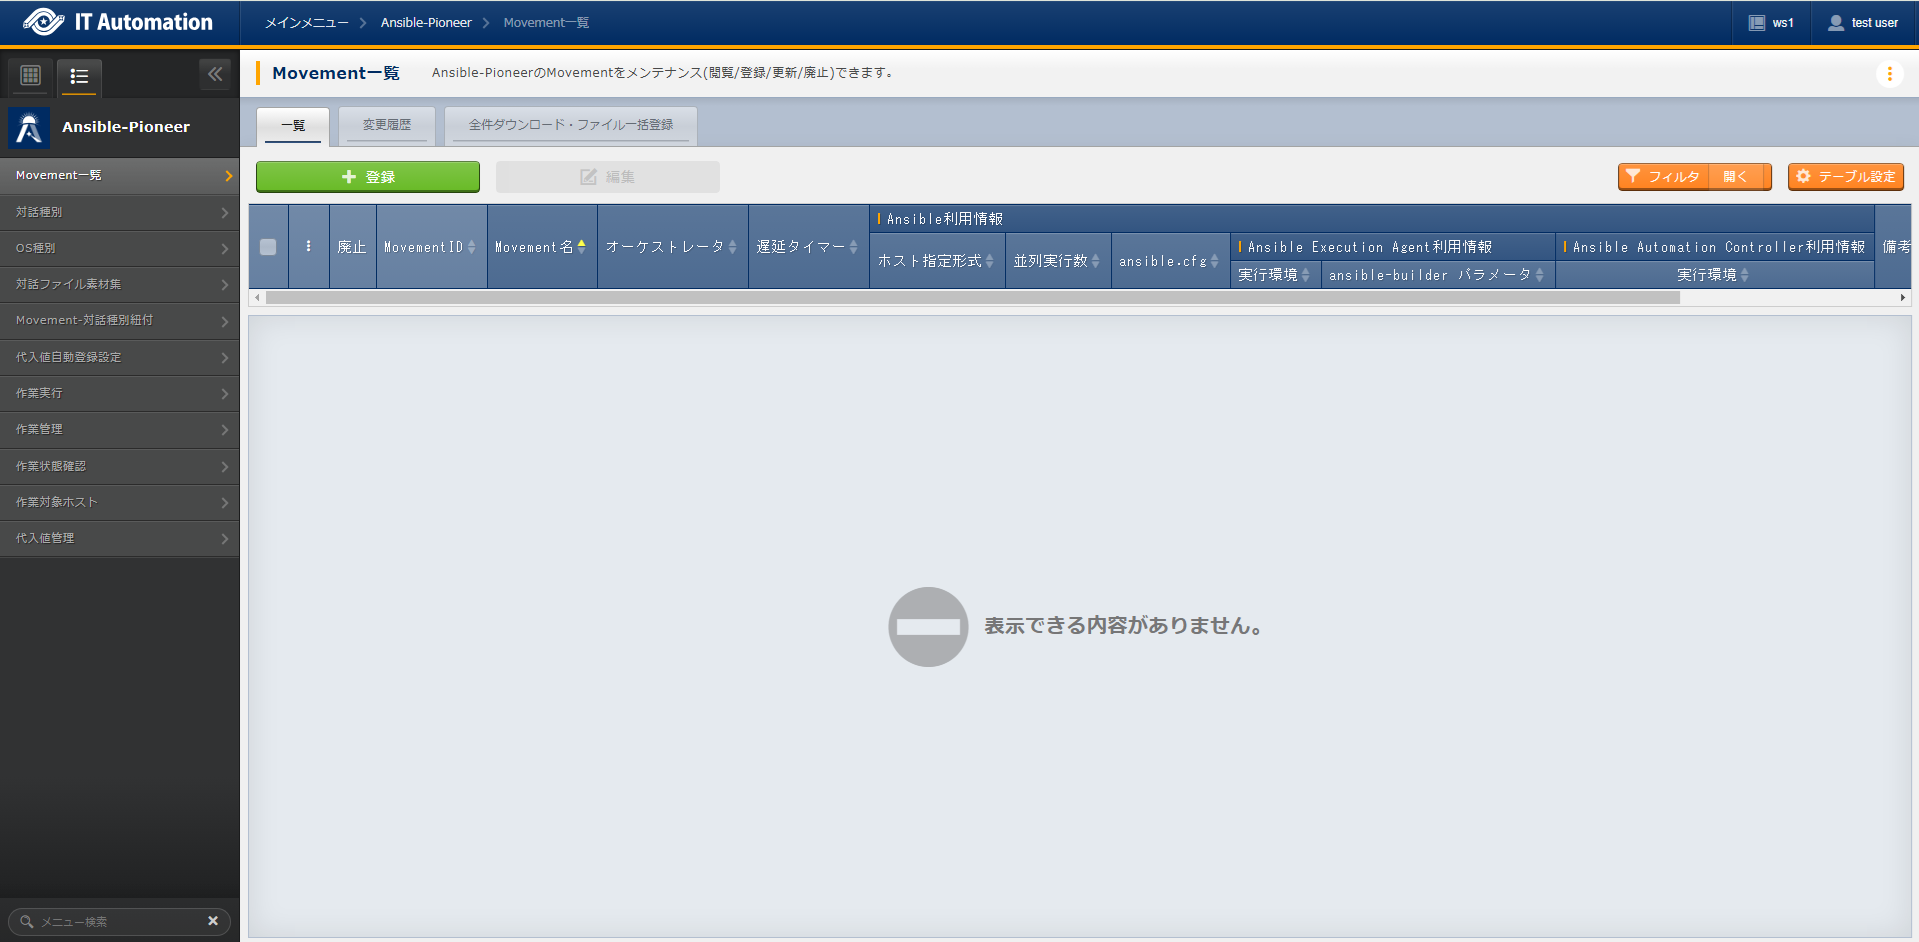
図 3.34 Submenu (Movement list)
- Press the Register button to register Movement information.
図 3.35 Registration page (Movement list)
- The items found in the registration page are as following.
Tip
※1 Select from data fetched from Ansible Automation Controller data synchronization.
Interactive type
- Maintains (view/register/edit/discard) Interactive types.In Ansible-Pioneer, define differences per OS type in Interactive files, and dialogue files with the same purpose are grouped together as 'Interactive type' to absorb (extract) differences.
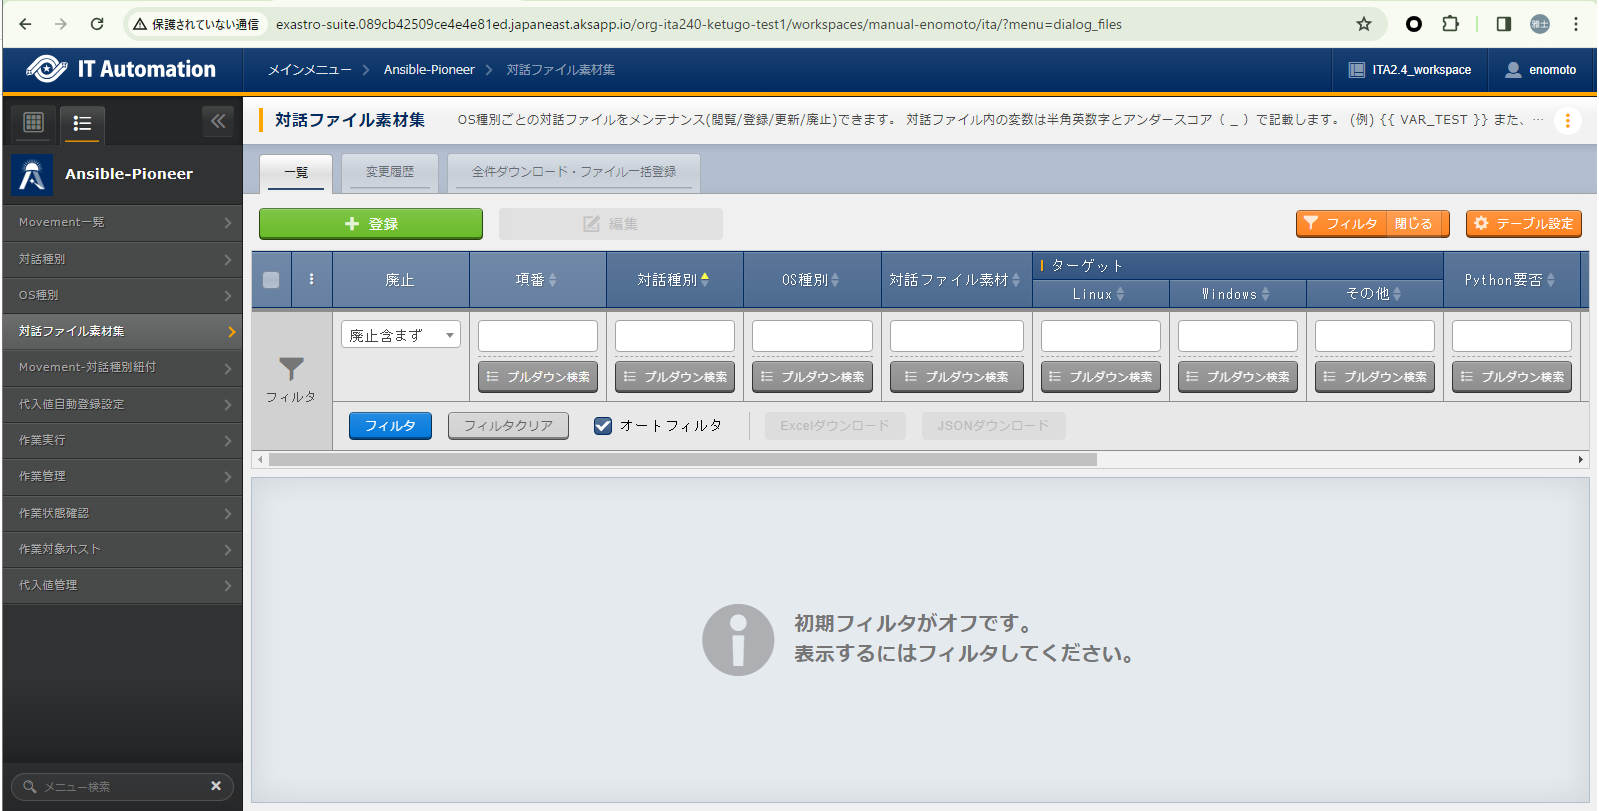
図 3.36 Submenu (Interactive type)
- Press the Register button to register an Interactive type.

図 3.37 Registration page(Interactive type)
- The items found in the registration page are as following.
表 3.27 Registration page item list(Interactive type)¶ Item
Description
Input required
Input method
Restrictions
Item number
Displays an automatically numbered string of 36 characters.
ー
Automatic
ー
Interactive type name
Input a name for the Interactive type.
〇
List selection
Maximum length 255 bytes
Remarks
Free description field
ー
Manual
Maximum 4000 bytes
Interactive file colletion
- Maintains (view/register/edit/discard) user created interactive filesFor more information regarding writing Interactive files, see Writing Interactive files (Ansible-Pioneer).Register Interactive file for each Interactive type and OS type combination.In order to have multiple OS work for 1 Interactive type, the user must register an Interactive file for each OS type.
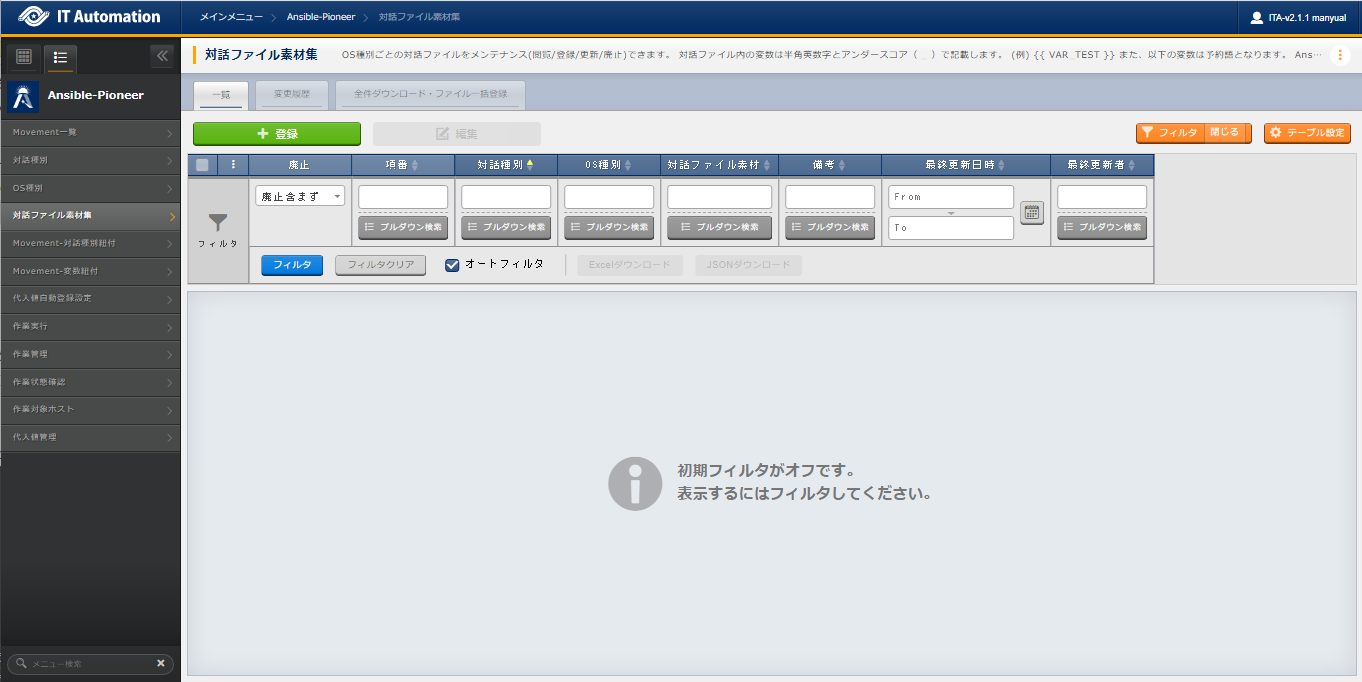
図 3.38 Submenu (Interactive file colletion)
- Press the Register button to register Interactive file materials.
図 3.39 Registration page(Interactive file colletion)
- The items found in the registration page are as following.
警告
Movement-Interactive type link
- Maintains (view/register/edit/discard) links between Movements and Interactive types.
図 3.40 Submenu (Movement-Interactive type link)
- Press the Register button to register Movement and Interactive type links.
図 3.41 Registration page(Movement-Interactive type link)
- The items found in the registration page are as following.
表 3.28 Registration page item list(Movement-Interactive type linkの場合)¶ Item
Description
Input required
Input method
Restrictions
Item number
Displays an automatically numbered string of 36 characters.ー
Automatic
ー
Movement
Displays registered in .Select Movement.〇
List selection
Same as description.
Interactive file type
Displays registered in .Select the Interactive type for the Interactive file.The Interactive file linked to the execution target's OS type and Interactive type can be executed.〇
List selection
Same as description.
Include order
Input an include order (1~) for the Playbook.The included Playbook files will be executed in order based on their include order (rising).〇
Manual
1~2,147,483,647
Remarks
Free description field
ー
Manual
Maximum length 4000 bytes
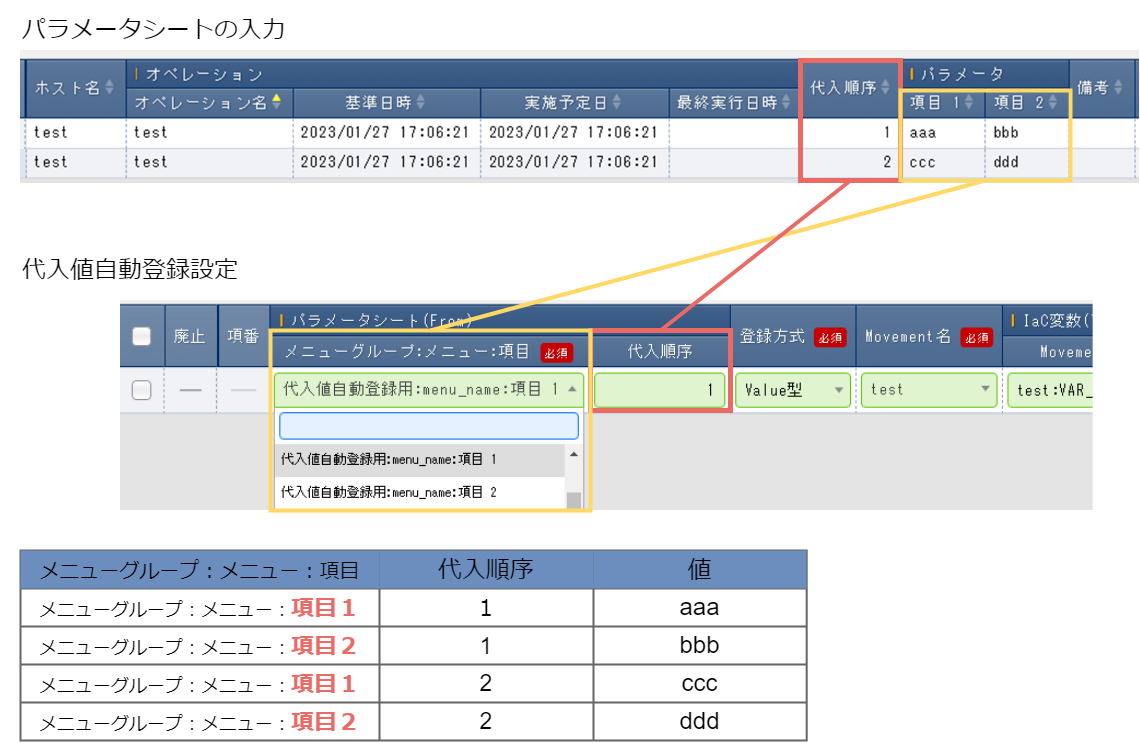
Substitute value auto registration settings
- Links (view/register/edit/discard) parameter item setting values and Movement variables.
|The registered information is displayed in and when executed by internal processes.
図 3.42 Submenu (Substitute value auto registration settings)
- Press the Register button to register a link between the Movement variables and Parameter sheet item setting values

図 3.43 Registration page (Substitute value auto registration settings)
- The items found in the registration page are as following.
Tip
Tip
- In :menuselection:`Ansible-Pioneer --> Substitute value auto registration settings`s link Role variables and th setting values for items registered to the Parameter sheets.
表 3.29 Parameter sheet registration contents¶ Host name
Operation name
Parameter
Item1
Item2
Item3
Item4
test-host
test-ope
value1
value2
value3
value4
表 3.30 Substitute value auto registration settings registration contents¶ Menu name
Item
Variable name
Substitute order
sample-menu
Item1
VAR_substitutionA
30
sample-menu
Item2
VAR_substitutionA
10
sample-menu
Item3
VAR_substitutionA
20
sample-menu
Item1
VAR_substitutionB
2
sample-menu
Item2
VAR_substitutionB
4
sample-menu
Item3
VAR_substitutionB
1
sample-menu
Item4
VAR_substitutionB
3
- When executed, the host variable file (host_vars/test-host) will have the variables registered in Substitute value auto registration settings output similarly to the example below.Output to Host variable file
VAR_substitutionA:
  - value2
  - value3
  - value1
VAR_substitutionB:
  - value3
  - value1
  - value4
  - value2
Tip
Tip
- Register the following in:menuselection:Ansible common --> File management / .
表 3.31 Template management registration contents¶ Template embedded variable name
Template file
TPF_sample
sample.tpl
- After creating "Ansible common:File management:File embedded variable name" and "Ansible common:Template management:Template embedded variable name" as Parameter sheet items in , register File embedded variables and Template embedded variables as the Parameter sheets' item values.
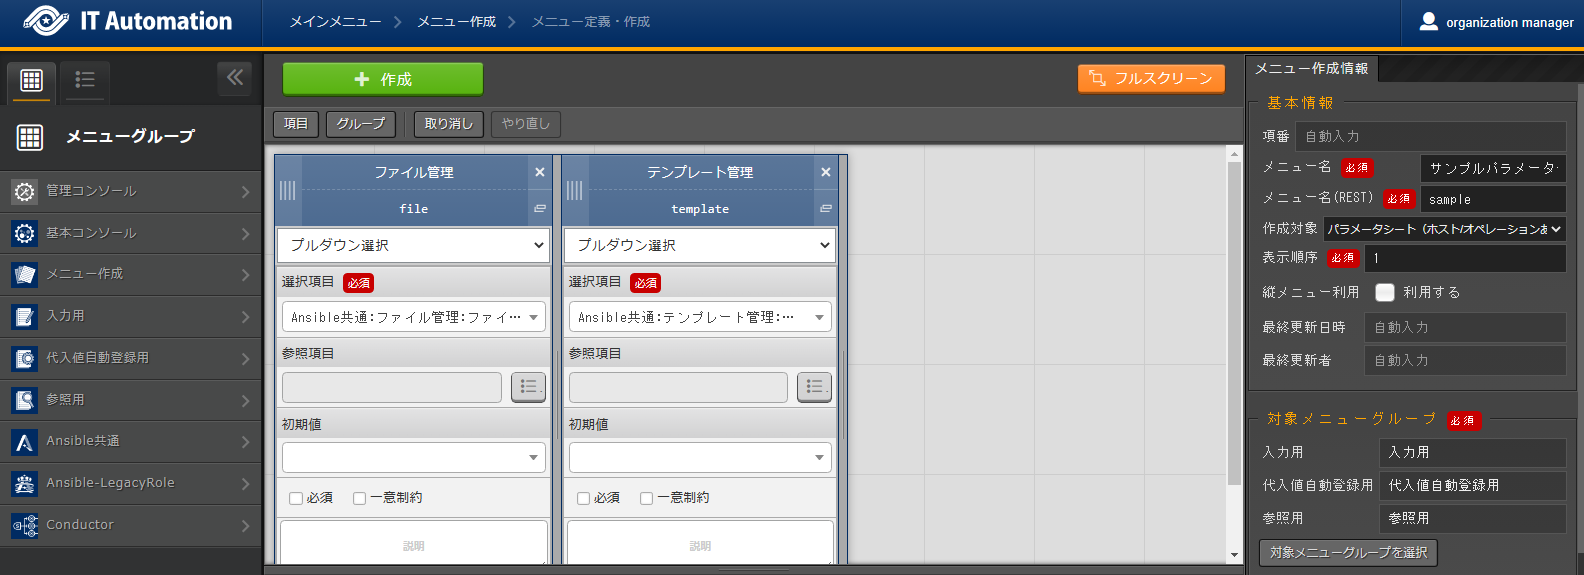
図 3.44 Define/Create parameter sheet
- In , link the Playbook variable and the Item setting value of the Parameter sheet registered in Step 2. and Execute Ansible in .
表 3.32 Substitute value auto registration settings registration contents¶ Menu name
Item
Variable name
Sample parameter sheet
File management
VAR_filetest
Sample parameter sheet
Template management
VAR_temptest
- Click the 's Check substitute value button to check that the '{{ CPF_test }}' and '{{ TPF_sample }}' are dispalyed to the Specific value.

図 3.45 Confirm execution status Substitute value management
Execute

図 3.46 Execute menu
- ExecutePress the Execute button to run operations to the execution target.
- Dry runClicking the Dry run button allows the user to perform a dry run where the operation is not executed to the execution target.Dry runs will execute the Ansible-Playbook command's --check parameter.
- Check ParameterClicking the Check Parameter button allows users to check that the information registered in and the Operation and Movement link information is displayed to and without actually executing to the execution target.
Tip
Confirm execution status

図 3.47 Submenu (Confirm execution status)
- Execution status displayThe status matching the Execution status is displayed.The execution log and error log also displays detailed information regarding the execution status.If the execute type is "Execute", "Normal" will be displayed. If Dry run is selected, "Dry run". If Parameter check is selected, "Parameter check" will be displayed.If the status ends in an unexpected error, a message will be displayed in the error log."Call Conductor" displays which Conductor was executed. This field will be blank if directly executed from Ansible-LegacyRole.
- Confirm Target hostClicking the Check Target host button displays where hosts from Operations and Movements are displayed.
- Confirm Substitute valueClicking the Check Sbstitute value button displays where users can see Specific values and Variables from Operations and Movements.
- Emergency stop/Delete reservationUsers can press the Emergency stop button to stop the operation.If the status was "Reserved execution", the Delete reservation button will be displayed. Check the Delete reservation button to delete the reservation
- Display execution logWhen Ansible Automation Controller is executed, the Playbook is executed in units of the device to be built grouped by the item values of 's ・ ・ ・ ・ ・ , which splits the execution logs.By specifying the number of job slices in the in or , the grouped targets can be further divided into the number of specified job slices before the Playbook is executed and the execution log is further divided.If the execution log has been divided, the execution log will be divided into tabs, where the user can select which execution log they want to see.The log file names displayed in the execution log's pulldown menu are as following.exec.log: Log file containing all execution logs.Not exec.log: Divided execution log. The file convention are as following.exec_<Group number>_<Serial number>
表 3.33 Divided execution log file naming convention¶ Component
Contents
Group number
The Execution target's serial number grouped by the 's ・ ・ ・ ・ ・ items.
Serial number
Serial number from 1 that divides the group by setting the number of job slices.If 0, no division of job slicing was done. - Search logUsers can filter information to narrow down information in the execution log and the error log.Input the string the user wants to search for and tick the "Corresponding lines only" checkbox to view only the lines corresponding to the string.The refresh interval and maximum display lines can be configured by changing the "Status monitoring cycle item" and "Progress status display lines" items in .
- Input dataUsers can download executed Playbooks.For more information, see Link between ITA menus and Input data when executing Ansible.
- Result dataUsers can download execution logs and error logs.For more information, see Result data created when executing Ansible.
Execution management
Allows userse to view execution histories.Specify search conditions and press the Filter button to view a table of executions.Pressing the Details button moves the user to where they can view detailed information regarding the execution status.
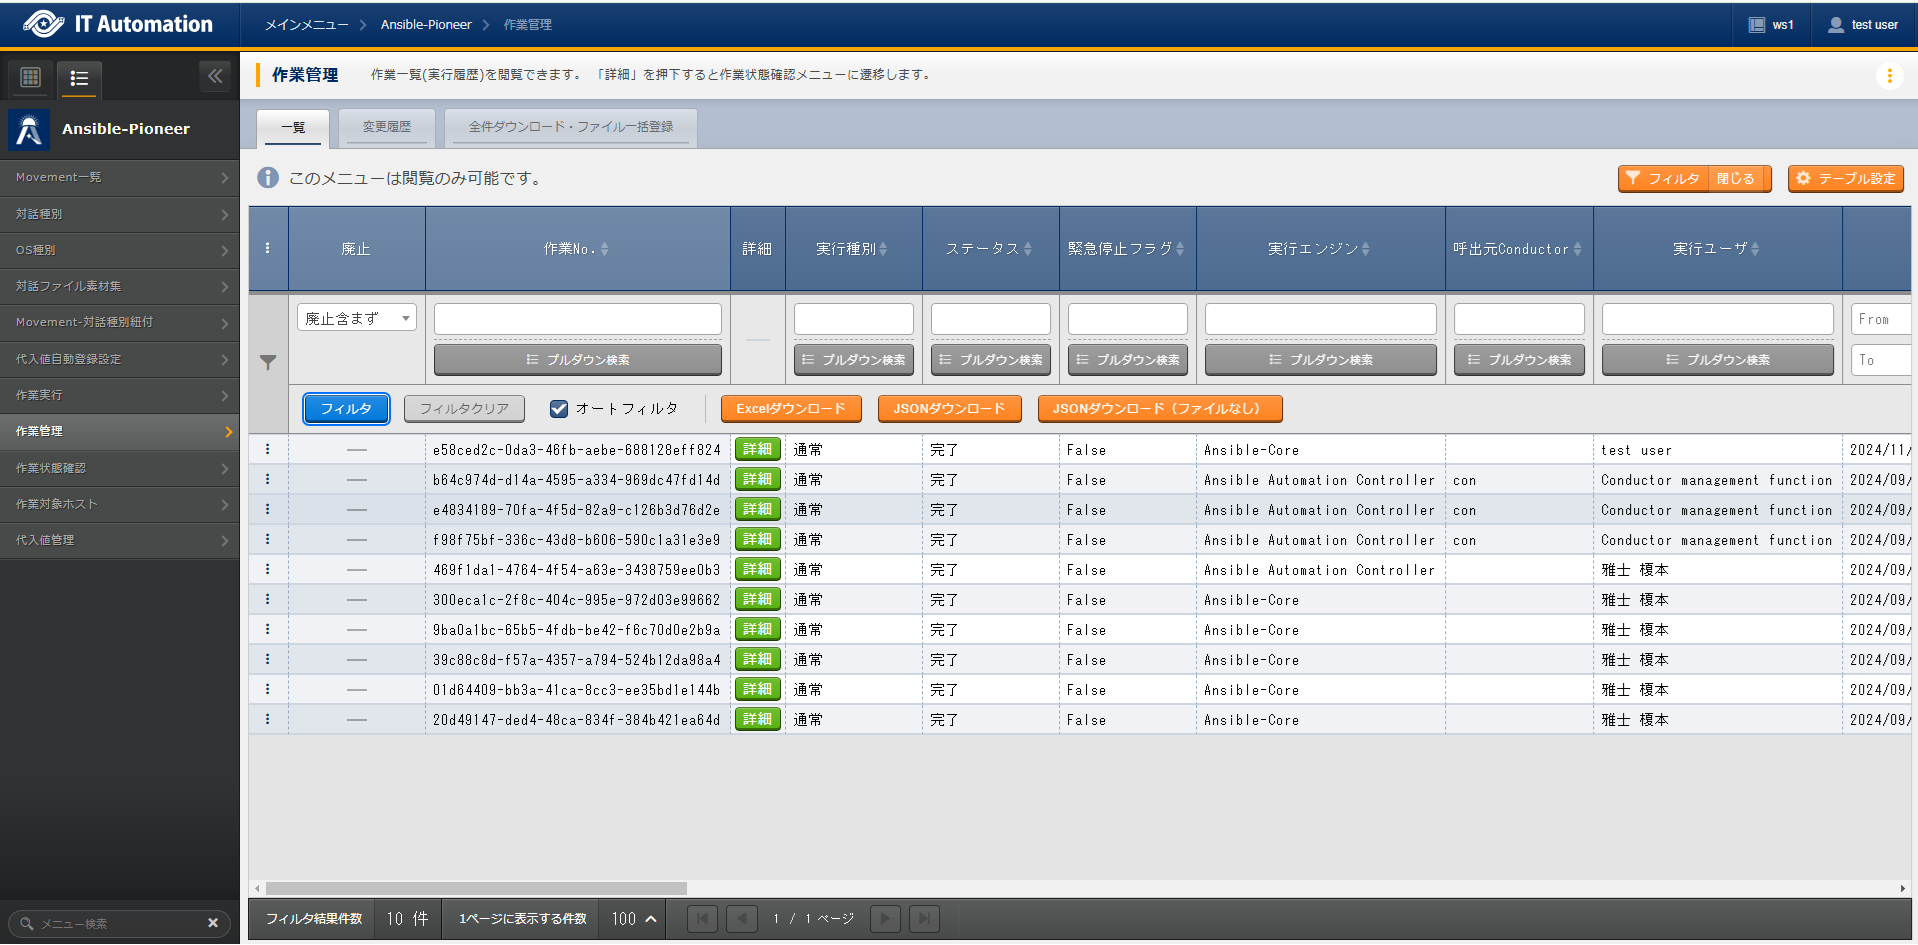
図 3.48 Submenu (Execution management)
- The items found in the page are as following.
表 3.34 View page item list (Execution management)¶ Item
Description
Execution number.
Displays an automatically given unique ID (36 characters)
Execution type
Displays the Execution type.
Status
Displays the status of the Execution.
Emergency stop flag
Displays whether the operation has been stopped by the Emergency stop button from the menu or not.
Execution engine
Displays the Execution engine used.
Called Conductor
Displays the Conductor name if executed from Conductor.
Execution user
Displays the user who executed the Ansible.
Registration date
Displays when the Execute button was clicked.
Movement
ID
Displays the selected Movement ID.
name
Displays the selected Movement name
Delay timer
Displays the delay timer value configured to the Movement.
Ansible use information
Host specification format
Displays the selected Movement's Host specification format.
WinRM connection
Displays the selected Movement's WinRM connection.
Header section
Displays the selected Movement's header section.
ansible.cfg
Allows users to download the selected Movement's ansible.cfg file.
Ansible Execution Agent use information
Execution environment
Displays the Ansible Execution Agent's execution environment of the selected Movement.
ansible-builderparameter
Displays the ansible-builder of the selected Movement.
Ansible Automation Controller use information
Execution environment
Displays the selected Movement's execution environment.
Operation
No.
Displays the selected Operation's ID
Name
Displays the selected Operation's name
Input data
Allows users to download the input data in a Zip file
Result data
Allows users to download the result data in a Zip file.
Execution status
Reservation date
Displays the reservation date if the execution is reserved.
Start date
Displays when the execution will start.
End date
Displays when the execution will end.
Collect status
Status
Displays the Connection function's status.
Collection log
Allows users to downlaod the Collection function's log.
Conductor instance number
Displays the Conductor instance number if executed from Conductor.
Target host
- Allows users to view Target hosts.
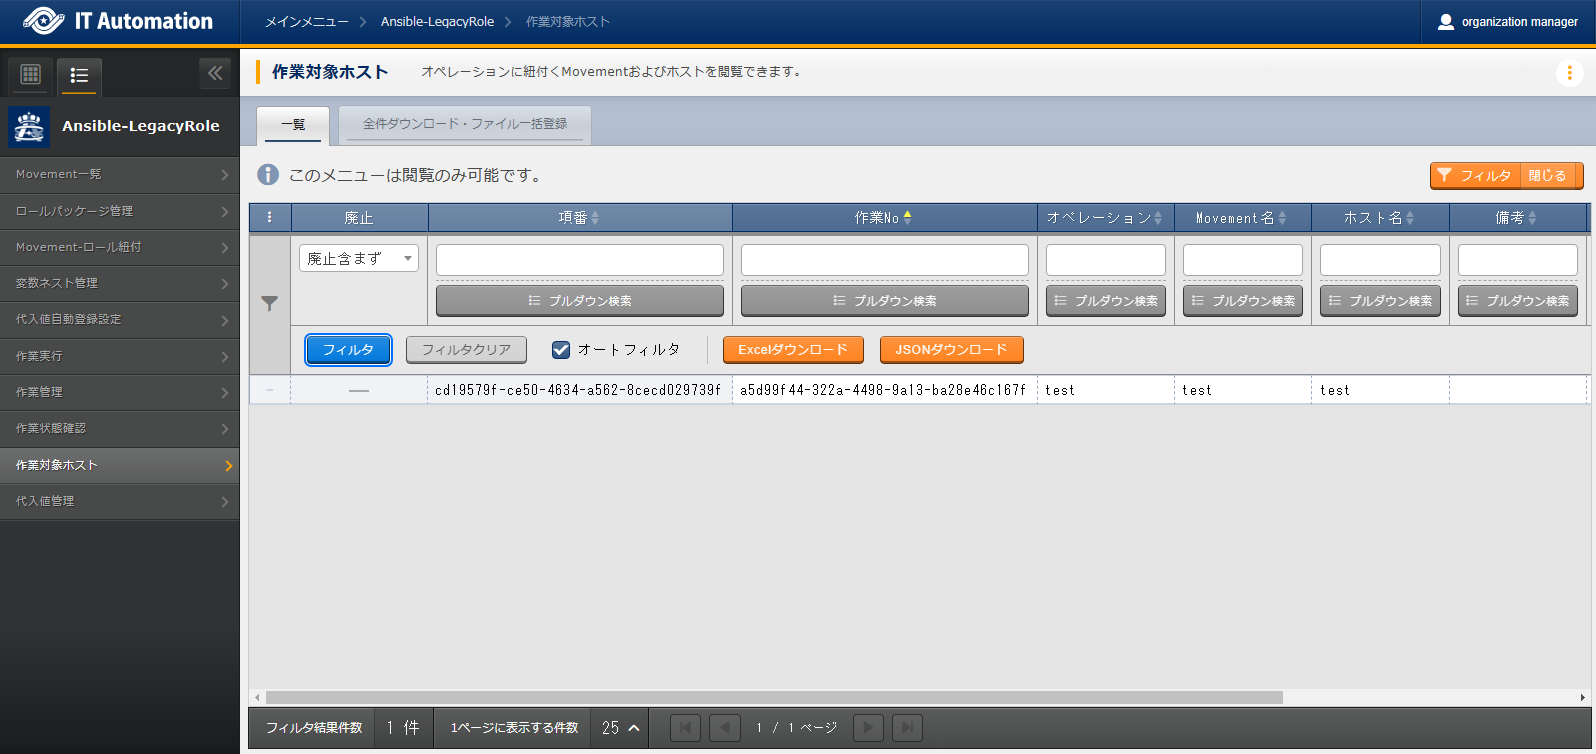
図 3.49 Submenu (Target host)
- The items found in the view page are as following.
表 3.35 View page item list (Target host)¶ Item
Description
Item number
Displays an automatically given unique ID (36 characters)
Execution number
Displays the Execution number when executed.
Operation
Displays the Operation when executed.
Movement name
Displays the Movement when executed.
Host name
Displays the Target host when Executed.
Remarks
Free description field
Substitute value management
- Displays the Variable's specific values.
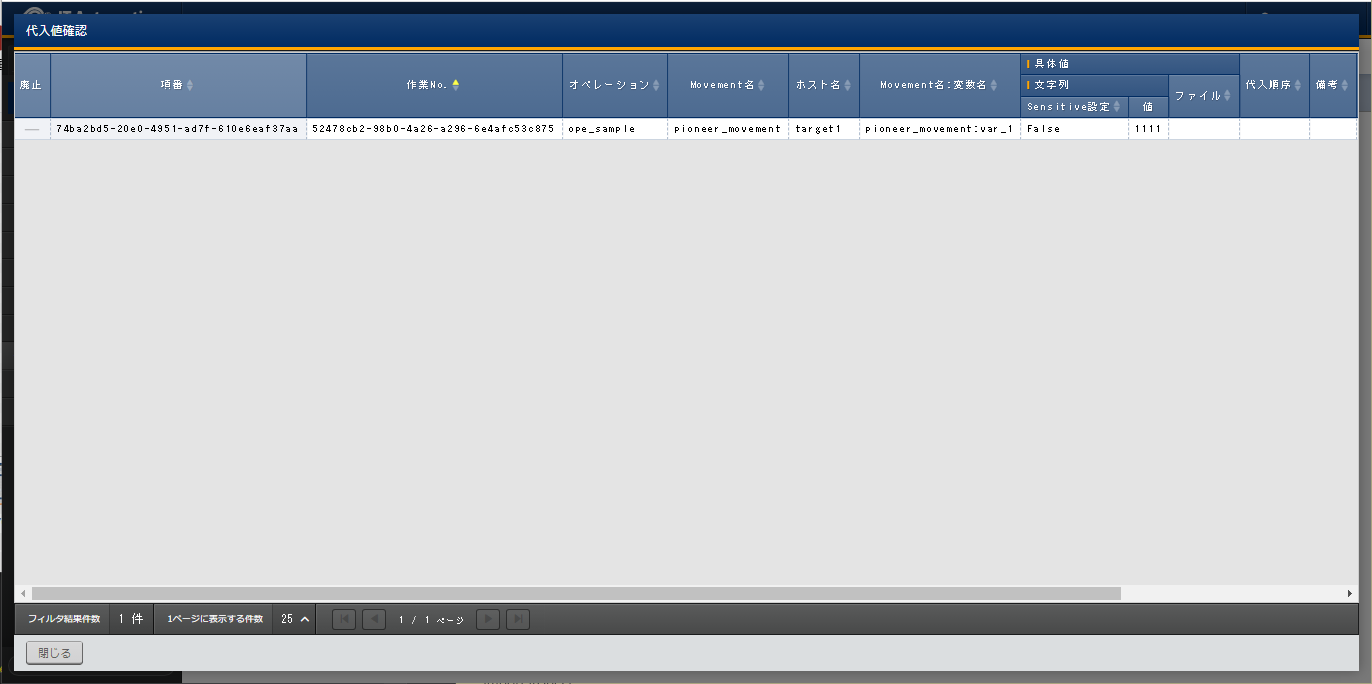
図 3.50 Submenu (Substitute value management)
- The items found in the page are as following.
表 3.36 View page item list (Substitute value management)¶ Item
Description
Item number
Displays an automatically given unique ID (36 characters).
Execution number
Displays the Execution number when executed.
Operation
Displays the selected Operation.
Movement name
Displays the selected Movement.
Host name
Displays the selected Target host.
Movement name:Variable name
Displays the Variable name when executed
- Specific
value
String
Sensitive settings
Displays either "True" or "False".
Value
Displays the Variable's Specific value when executed.
- If the are set to "True"The Specific value input to the Parameter sheet will be encrypted and not be viewable on ITA. The variable's Specific value has its encrypted contents configured by ansible-vault.
- If the are set to "False"The Specific value input to the Parameter sheets will be displayed.
File
Displays the File name linked to the Variables.
Substitute order
If the variable is a Multiple Specific Value Variable, the Substitute order will be displayed.
Remarks
Free description field
3.6. Writing Interactive files (Ansible-Pioneer)
Terminology |
Description |
|---|---|
Command prompt |
Strings waiting for command input when ssh connecting to the target server from a terminal, |
Standard output |
Command process result output from the Command prompt after input a command to the target server. |

図 3.51 Command prompt standard output
3.6.1. Interactive file structure
Section name |
Application |
|---|---|
conf |
Specify the timeout value according to timeout parameter. timeout value: 1~3600(unit:second) |
exe_list |
Construct the target host with 4 kinds of dialog commands. |
- e.g.)conf session's timeout parameter example
# Comment
conf:
△△timeout: 10
exec_list:

△:half width space
- e.g.)Password authentication input example.
exec_list:
  # Wait for ssh connection password input prompt and input the correct password.
  - expect: '*assword'
    exec: 'password'
3.6.2. Interactive Module
Module |
Application |
|---|---|
expect |
Input commands after waiting for the command prompt from the target host. |
state |
Input the command to target host. The contents of the standard output until the prompt is output to the standard output are analyzed by external shell, and the result is determined. |
command |
Loops and conditional branching can be performed before and after inputting commands to the target host. |
localaction |
Input command in the environment Ansible Core/Ansible Automation Controller/Ansible execution agent is executed. |
expect module
Overview

Format
Input example
- e.g.)expect module input example.
# Wait for ssh connection password input prompt and input the correct password.
- expect: '*assword'
  exec: 'password'
state module
Overview
Format
Input examples
- e.g.)state module Input examples
# cat the hosts file and grep the displayed results with parameter value.
# If there is line containing 127.0.0.1 or lalhost, the result is determined as normal and proceed to the next.
# If there is no such line, the result is determined as abnormal and the interactive file is terminated abnormally.
exec_list:
  - state: 'cat /etc/hosts'
    prompt: '{{ __loginuser__ }}@{{ __inventory_hostname__ }}'
    parameter:
      - '127.0.0.1'
      - 'localhost'
  - expect: '{{ __loginuser__ }}@{{ __inventory_hostname__ }}'
    exec: exit
- e.g.)Using success_exit
# cat the hosts file and grep the displayed results with parameter value.
# If there is line containing 127.0.0.1 or lalhost, the result is determined as normal and proceed to the next.
# 対象If there is no such line, the result is determined as abnormal and the interactive file is terminated abnormally.

exec_list:
  - state: 'cat /etc/hosts'
    prompt: '{{ __loginuser__ }}@{{ __inventory_hostname__ }}'
    parameter:
      - '127.0.0.1'
      - 'localhost'
    success_exit: yes
  - expect: '{{ __loginuser__ }}@{{ __inventory_hostname__ }}'
    exec: exit
- e.g.)Using ignore_errors
# cat the hosts file and grep the displayed results with parameter value.
# If there is line containing 127.0.0.1 or lalhost, the result is determined as normal and proceed to the next.
# If there is no such line, the result is determined as abnormal and proceed to the next according to the ignore_errors:yes settings.

exec_list:
 - state: 'cat /etc/hosts'
   prompt: '{{ __loginuser__ }}@{{ __inventory_hostname__ }}'
   parameter:
     - '127.0.0.1'
     - 'localhost'
   ignore_errors: yes
 - expect: '{{ __loginuser__ }}@{{ __inventory_hostname__ }}'
   exec: exit
- e.g.)Using shell
# cat the hosts file and evaluate the contents output by the user created shell.
# Parameter value is given using user created shell parameter.
# If a user created shell ends in an error, the interactive file will end.

exec_list:
 - state: 'cat /etc/hosts'
   prompt: '{{ __loginuser__ }}@{{ __inventory_hostname__ }}'
   shell: '/tmp/grep.sh'
   stdout_file: '/tmp/stdout.txt'
   parameter:
     - '127.0.0.1'
     - 'localhost'
 - expect: '{{ __loginuser__ }}@{{ __inventory_hostname__ }}'
   exec: exit
- e.g.) User shell(/tmp/grep.sh) example
#!/bin/bash
STDOUT=/tmp/STDOUT.tmp
STDERR=/tmp/STDERR.tmp
cat $1 | grep $2 | grep $3 | wc -l >${STDOUT} 2>${STDERR}
RET=$?
if [ $RET -ne 0 ]; then
   EXIT_CODE=$RET
else
   if [ -s ${STDERR} ]; then
       EXIT_CODE=1
   else
       CNT=`cat ${STDOUT}`
       if [ ${CNT} -eq 0 ]; then
           EXIT_CODE=1
       else
           EXIT_CODE=0
       fi
   fi
fi
/bin/rm -rf ${STDOUT} ${STDERR} >/dev/null 2&>1
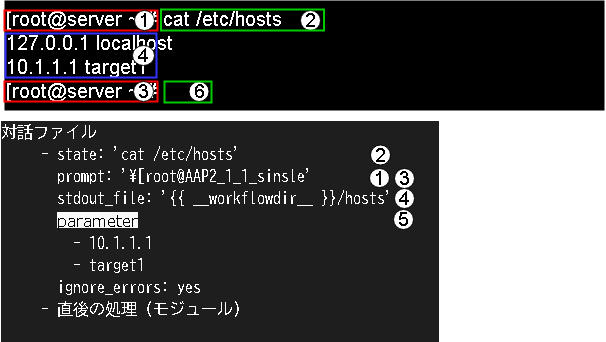
- e.g.)Save target host file to "Result data" with state.
# cat the hosts file and save the displayed result to the file specified by stdout_file then proceed to the next.
# Will end in error if the default shell parameter is not configured. Set ignore_errors: yes in order to move to the next process.
exec_list:
 - state: 'cat /etc/hosts'
   prompt: '{{ __loginuser__ }}@{{ __inventory_hostname__ }}'
   stdout_file: '{{ __workflowdir__ }}/hosts'
   ignore_errors: yes
 - expect: '{{ __loginuser__ }}@{{ __inventory_hostname__ }}'
   exec: exit
command module
Overview
Format
Input examples
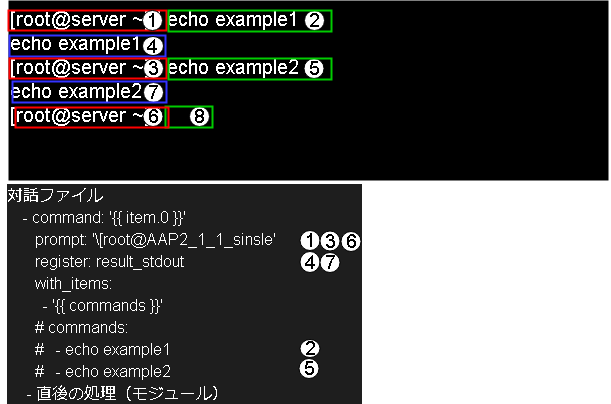
- e.g.) command module Input examplesInputting the following commands with the command module
systemctl start httpd
systemctl start mysql
The variable's specific values used with "with_items" and the interactive file description are as following.- Interactive file contents
- command: "systemctl  {{ item.0 }}  {{ item.1 }}"
  prompt: '{{ item.2 }}'
  timeout: '{{ item.3 }}'
  with_items:
    - '{{ VAR_status_list }}'    # item.0
    - '{{ VAR_service_list }}'   # item.1
    - '{{ VAR_prompt_list }}'    # item.2
    - '{{ VAR_timeout_list }}'   # item.3
- Variable specific values using with_items
VAR_status_list:
  - start
  - start
VAR_service_list:
  - httpd
  - mysql
# there are 2 specific values used by command.
# The required amount of specific values for the variables using prompt and timeout is 3.
VAR_prompt_list:
  - Command prompt
  - Command prompt
  - Command prompt
VAR_timeout_list:
  - 10
  - 10
  - 10
- e.g.) Example using when
conf:
  timeout: 30

exec_list:
  - expect: 'password:'
    exec:   '{{ __loginpassword__ }}'

  # If the ITA variable, VAR_hosts_make, is written in host variable file(The parameter sheet items and variables are linked in Susbtitute value auto registration), cat the host file.
  # If the variable are not written, the command is skipped.
  - command: cat /etc/hosts
    prompt: '{{ __loginuser__ }}@{{ __inventory_hostname__ }}'
    when:
      - VAR_hosts_make is define
  - expect: '{{ __loginuser__ }}@{{ __inventory_hostname__ }}'
    exec: exit
- e.g.) Example using exec_when and register
conf:
  timeout: 30

exec_list:
  - expect: 'password:'
    exec:   '{{ __loginpassword__ }}'

  # If the ITA variable, VAR_hosts_make, is written in host variable file, cat the host file.
  # If the variable are not written, the command is skipped.
  # Use cat to save the contents of the standard output hosts file to result_stdout.
  - command: cat /etc/hosts
    prompt: '{{ __loginuser__ }}@{{ __inventory_hostname__ }}'
    register: result_stdout
    when:
      - VAR_hosts_make is define

  # If the ITA variable, VAR_hosts_make, is written in host variable file, cat the host file.
  # Input commad. If the variable are not written, the command is skipped.
  # Execute the command for the numbers of the specific values of the multiple specific value variables set in the with_items.
  # From the result of condition judgment for each loop, if "ip address host name" does not
  # correspond to the hosts file, Input command.  "IP address Host name" is added to the end of the hosts file.。
  - command: 'echo {{ item.0 }}  {{ item.1 }} >> /etc/hosts'
    prompt: '{{ __loginuser__ }}@{{ __inventory_hostname__ }}'
    when:
      - VAR_hosts_make is define
    with_items:
      - '{{ VAR_hosts_ip }}'     # item.0
      - '{{ VAR_hosts_name }}'   # item.1
    exec_when:
      - result_stdout no match({{ item.0 }} *{{ item.1 }})

  - expect: '{{ __loginuser__ }}@{{ __inventory_hostname__ }}'
    exec: exit
- e.g.)Example using failed_when
conf:
  timeout: 30

exec_list:
  - expect: 'password:'
    exec:   '{{ __loginpassword__ }}'

  # Execute the command for the numbers of the specific values of the multiple specific value variables set in the with_items.
  # Configure auto startup for the service.
  - command: 'systemctl enable {{ item.0 }}'
    prompt: '{{ __loginuser__ }}@{{ __inventory_hostname__ }}'
    with_items:
      - '{{ VAR_service_name_list }}'  # item.0

  # Execute the command for the numbers of the specific values of the multiple specific value variables set in the with_items.
  # Start the service.
  - command: 'systemctl start {{ item.0 }}'
    prompt: '{{ __loginuser__ }}@{{ __inventory_hostname__ }}'
    with_items:
      - '{{ VAR_service_name_list }}'  # item.0

  # Execute the command for the numbers of the specific values of the multiple specific value variables set in the with_items.
  # outputs service status (stdout)
  # If the content of result output to standard output contains the regular expression of item.1, the result is right.
  # For example, in the case that the specific value of VAR_service_status_list is set to running and the service is running, "running" in "Active: active(running)" matches so the result is right. (Move on to the next loop)
  # In the case that condition doesn't match, the result is determined as abnormal and the dialog file terminates abnormally.
  - command: 'systemctl status {{ item.0 }}'
    prompt: '{{ __loginuser__ }}@{{ __inventory_hostname__ }}'
    with_items:
      - '{{ VAR_service_name_list }}'  # item.0
      - '{{ VAR_service_status_list }}'  # item.1
    failed_when:
      - stdout match({{ item.1 }})

  - expect: '{{ __loginuser__ }}@{{ __inventory_hostname__ }}'
    exec: exit
- e.g.) Example using when with or/and condition
conf:
  timeout: 30

exec_list:
  - expect: 'password:'
    exec:   '{{ __loginpassword__ }}'

  # Example of compound condition using and / or.
  # When processing with or condition, write the if statement horizontally.
  # When processing with and condition, describing the statement in multiple lines.
  # "when" is used as the example here but the same applies to exec_when and failed_when.
  - command: systemctl stop my_service
    prompt: '{{ __loginuser__ }}@{{ __inventory_hostname__ }}'
    when:
      - '{{ VAR_status }} == 10 OR {{ VAR_status }} == 11'
      - '{{ VAR_sub_status }} == 20 OR {{ VAR_sub_status }} == 21'

  - expect: '{{ __loginuser__ }}@{{ __inventory_hostname__ }}'
    exec: exit
localaction module
Overview
Format
Input examples
- e.g.)localactionのInput examples
exec_list:
  - expect: 'password:'
    exec:   '{{ __loginpassword__ }}'
  # Create a directory to output the hosts file for every host in the shared directory ({{ __symphony_workflowdir__ }}) of each Movement.
  - localaction: mkdir -p 0755 {{ __workflowdir__ }}/{{ __inventory_hostname__ }}
    ignore_errors: yes
  # Output hosts file contents to the directory created with localaction.
  - state: cat /etc/hosts
    prompt: '{{ __loginuser__ }}@{{ __inventory_hostname__ }}'
    stdout_file: '{{ __workflowdir__ }}/{{ __inventory_hostname__ }}/hosts'
    ignore_errors: yes
  - expect: '{{ __loginuser__ }}@{{ __inventory_hostname__ }}'
    exec: exit
3.6.3. Regular expression
Target character |
After Escape |
|---|---|
\ |
\\
|
* |
\* |
. |
\. |
+ |
\+ |
? |
\? |
| |
\| |
{ } |
\{ \} |
( ) |
\( \) |
[ ] |
\[ \] |
^ |
\^ |
$ |
\$ |
- e.g.) Good example
expect: 'XAMPP Developer Files ¥[Y/n¥] exec_list:'
- e.g.) Bad example
expect: 'XAMPP Developer Files [Y/n] exec_list:'
3.6.4. Warning
Using state module and command module
- If the prompt parameter is a backward match in the regular table ". *If the prompt parameter contains the backward match ".If the backward match ". *Ј*", the result of the executed command (standard output) will be empty.D not use backward match regular expressions.
- e.g.)Regular expression backmatches
- state: echo 'saple data'
  prompt: '\.\*{{ __loginuser__ }}@{{ __inventory_hostname__ }}'
  stdout_file: '{{ __workflowdir__ }}/{{ __inventory_hostname__ }}/hosts'
- Processing interactive commandsNot processed with command and state modules, Create interactive files with expect module.
- e.g.)Interactive command "ssh-keygen" process example
# Process ssh-keygen in a dialogue file
conf:
  timeout: 10

exec_list:
  # ssh connection Password authentication
  - expect: 'assword:'
    exec: '{{ __loginpassword__ }}'

  # Execute ssh-keygen command
  - expect: '{{ __loginuser__ }}@{{ __loginhostname__ }}'
    exec: ssh-keygen

  # The following is the process for prompts other than the command prompt.
  # Set file path of the secret key
  # Since expect is evaluated in regular notation, the escape character (\) must be inserted for characters that needs escape
  - expect: 'id_rsa\):'
    exec: '{{ VAR_id_rsa_path }}'

  # Configure Passprhase
  - expect: ' passphrase\):'
    exec: '{{ VAR_passphrase }}'

  # Configure Passprhase
  - expect: ' passphrase again:'
    exec: '{{ VAR_passphrase }}'

  # Check generated secret key file
  - expect: '{{ __loginuser__ }}@{{ __loginhostname__ }}'
    exec: 'ls -al {{ VAR_id_rsa_path }}'

  # Close ssh connection
  - expect: '{{ __loginuser__ }}@{{ __loginhostname__ }}'
    exec: exit
Using multiple specific value variables
Ending interactive files
- e.g.)Putting "exit" command for ending the session at the end of the interactive file.
conf:
  timeout: 10

exec_list:
  # ssh connection Password authentication
  - expect: 'assword:'
    exec: '{{ __loginpassword__ }}'

  # Copy file
  - expect: '{{ __loginuser__ }}@{{ __loginhostname__ }}'
    exec: 'cp -rfp {{ VAR_src_path }} {{ VAR_dest_path }}'

  # Write a line that waits for the previous command to end in the command prompt and inputs an exit command at the end of the Interactive file.
  - expect: '{{ __loginuser__ }}@{{ __loginhostname__ }}'
    exec: exit
Writing interactive files in YAML format
- When the Module parameters are not enclosed in quotation marks when inputting variables into them.
- When each parameter is described by a constant only and the entire parameter is not enclosed in quotation marks, e.g. when the constant ends in ":".
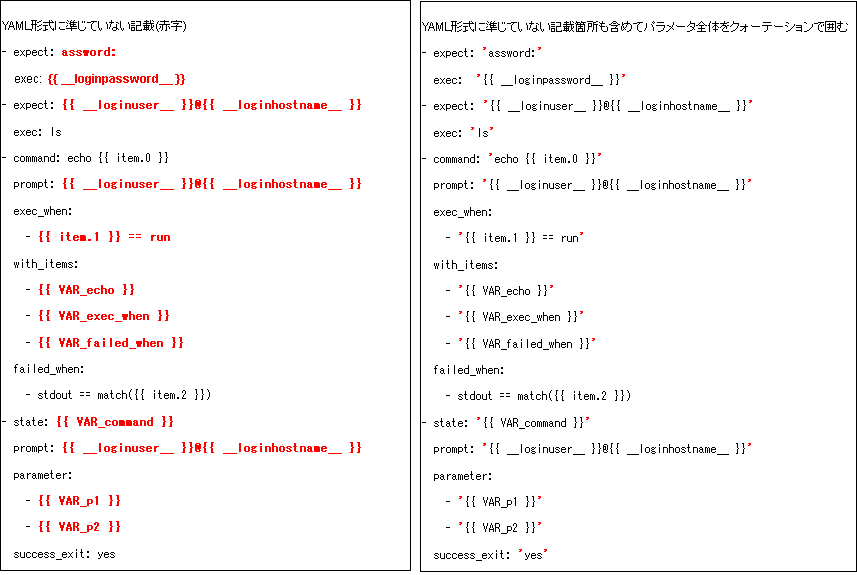
図 3.52 Writing Interactive files in yaml format
LANG for Target device login user
Termination codes for commands input to the target device
The termination code for the code executed to the target host sends "LF". If the termination code is "CRLF", add "r" to the end of the command.
conf:
  timeout: 10
exec_list:
  - expect: 'password:'
    exec: 'XXXXXXXX\r'
  - command: '{{ VAR_command }}\r'
    prompt: '{{ __loginuser__ }}@{{ __loginhostname__ }}'
  - state: '{{ VAR_state }}\r'
    prompt: '{{ __loginuser__ }}@{{ __loginhostname__ }}'
    parameter:
     - '{{ VAR_parameter1 }}'
     - '{{ VAR_parameter2 }}'
Operating System Command sequence
3.7. Appendix
3.7.2. Result data created when executing Ansible
File list saved to Ansible-Pioneer result data
File name |
Recorded contents |
Ansible Core |
Ansible Automation Controller |
Ansible Execution Agent |
|---|---|---|---|---|
result.txt |
Records Ansible execution result's execution results |
〇 |
||
error.log |
Error output file with Executing.
Ansible-playbbok command standard error output file.
Contents displayed in the Execute confirmation error log.
|
〇 |
〇 |
|
exec.log.org |
xecution log output by Ansible-playbook |
〇 |
〇 |
〇 |
exec.log |
Edited Aexec.log.org
Contents displayed to the Execution confirmation execution log
|
〇 |
〇 |
〇 |
exec_<Execution number>_<group number> |
Divided execution log file
For more information regarding file name conventions, see the execution log in Confirm execution status .
|
〇 |
||
forced.txt |
Text file if stopped with Emergency stop |
〇 |
〇 |
|
user_files |
A directory where files are recorded when some file is output to ITA's original variable "__workflowdir__" in the playbook executed. |
〇 |
〇 |
〇 |
child_exec.log
child_error.log
|
ansible-builder execution log |
〇 |