
4. Ansible-LegacyRole
4.1. Introduction
4.2. Ansible-LegacyRole overview
4.4. Ansible-LegacyRole procedure
4.4.1. Ansible-LegacyRole workflow
Workflow details and references
- Register connection information for the targetFrom the menu, register connection information for the target.For more information, see Device list.
- Register operation nameFrom the menu, register an Operation list.For more information, see Operation list.
- **Register Ansible Automation Controller host information (if needed) **From the menu, Register information for the Ansible Automation Controller host.For more information, see Ansible Automation Controller host list.
- Register Interface informationFrom the menu, select Ansible Core, Ansible Automation Controller or Ansible Execution Agent for the execution engine and register connection information for the execution engine serverFor more information, see Interface information.
- Register Execution environment definition template management(If needed)From the menu, Register the template file for the Execution environment definition file (execution-environment.yml) which is used to build the Execution environment by the ansible-builder within the Ansible Execution Agent.For more information, see ansible_execution_environment_definition_template_list and Using the Template file registered to Ansible common ▶ Execution environment definition template ` and :menuselection:"Execution Environment Parameter Definition" Parameter sheet`.Installing ITA registers a template file that allows users to add python module and ansible galaxy collections.
- Register "Execution environment parameter definition" parameter sheet. sheet(If needed)Register Parameters that will be embedded to the execution environment definition file (execution-environment.yml) template file registered in .For more information, see Using the Template file registered to Ansible common ▶ Execution environment definition template ` and :menuselection:"Execution Environment Parameter Definition" Parameter sheet`.Installing ITA registers , the with the parameters that embeds to the execution environment definition template file (execution-environment.yml) file is registered.
- Register Execution environment management (If needed)Register a link between the and the template file for the execution environment definition file (execution-environment.yml) registered inFor more information, see Execution environment management.Installing ITA registers a link between the and .
- Register Role packageFrom the menu, register a Role package.For more information, see Role package management console.
- **Register Global variables (if needed) **From the menu, register global variables to be used in the Playbook.For more information, see Global variable management.
- **Register Template files (if needed) **From the menu, register template files and template embedded variables to be used in the Playbooks.For more information, see Template management.
- **Register File material (if needed) **From the menu, register file materials and file embedded variables to be used in the Playbooks.For more information, see File management.
- **Register Unmanaged variables (if needed) **From the menu, register extracted variables which will not be displayed in 's .For more information, see Unmanaged target variable list.
- Register Role package to MovementFrom the menu, register a link between the registered Movement and the Role package.For more information, see Movement-Role link.
- Register Multistage variable maximum repetitions(if needed)From the register maximum repetitions for the Member variable array defined in the Multistage variable arrays.For more information, see Variable nest management.
- Create parameter sheetFrom the menu, create a Parameter sheet which will have data registered to it that can configure settings for the target.For more information, see Parameter sheet creation function.
- Register data to Parameter sheetRegister data to the parameter sheet created in the previous step.For more information, see Parameter sheet creation function.
- Substitute value auto registration settingsFrom the menu, link the Movement variables with the Parameter sheet's item's setting values.For more information, see Substitute value auto registration settings.
- ExecuteFrom the menu, select the desired Movement and Operation and execute them.For more information, see Execute.
- Confirm execution statusFrom the menu,the status of all previously executed operations will be updated in realtime. Users can also monitor error logs and execution logs as well as stop them with an emergency stop.For more information, see Confirm execution status.
- Confirm execution historyFrom the menu, users can check the history of all previously executed operations..For more information, see Execution management.
4.5. Ansible-LegacyRole menu operation
4.5.1. Basic console
4.5.2. Ansible common
4.5.3. Ansible-LegacyRole
Movement list
- Maintains (view.register/edit/discard) Movement information.
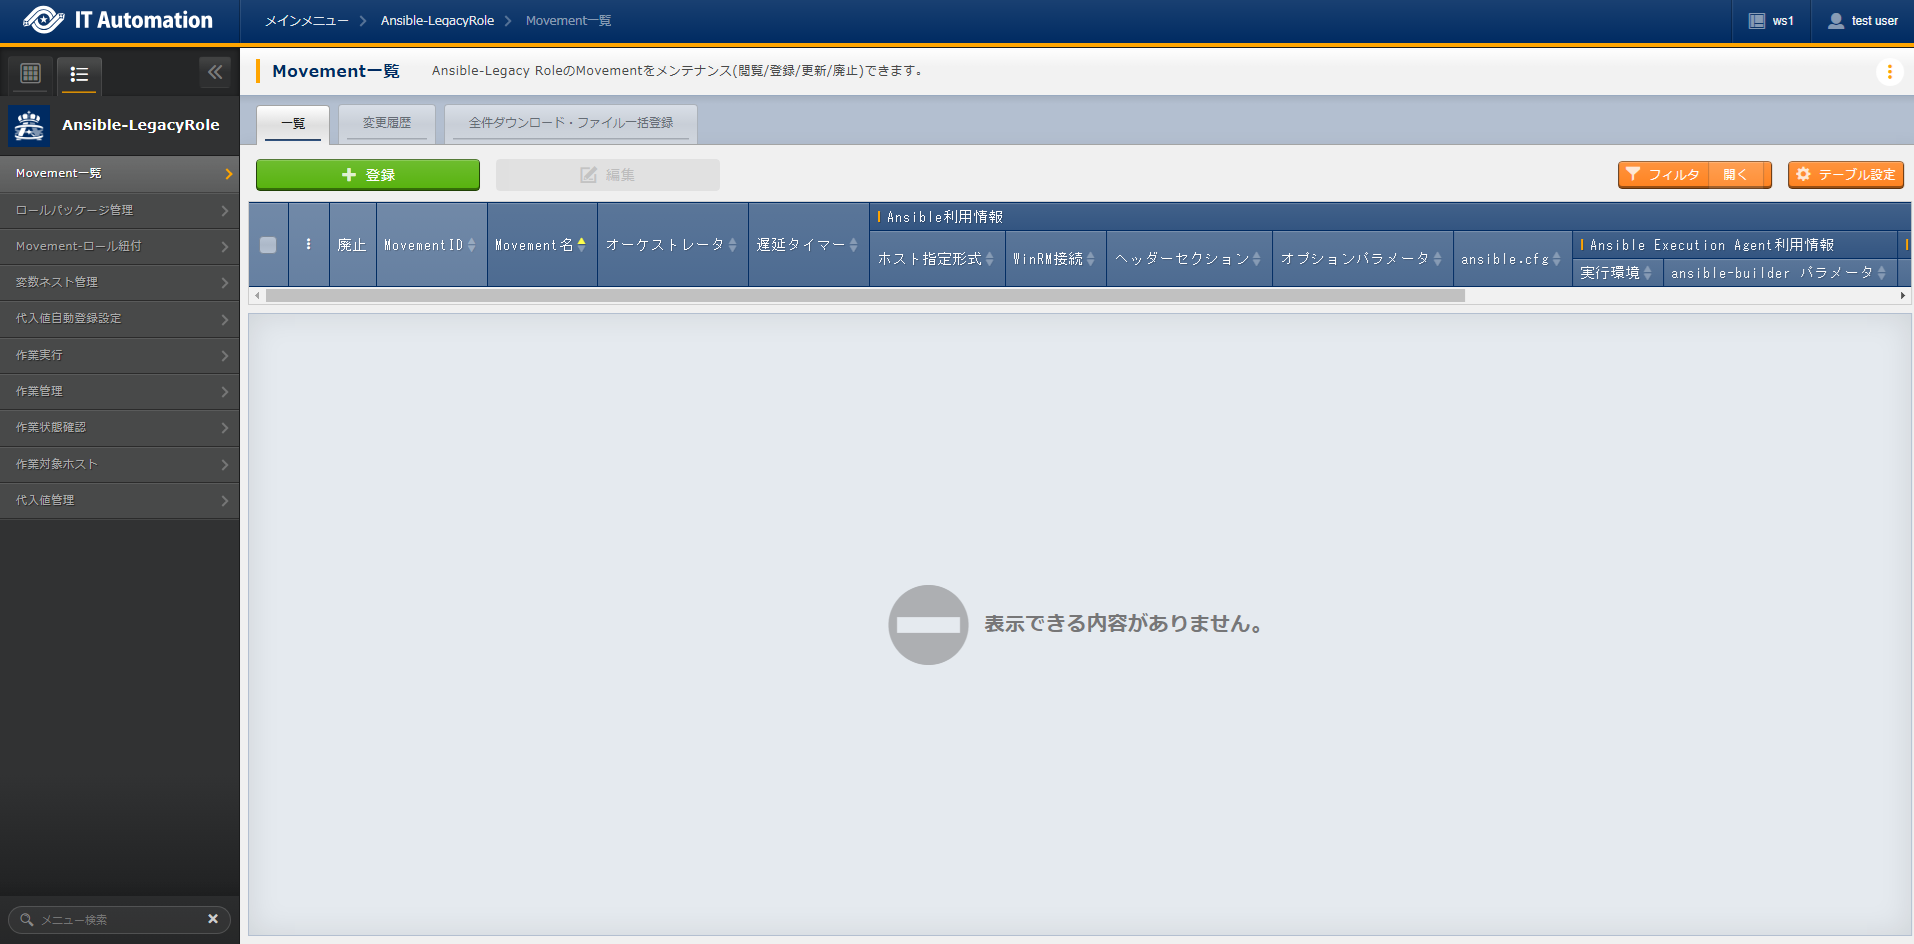
図 4.13 Submenu (Movement list)
- Press the Register button to register Movement information.
図 4.14 Registration page (Movement list)
- The items found in the registration page are as following.
Tip
※1 If the has "become: yes" configured.The following settings must be configured to the target.Login user must have sudo permission NOPASSWD configured to/etc/sudoerswith NOPASSWD.Demo_user ALL=(ALL) NOPASSWD:ALLTip
※2 Select from data fetched from Ansible Automation Controller data synchronization.警告
If is set to "True", the connecting hosts will be all Windows servers..
Role package management console
- Maintains (view/register/edit/discard) Role package files .Make sure to register a directory with a hierarchy that has "roles" compressed in a ZIP file. For more information regarding Role package directories, see Writing Role packages .

図 4.15 Submenu(Role package management)
- Press the Register to register Role packages.
図 4.16 Registration page (Role package management)
- The items found in the registration page are as following.
警告
警告
Movement-Role link
- Maintain (view/register/edit/discard) links between Role packages and Movements.

図 4.17 Submenu(Movement-Role link)
- Press the Register to register the Role package that will be included in the Movement.

図 4.18 Registration page (Movement-Role link)
- The items found in the registration page are as following.
表 4.10 Registration page Item list(Movement-Role link)¶ Item
Description
Input required
Input method
Restrictions
Item number
Displays an automatically numbered string of 36 characters.ー
Automatic
ー
Movement
Displays registered in the menu.Select a Movement〇
List selection
ー
Role package:Role name
Displays Role names included in the registered in .Select the Role package role that will be included in the Movement.It is not possible to register multiple role packages to a single Movement.〇
List selection
ー
Include order
Input the order in which the role will be executed (1~).The input include order executes the Roles in rising order.〇
Manual
1~2,147,483,647
Remarks
Free description field
ー
Manual
Maximum length 4000 bytes
Variable nest management
- Maintain (view/edit) maximum repetitions of the Member variable array from the Multistage variable defined in the registered in .For more information, see Substitute value auto registration settings.
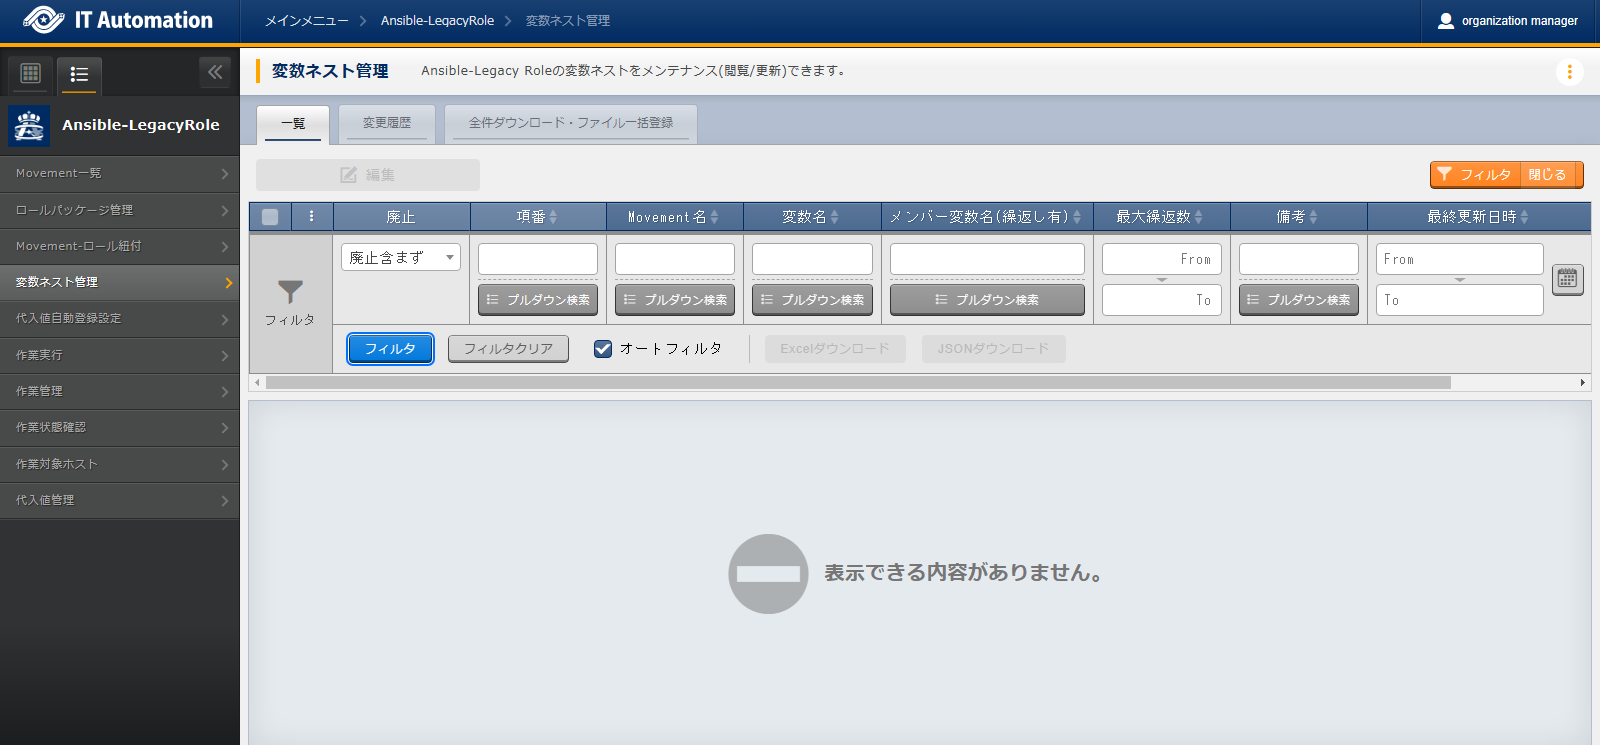
図 4.19 Submenu(Variable nest management)
- Press the Register button to edit the maximum amount of repetitions.
図 4.20 Registration page (Variable nest management)
- The items found in the registration page are as following.
表 4.11 Registration page Item list(Variable nest management)¶ Item
Description
Input required
Input method
Restrictions
Item number
Displays an automatically numbered string of 36 characters.ー
Automatic
ー
Maximum repetitions
Input a value between 1~1,024 for the maximum repetitions.The maximum value can be changed by configuring the MAXIMUM_ITERATION_ANSIBLE-LEGACYROLE in Management Console - System settings〇
Manual
Input value from 1~1,024(Can be changed from System settings)
Remarks
Free description field
ー
Manual
Maximum length 4000 bytes
警告
Substitute value auto registration settings
- Links (view/register/edit/discard) parameter item setting values and Movement variables.
|The registered information is displayed in and when executed by internal processes.

図 4.21 Submenu (Substitute value auto registration settings)
- Press the Register button to register a link between the Movement variables and Parameter sheet item setting values

図 4.22 Registration page (Substitute value auto registration settings)
- The items found in the registration page are as following.
Tip
Tip
- Define variables to the Role package variable definition file (defaults/main.yml) as below and register Role package inVariable definition file contents
VAR_aaaa:
  - name: alice
    object: obj1
    directory:
      - craete_dir: /dir
    password:
      - craete_pass:
        sample:
          - sample_pass: pass1
      - craete_pass:
        sample:
          - sample_pass: pass2
    user:
      root:
        - craete_users:
          prod:
            - prod_user: user1
          dev:
            - dev_user: user2
- If a role package is registered with variables defined like in Step 1. the following will be registered to and the user will able to select the following member variables in by default.
表 4.12 Variable nest management registration contents¶ Variable name
Member variable name
Maximum repetitions
VAR_aaaa
0
1
VAR_aaaa
0.directory
1
VAR_aaaa
0.password
1
VAR_aaaa
0.password.sample
1
VAR_aaaa
0.user.root
1
VAR_aaaa
0.user.root.dev
1
VAR_aaaa
0.user.root.prod
1
表 4.13 Selectable Member variables in Substitute value auto registration settings¶ Variable name
Member variable name
VAR_aaaa
[0].directory[0].create_dir
VAR_aaaa
[0].name
VAR_aaaa
[0].object
VAR_aaaa
[0].password[0].create_pass
VAR_aaaa
[0].password[0].sample[0].sample_pass
VAR_aaaa
[0].user.root[0].create_users
VAR_aaaa
[0].user.root[0].dev[0].dev_user
VAR_aaaa
[0].user.root[0].prod[0].prod_user
- In , edit the Member variable "0.user.root.prod"'s Maximum repetitions from "1" to "3".
表 4.14 Variable nest management edited contents¶ Variable name
Member variable name
Maximum repetitions
VAR_aaaa
0.user.root.prod
3
- If the member variables are edited like they were in Step 3., The selectable member variables in are also changed.(Member variable [0].user.root[0].prod[1].prod_user and [0].user.root[0].prod[2].prod_user are added to the pulldown selection)
表 4.15 Selectable Member variables in Substitute value auto registration settings¶ Variable name
Member variable name
VAR_aaaa
[0].directory[0].create_dir
VAR_aaaa
[0].name
VAR_aaaa
[0].object
VAR_aaaa
[0].password[0].create_pass
VAR_aaaa
[0].password[0].sample[0].sample_pass
VAR_aaaa
[0].user.root[0].create_users
VAR_aaaa
[0].user.root[0].dev[0].dev_user
VAR_aaaa
[0].user.root[0].prod[0].prod_user
VAR_aaaa
[0].user.root[0].prod[1].prod_user
VAR_aaaa
[0].user.root[0].prod[2].prod_user
Tip
- Follow the example below and define variables to the Role package variable definition file(defaults/main.yml) and register a Role package in .Variable definition file description contents
VAR_substitutionA:
  - user-name
  - group-name
  - meta-name

VAR_substitutionB:
  - login
  - authorized
  - space
  - cluster
- In :menuselection:`Ansible-LegacyRole --> Substitute value auto registration settings`m link Role variables and th setting values for items registered to the Parameter sheets.
表 4.16 Parameter sheet registration contents¶ Host name
Operation name
Parameter
Item1
Item2
Item3
Item4
test-host
test-ope
value1
value2
value3
value4
表 4.17 Substitute value auto registration settings registration contents¶ Menu name
Item
Variable name
Substitute order
sample-menu
Item1
VAR_substitutionA
30
sample-menu
Item2
VAR_substitutionA
10
sample-menu
Item3
VAR_substitutionA
20
sample-menu
Item1
VAR_substitutionB
2
sample-menu
Item2
VAR_substitutionB
4
sample-menu
Item3
VAR_substitutionB
1
sample-menu
Item4
VAR_substitutionB
3
- When executed, the host variable file (host_vars/test-host) will have the variables registered in Substitute value auto registration settings output similarly to the example below.Output to Host variable file
VAR_substitutionA:
  - value2
  - value3
  - value1
VAR_substitutionB:
  - value3
  - value1
  - value4
  - value2
Tip
- Follow the example below and define variables to the Role package variable definition file(defaults/main.yml) and register a Role package in .Variable definition file description contents
VAR_output:
  - name: alice
    group: root
    user:
      root:
        - craete_users:
          prod:
            - prod_user: user1
          dev:
            - dev_user: user2
- In the menu, link Role variables and setting values for items registered to the Parameter sheets.
表 4.18 Parameter sheet registration contents¶ Host name
Operation name
Parameter
Item1
Item2
test-host
test-ope
value1
value2
表 4.19 Substitute value auto registration settings registration contents¶ Menu name
Item
Variable name
Member variable name
sample-menu
Item1
VAR_output
[0].name
sample-menu
Item2
VAR_output
[0].user.root[0].dev[0].dev_user
- When executed, the host variable file (host_vars/test-host) will have the variables registered in Substitute value auto registration settings output similarly to the example below.Output to Host variable file
VAR_output:
  - name: value1
    user:
      root:
      - dev:
        - dev_user: value2
Tip
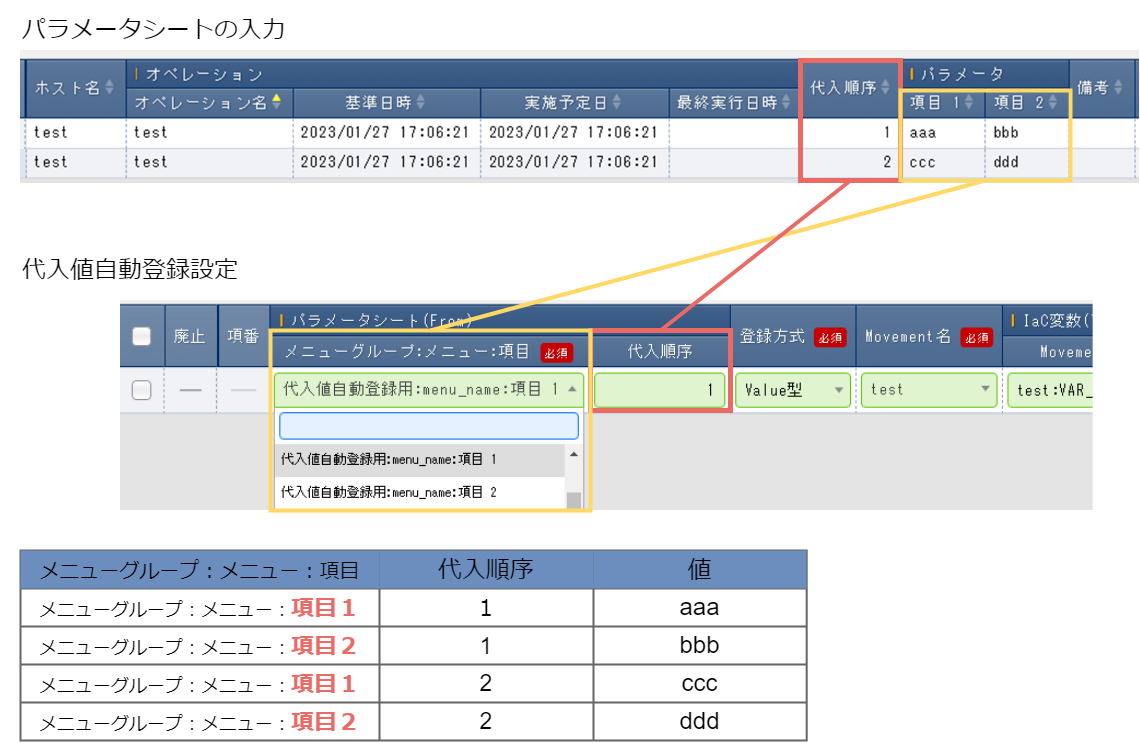
- Register the following in:menuselection:Ansible common --> File management / .
表 4.20 Template management registration contents¶ Template embedded variable name
Template file
TPF_sample
sample.tpl
- After creating "Ansible common:File management:File embedded variable name" and "Ansible common:Template management:Template embedded variable name" as Parameter sheet items in , register File embedded variables and Template embedded variables as the Parameter sheets' item values.
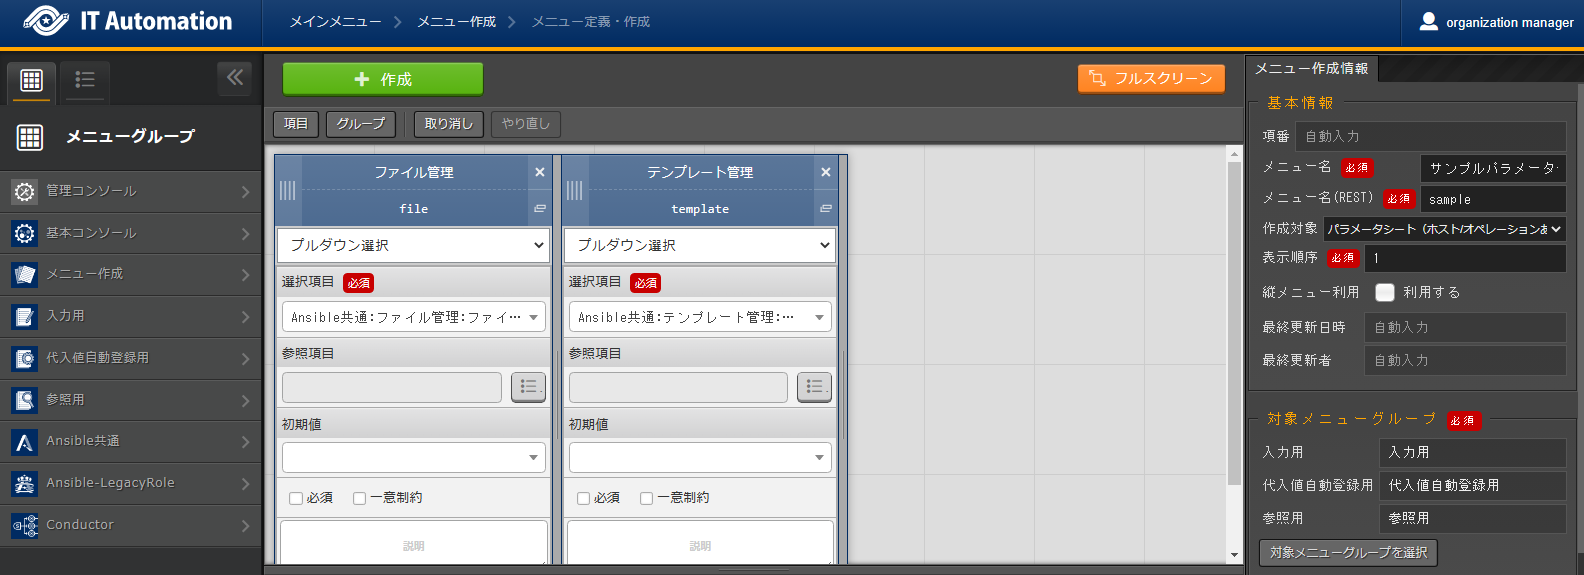
図 4.23 Define/Create parameter sheet
表 4.21 Sample parameter sheet registration contents¶ Host name
Operation name
Parameter
File management
Template management
test-host
test-ope
CPF_test
TPF_sample
- In , link the Playbook variable and the Item setting value of the Parameter sheet registered in Step 2. and Execute Ansible in .
表 4.22 Substitute value auto registration settings registration contents¶ Menu name
Item
Variable name
Sample parameter sheet
File management
VAR_filetest
Sample parameter sheet
Template management
VAR_temptest
- Click the 's Check substitute value button to check that the '{{ CPF_test }}' and '{{ TPF_sample }}' are dispalyed to the Specific value.

図 4.24 Confirm execution status Substitute value management
Execute
図 4.25 Execute menu
- ExecutePress the Execute button to run operations to the execution target.
- Dry runClicking the Dry run button allows the user to perform a dry run where the operation is not executed to the execution target.Dry runs will execute the Ansible-Playbook command's --check parameter.
- Check ParameterClicking the Check Parameter button allows users to check that the information registered in and the Operation and Movement link information is displayed to and without actually executing to the execution target.
Tip
Confirm execution status
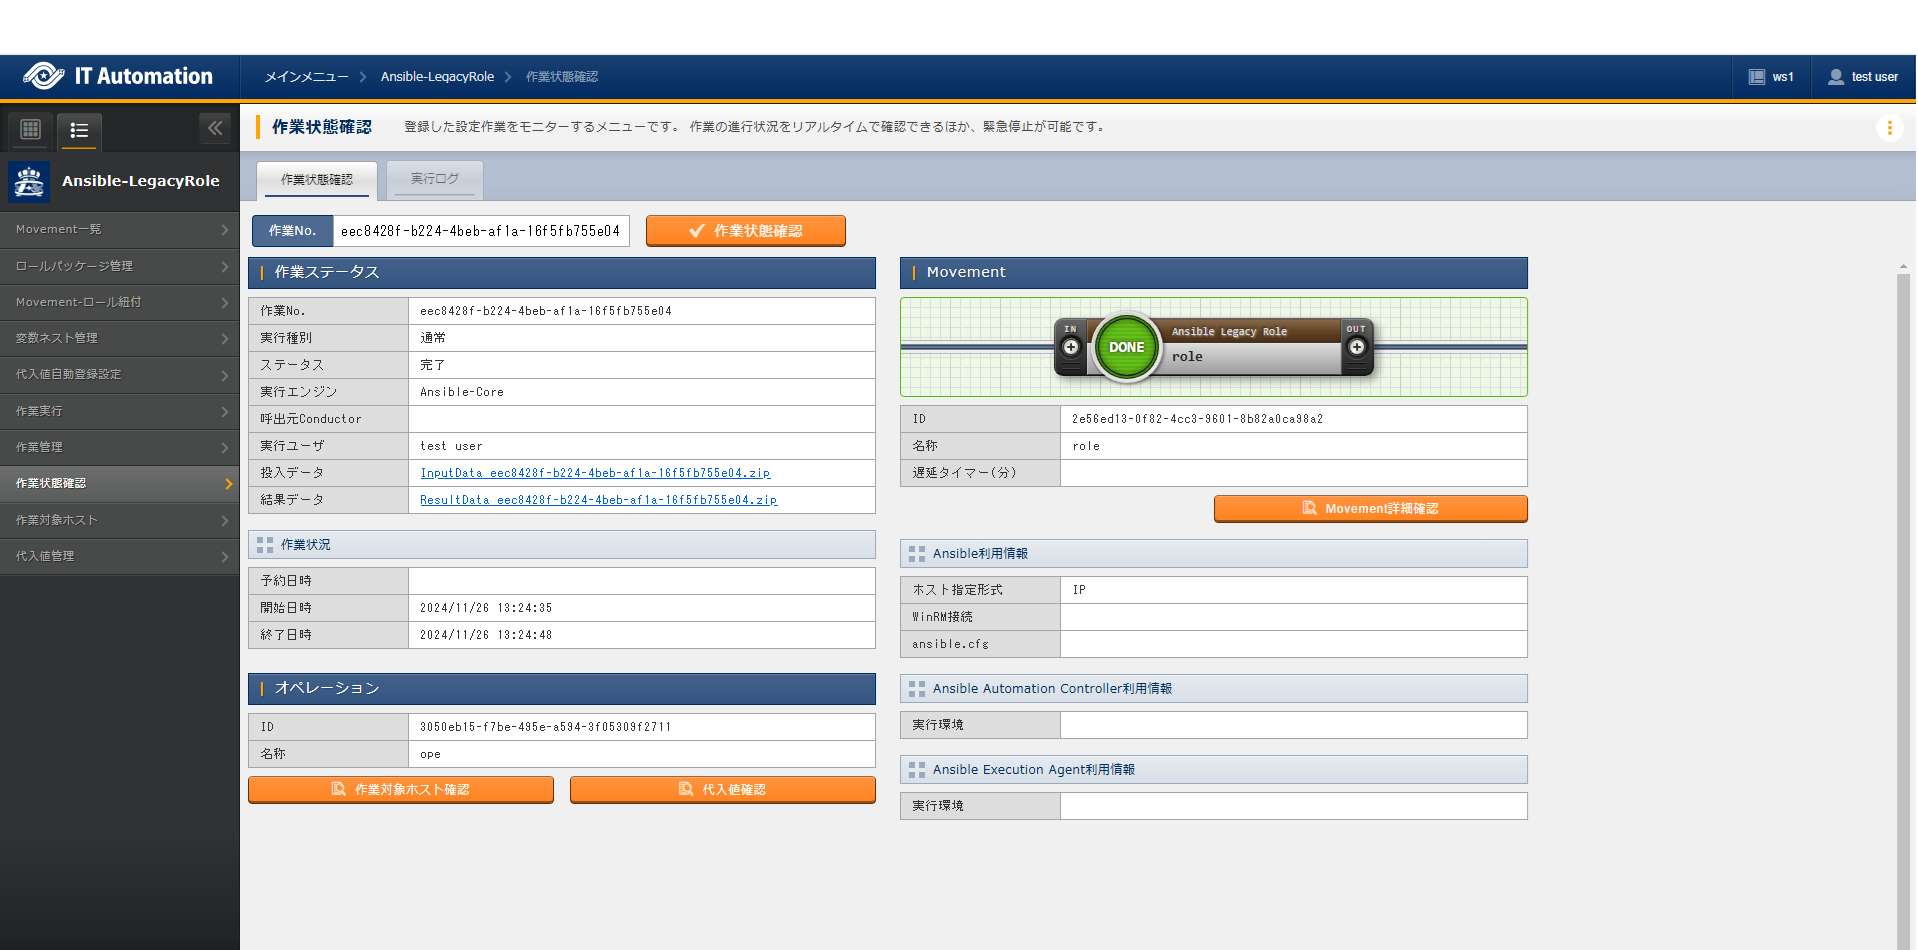
図 4.26 Submenu (Confirm execution status)
- Execution status displayThe status matching the Execution status is displayed.The execution log and error log also displays detailed information regarding the execution status.If the execute type is "Execute", "Normal" will be displayed. If Dry run is selected, "Dry run". If Parameter check is selected, "Parameter check" will be displayed.If the status ends in an unexpected error, a message will be displayed in the error log."Call Conductor" displays which Conductor was executed. This field will be blank if directly executed from Ansible-LegacyRole.
- Confirm Target hostClicking the Check Target host button displays where hosts from Operations and Movements are displayed.
- Confirm Substitute valueClicking the Check Sbstitute value button displays where users can see Specific values and Variables from Operations and Movements.
- Emergency stop/Delete reservationUsers can press the Emergency stop button to stop the operation.If the status was "Reserved execution", the Delete reservation button will be displayed. Check the Delete reservation button to delete the reservation
- Display execution logWhen Ansible Automation Controller is executed, the Playbook is executed in units of the device to be built grouped by the item values of 's ・ ・ ・ ・ ・ , which splits the execution logs.By specifying the number of job slices in the in or , the grouped targets can be further divided into the number of specified job slices before the Playbook is executed and the execution log is further divided.If the execution log has been divided, the execution log will be divided into tabs, where the user can select which execution log they want to see.The log file names displayed in the execution log's pulldown menu are as following.exec.log: Log file containing all execution logs.Not exec.log: Divided execution log. The file convention are as following.exec_<Group number>_<Serial number>
表 4.23 Divided execution log file naming convention¶ Component
Contents
Group number
The Execution target's serial number grouped by the 's ・ ・ ・ ・ ・ items.
Serial number
Serial number from 1 that divides the group by setting the number of job slices.If 0, no division of job slicing was done. - Search logUsers can filter information to narrow down information in the execution log and the error log.Input the string the user wants to search for and tick the "Corresponding lines only" checkbox to view only the lines corresponding to the string.The refresh interval and maximum display lines can be configured by changing the "Status monitoring cycle item" and "Progress status display lines" items in .
- Input dataUsers can download executed Playbooks.For more information, see Link between ITA menus and Input data when executing Ansible.
- Result dataUsers can download execution logs and error logs.For more information, see Result data created when executing Ansible.
Execution management
Allows userse to view execution histories.Specify search conditions and press the Filter button to view a table of executions.Pressing the Details button moves the user to where they can view detailed information regarding the execution status.
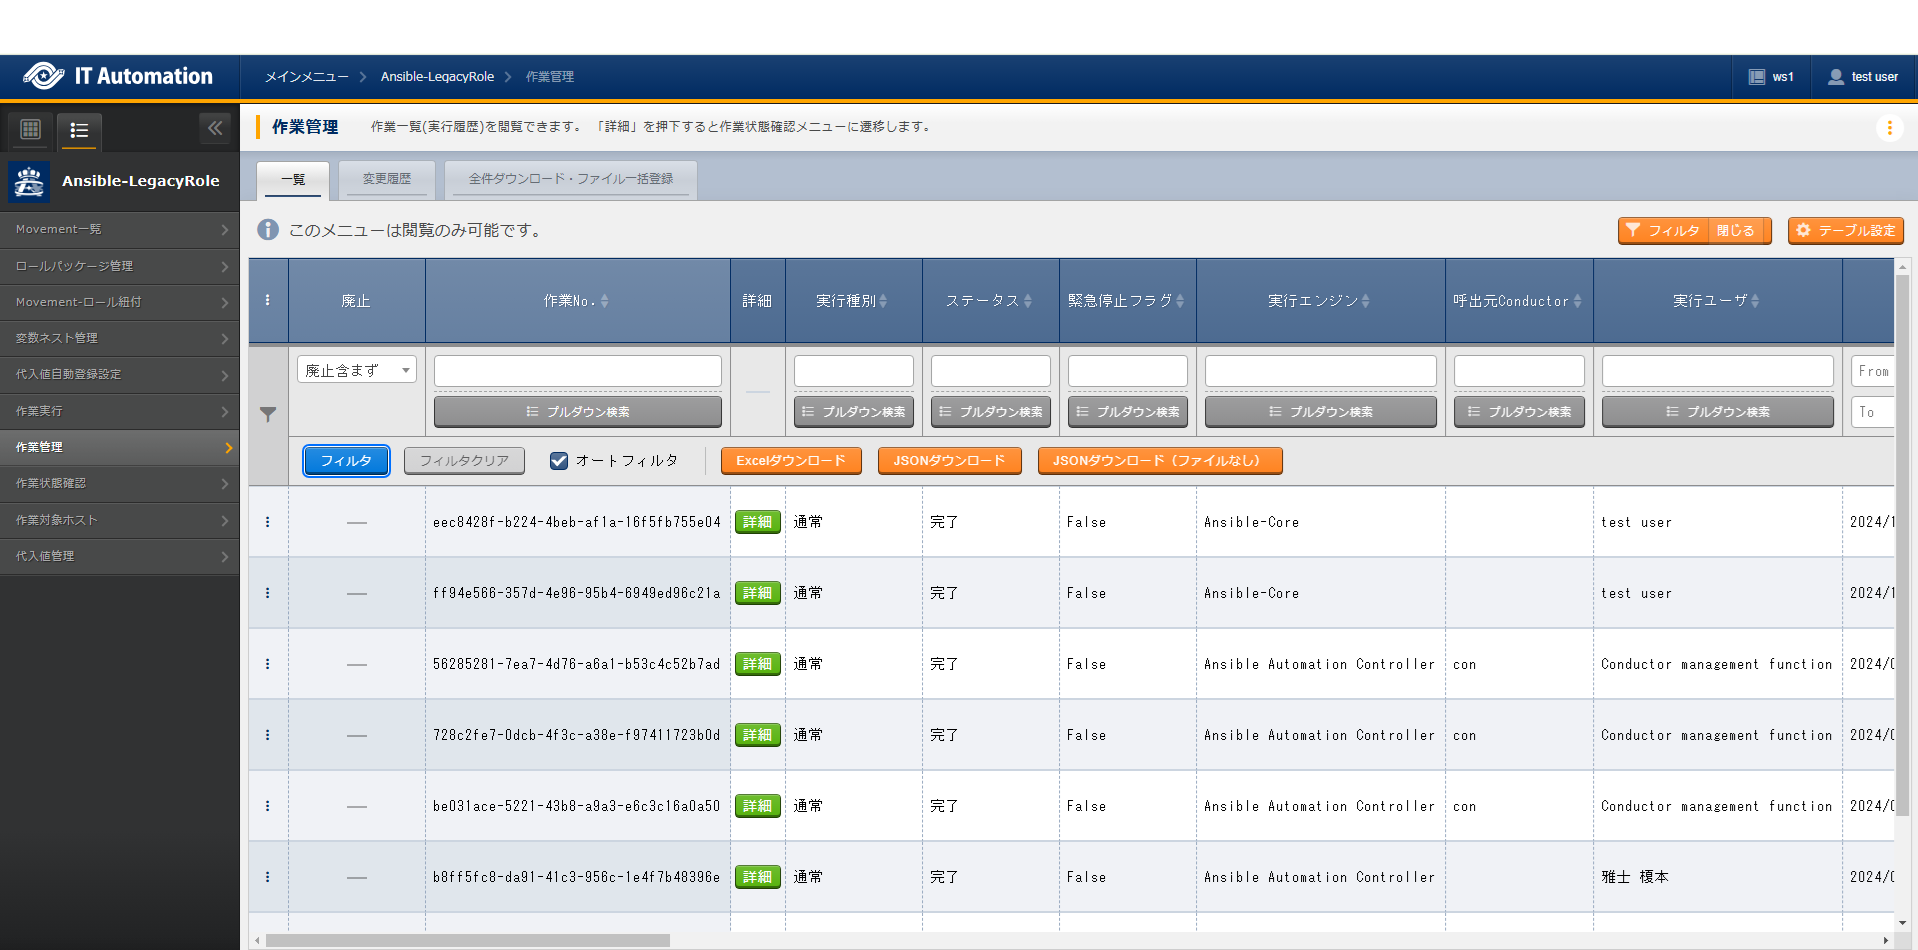
図 4.27 Submenu (Execution management)
- The items found in the page are as following.
表 4.24 View page item list (Execution management)¶ Item
Description
Execution number.
Displays an automatically given unique ID (36 characters)
Execution type
Displays the Execution type.
Status
Displays the status of the Execution.
Emergency stop flag
Displays whether the operation has been stopped by the Emergency stop button from the menu or not.
Execution engine
Displays the Execution engine used.
Called Conductor
Displays the Conductor name if executed from Conductor.
Execution user
Displays the user who executed the Ansible.
Registration date
Displays when the Execute button was clicked.
Movement
ID
Displays the selected Movement ID.
name
Displays the selected Movement name
Delay timer
Displays the delay timer value configured to the Movement.
Ansible use information
Host specification format
Displays the selected Movement's Host specification format.
WinRM connection
Displays the selected Movement's WinRM connection.
Header section
Displays the selected Movement's header section.
ansible.cfg
Allows users to download the selected Movement's ansible.cfg file.
Ansible Execution Agent use information
Execution environment
Displays the Ansible Execution Agent's execution environment of the selected Movement.
ansible-builderparameter
Displays the ansible-builder of the selected Movement.
Ansible Automation Controller use information
Execution environment
Displays the selected Movement's execution environment.
Operation
No.
Displays the selected Operation's ID
Name
Displays the selected Operation's name
Input data
Allows users to download the input data in a Zip file
Result data
Allows users to download the result data in a Zip file.
Execution status
Reservation date
Displays the reservation date if the execution is reserved.
Start date
Displays when the execution will start.
End date
Displays when the execution will end.
Collect status
Status
Displays the Connection function's status.
Collection log
Allows users to downlaod the Collection function's log.
Conductor instance number
Displays the Conductor instance number if executed from Conductor.
Target host
- Allows users to view Target hosts.
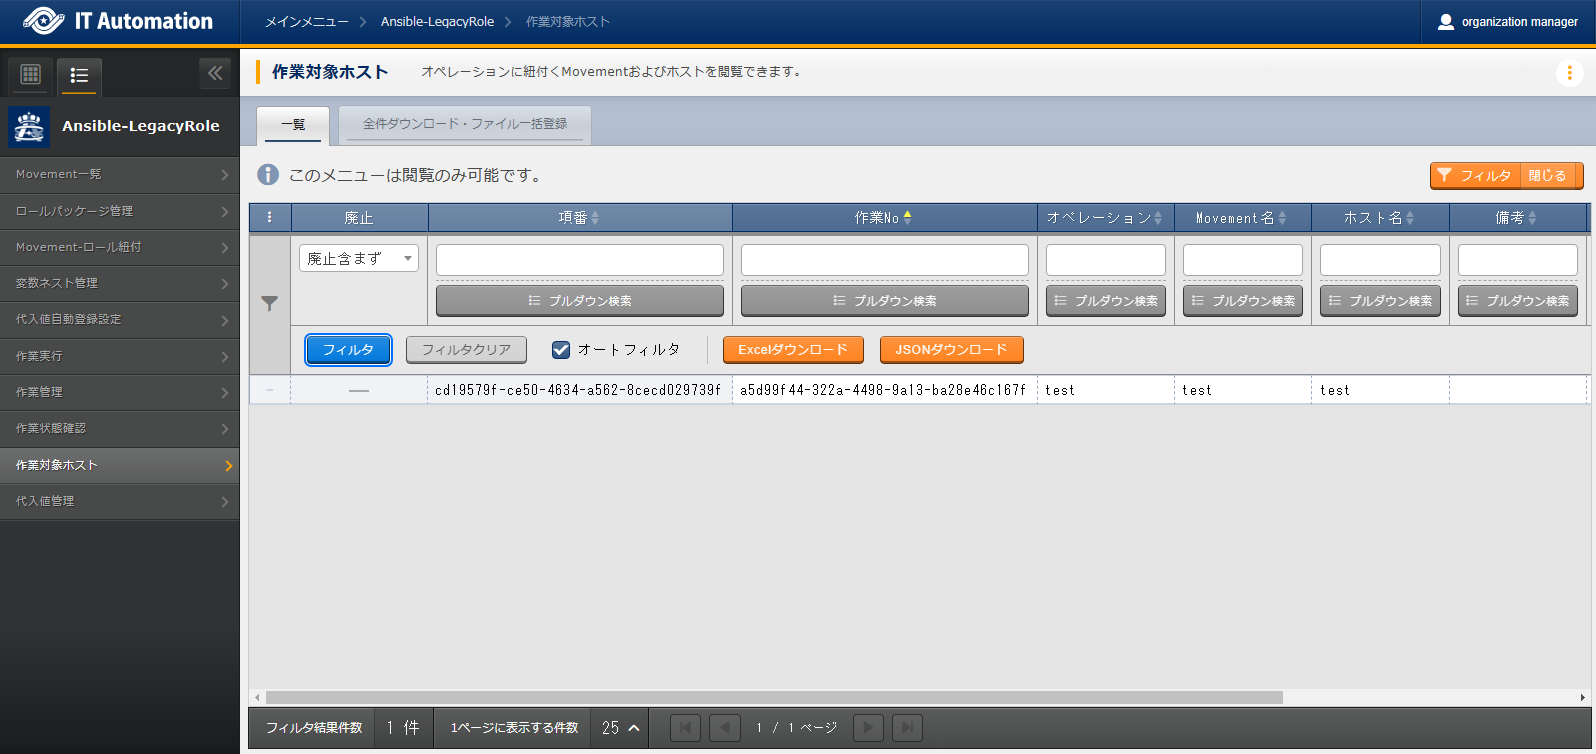
図 4.28 Submenu (Target host)
- The items found in the view page are as following.
表 4.25 View page item list (Target host)¶ Item
Description
Item number
Displays an automatically given unique ID (36 characters)
Execution number
Displays the Execution number when executed.
Operation
Displays the Operation when executed.
Movement name
Displays the Movement when executed.
Host name
Displays the Target host when Executed.
Remarks
Free description field
Substitute value management
- Displays the Variable's specific values.
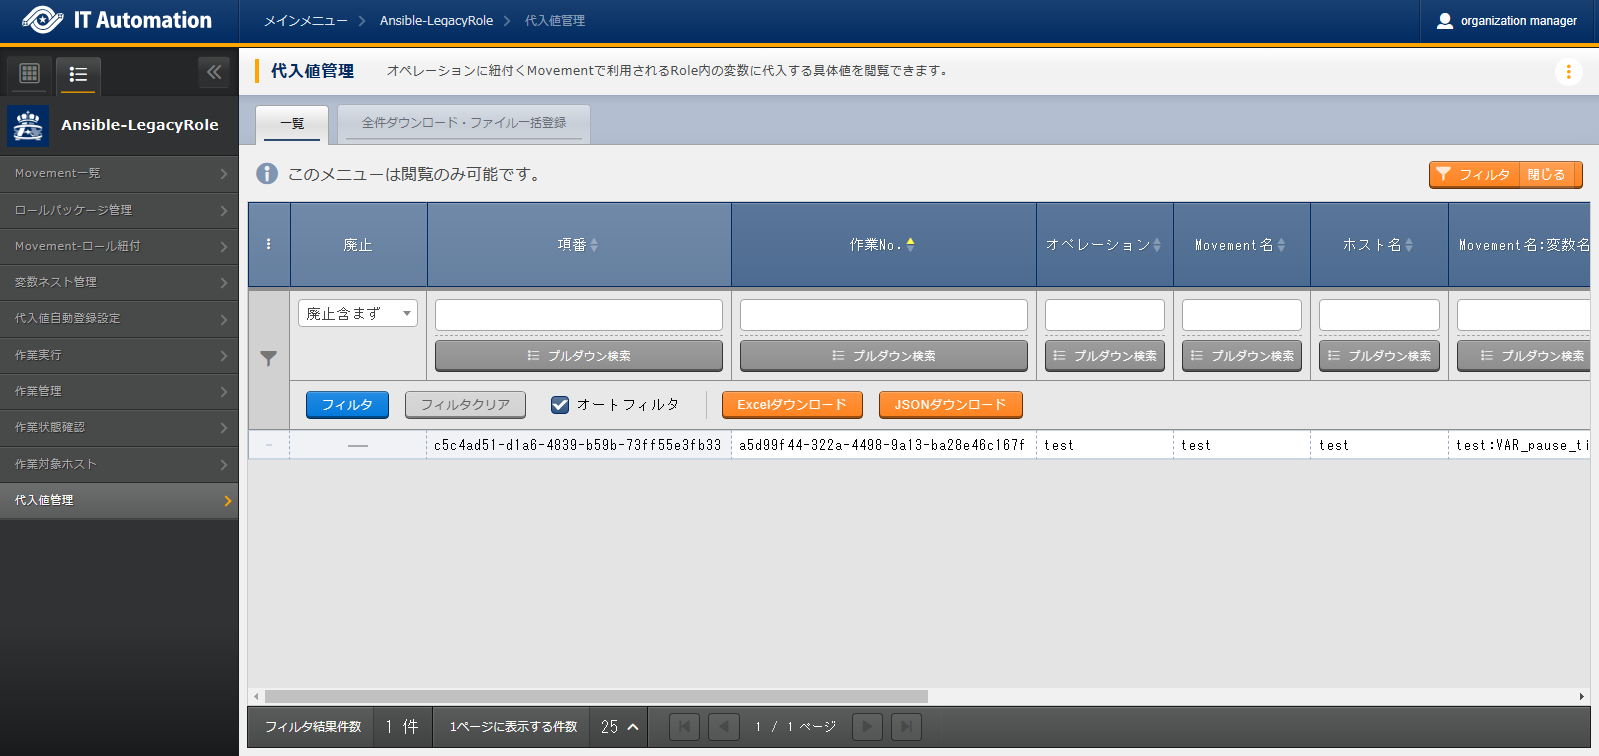
図 4.29 Submenu (Substitute value management)
- The items found in the page are as following.
表 4.26 View page item list (Substitute value management)¶ Item
Description
Item number
Displays an automatically given unique ID (36 characters).
Execution number
Displays the Execution number when executed.
Operation
Displays the selected Operation.
Movement name
Displays the selected Movement.
Host name
Displays the selected Target host.
Movement name:Variable name
Displays the Variable name when executed
- Specific
value
String
Sensitive settings
Displays either "True" or "False".
Value
Displays the Variable's Specific value when executed.
- If the are set to "True"The Specific value input to the Parameter sheet will be encrypted and not be viewable on ITA. The variable's Specific value has its encrypted contents configured by ansible-vault.
- If the are set to "False"The Specific value input to the Parameter sheets will be displayed.
File
Displays the File name linked to the Variables.
Substitute order
If the variable is a Multiple Specific Value Variable, the Substitute order will be displayed.
Remarks
Free description field
4.6. Describing Structure code
4.6.1. Writing Role packages
(Upper directory)
│
├─── site.yml                                             ・・・・・・・・・・・・・・・・・・・・・・・・ (1)
│
├─── hosts                                                ・・・・・・・・・・・・・・・・・・・・・・・・ (2)
│
├─── group_vars                                           ・・・・・・・・・・・・・・・・・・・・・・・・ (3)
│
├─── host_vars                                            ・・・・・・・・・・・・・・・・・・・・・・・・ (4)
│
├─── ITA readme                                           ・・・・・・・・・・・・・・・・・・・・・・・・ (5)
│
└─── roles                                                ・・・・・・・・・・・・・・・・・・・・・・・・ (6)
        │
        ├─ [role name①]                                    ・・・・・・・・・・・・・・・・・・・・・・・・ (7)
        │     │
        │     ├── readme.md                               ・・・・・・・・・・・・・・・・・・・・・・・・ (8)
        │     │
        │     ├── tasks                                   ・・・・・・・・・・・・・・・・・・・・・・・・ (9)
        │     │      ├── main.yml
        │     │      └── user_files
        │     │      └── user.yml
        │     │
        │     ├── handlers                                ・・・・・・・・・・・・・・・・・・・・・・・・ (10)
        │     │      ├── main.yml
        │     │      └── user_files
        │     │      └── user.yml
        │     │
        │     ├── templates                               ・・・・・・・・・・・・・・・・・・・・・・・・ (11)
        │     │      ├── hosts.j2
        │     │      └── user_files
        │     │      └── user.j2
        │     │
        │     ├── files                                   ・・・・・・・・・・・・・・・・・・・・・・・・ (12)
        │     │      └── sudoers
        │     │
        │     ├── vars                                    ・・・・・・・・・・・・・・・・・・・・・・・・ (13)
        │     │      └─ main.yml
        │     │
        │     ├── defaults                                ・・・・・・・・・・・・・・・・・・・・・・・・ (14)
        │     │      ├── main.yml
        │     │      └── user_files
        │     │              └── user.yml
        │     │
        │     ├── meta                                    ・・・・・・・・・・・・・・・・・・・・・・・・ (15)
        │     │      └── main.yml
        │     │
        │     If there are other directories and files, ITA will not recognize them.
        │
        └─ [role name②] roles have no specific limits.
Should include
〇 :Required
△ :Optional
|
Handled by ITA |
|
|---|---|---|
(1) site.yml (Master Playbook) |
△ |
Created by ITA. Will be overwritten if exists. |
(2) hosts |
△ |
Created by ITA. Will be overwritten if exists. |
(3) group_vars |
△ |
Not handled by ITA. Will be deleted if exists |
(4) host_vars |
△ |
Created by ITA. Will be overwritten if exists. |
(5) ITA readme |
△ |
ITA readme is defined for every role. Error doesn't occur even if the file deosn't exist.
ITA readme character code should be UTF-8 without BOM.
For more information, see "Writing ITAreadme"
|
(6) roles |
〇 |
An Upload error will occur if the roles directory does not exist. |
(7) roles/[role name①] |
〇 |
An Upload error will occur if the role name directory does not exist.
Handles directories (tasks directory included) as role.
Directory hierarchy can be deep.
|
(8) roles/[role name①]/readme.md |
△ |
Not recognized by ITA. |
(9) roles/[role name①]/tasks |
〇 |
tasks directory is required.
playbook character code should be UTF-8 without BOM.
An Upload error will occur if main.yml does not exist.
Can contain other files than main.yml
Can deploy other files than main.yml in the sub-directory.
|
(10) roles/[role name①]/handlers |
△ |
handlers directory is not recognized.
playbook character code should be UTF-8 without BOM.
main.yml is not recognized.
Can contain other files than main.yml
Can deploy files into the sub-directory.
|
(11) roles/[role name①]/templates |
△ |
templates directory is not recognized.
The file character code should be UTF-8 without BOM.
Can deploy files into the sub-directory.
|
(12) roles/[role name①]/files |
△ |
files directory is not recognized.
File or sub-directory is not recognized.
File contents are not recognized.
|
(13) roles/[role name①]/vars |
△ |
vars directory is not recognized.
playbook character code should be UTF-8 without BOM.
File or sub-directory is not recognized.
File contents are not recognized.
|
(14) roles/[role name①]/defaults |
△ |
defaults directory is not recognized.
playbook character code should be UTF-8 without BOM.
main.yml is not recognized.
Can contain other files than main.yml
Can deploy other files than main.yml in the subdirectory.
|
(15) roles/[role name①]/meta |
△ |
meta directory is not recognized.
playbook character code should be UTF-8 without BOM.
File or sub-directory is not recognized.
File contents are not recognized.
|
Master Playbook
- Header sectionHeader sections have default values, but users can change them by using 's .▼Header section default value
- hosts: all
  remote_user: "{{ __loginuser__ }}"
  gather_facts: no
  become: yes
# For winrm connections, "become: yes" is ommited.
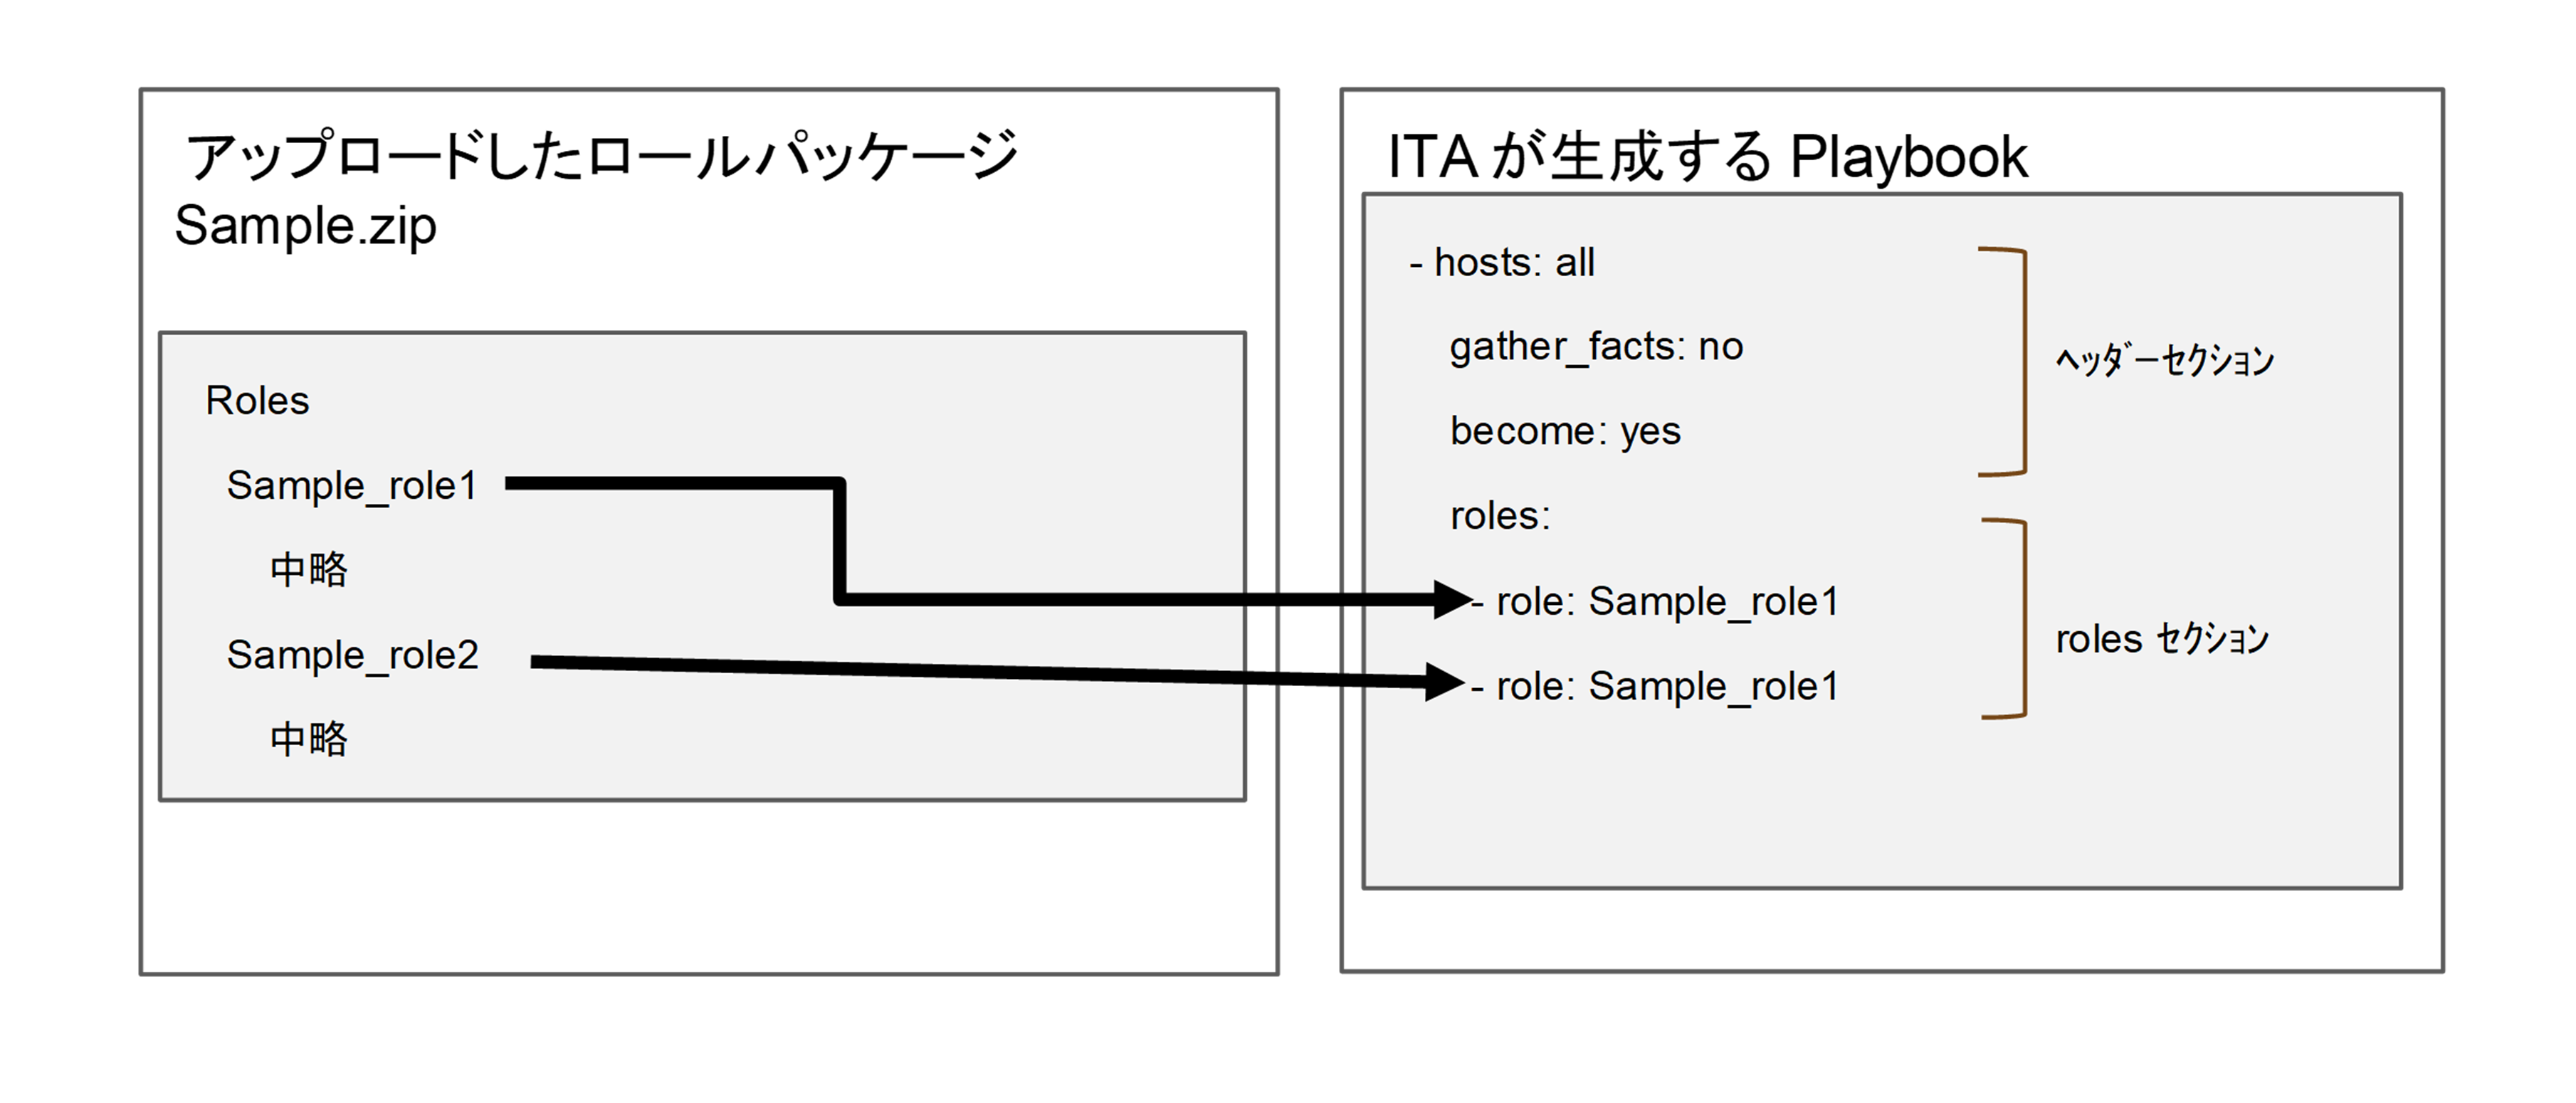
- roles sectionRoles from uploaded role packages are executed according to the in .
Points to note when the role name in the role package is set to the directory hierarchy.
└── roles
       ├── parent
       │     ├── sample_role1
       │     │ ├── defaults
       │     │ └── tasks
       │     └── sample_role2
       │            ├── defaults
       │            ├── sample_role3
       │            │     ├── defaults
       │            │     └── tasks
       │            ├── sample_role4
       │            │     ├── defaults
       │            │     └── tasks
       │            └── tasks
       ├── sample_role5
       │     └── defaults
       └── sample_role6
              ├── defaults
              └── tasks
- he directory recognized as a role is the directory containing the tasks directory.In this example. There are three directory hierarchies (role names) to be handled by roles.
parent/sample_role1
parent/sample_role2
sample_role6
- Exclude directory hierarchies with multiple tasks directoriesThere are tasks directories in parent/sample_role2/sample_role3 and parent/sample_role2/sample_role4, but parent/sample_role2 has a tasks directories and recognizes them as roles, meaning they are not handaled as a role.
4.6.2. Writing ITAreadme
ITA readme file naming convention
Role name |
File name |
|---|---|
mysql |
ita_readme_mysql.yml |
mysql/install |
ita_readme_mysql%install.yml |
警告
ITA readme format
Tip
表 4.27 Variable adoption rule¶ defaults variable definition file
ITA readme
Variable structure destination
Defined
Not defined
Default variable definition file
Not defined
Defined
ITA readme
Defined
Defined
ITA readme
The ITA readme is cut of from the Role package when executed.Variables and specific values written in the ITA readme file will not be given to Ansible.
"ita_readme" use example
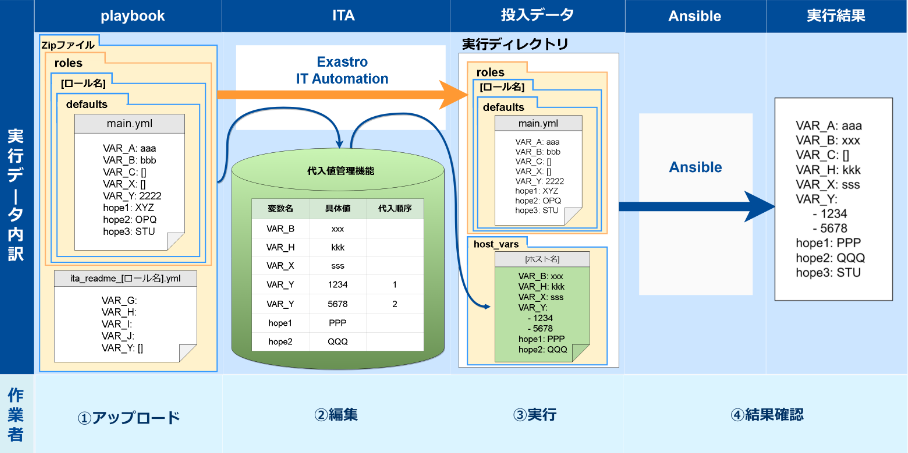
図 4.30 Overall image
No. |
Case |
|---|---|
1 |
Using externally fetched Ansible-LegacyRole without editing it. |
2 |
"ita_readme" role |
3 |
Variable definitions and default values described in the "defaults/main.yml" file. |
4 |
"host_vars" files and "ITA Parameter sheet" |
5 |
Adding variables to “defaults/main.yml” |
6 |
Applying Playbook Length evaluation |
7 |
Applying Playbook Defined evaluation |
- Case 1:Using externally fetched Ansible-LegacyRole without editing itUsers can use Ansible-Legacy Role (roles directory) acquired from anexternal source without modifying it.Therefore, users can put the ita_readme file and/or substitute table in the “roles” directory and assign parameters to the variables used inside the directory.
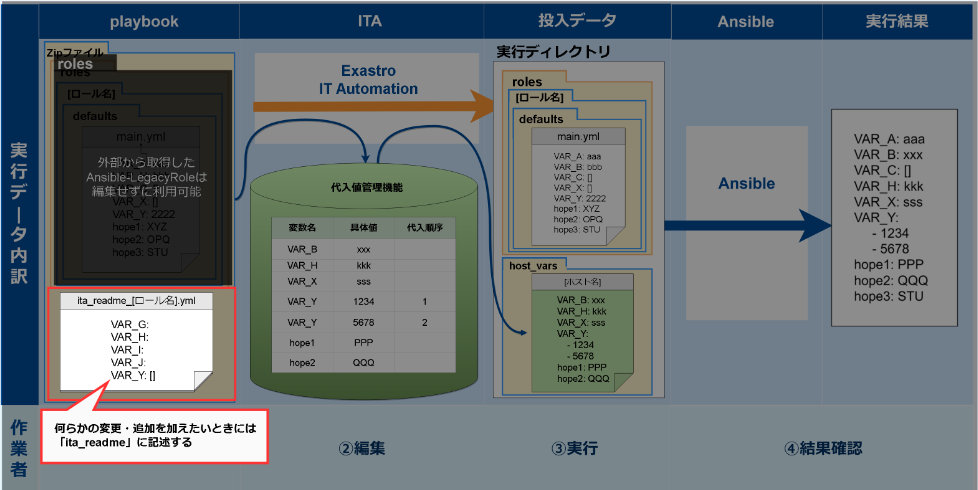
図 4.31 Case 1 figure
- Case 2:"ita_readme" roleThe ita_readme file is used to send variables/variable types to ITA.In other words, they are not used to define specific values (Parameters).ITA will not be able to read any specific values written in them.Please see the other cases below for information on how to assign specific values.
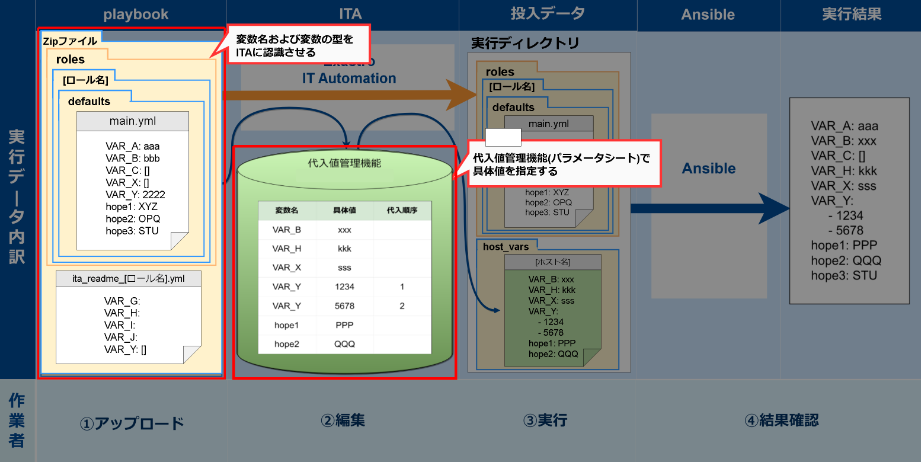
図 4.32 Case 2 figure
- Case 3:Variable definitions and default values described in the "defaults/main.yml" fileThe "defaults/main.yml" file stored under "roles" is automatically passed to ansible.The file will be automatically sent as long only if no variables or default values are defined in host_vars.(E.g: "VAR_A:aaa").
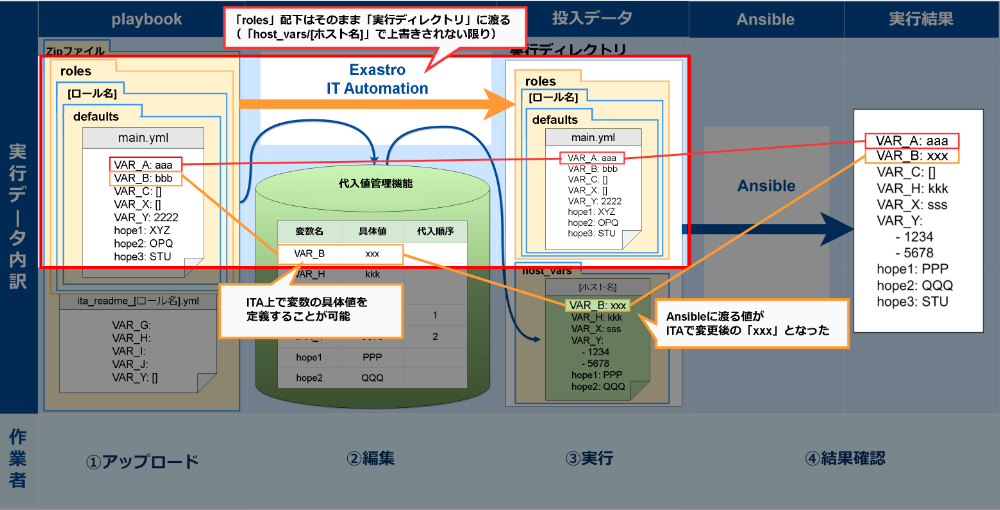
図 4.33 Case 3 figure
- Case 4:"host_vars" files and "ITA Parameter sheet"Host_vars files are automatically created everytime ITA parameter sheets executes something.
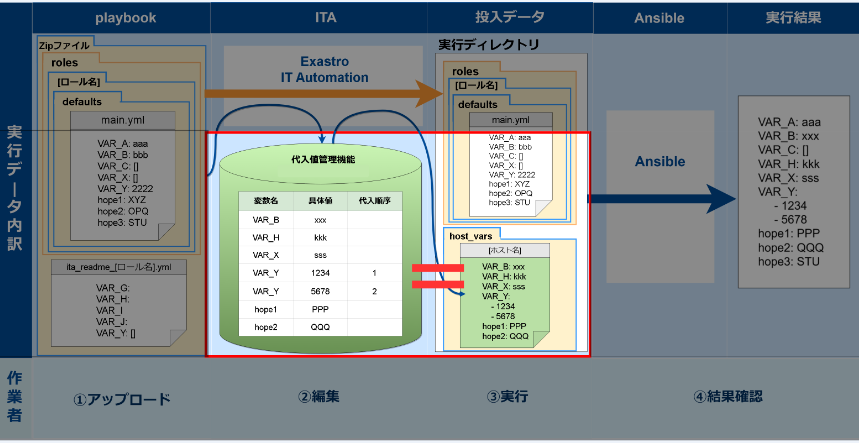
図 4.34 Case 4 figure
- Case 5:Adding variables to “defaults/main.yml”In order to add any changes to Ansible-Legacy Role ("roles" directory), users can describe variable names/types in the "ita_readme" file.Users do not have to define any variables in the ita_readme file that are already defined in the "defaults/main.yml" file.If there are different definitions for the same variables in the files, the ones in the "ita_readme" file will be prioritized.※The figure below illustrates that it is possible to add variables by describing a variable(VAR_H) in the ita_readme file
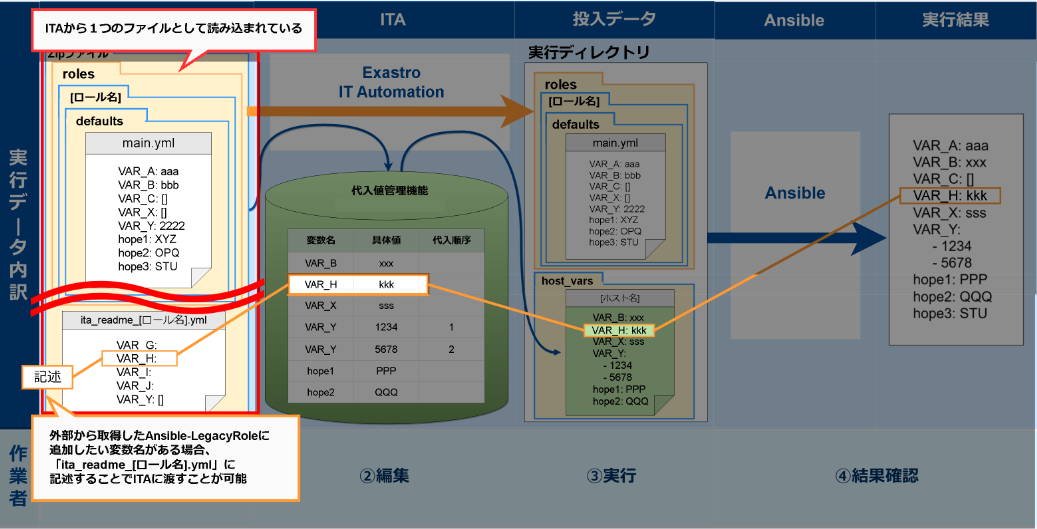
図 4.35 Case 5 figure
- Case 6:Applying Playbook Length evaluationDepending on whether a variable has a concrete value or not, it can be used as a conditional branch for length evaluation.For example if "VAR_C:[]" is written in "defaults/main.yml", the length will equal 0 if the operation is executed with no specific value set to "VAR_C".On the other hand, doing the same with a specific value set will have length be <0 (length<0). (E.g.: VAR_X:sss)
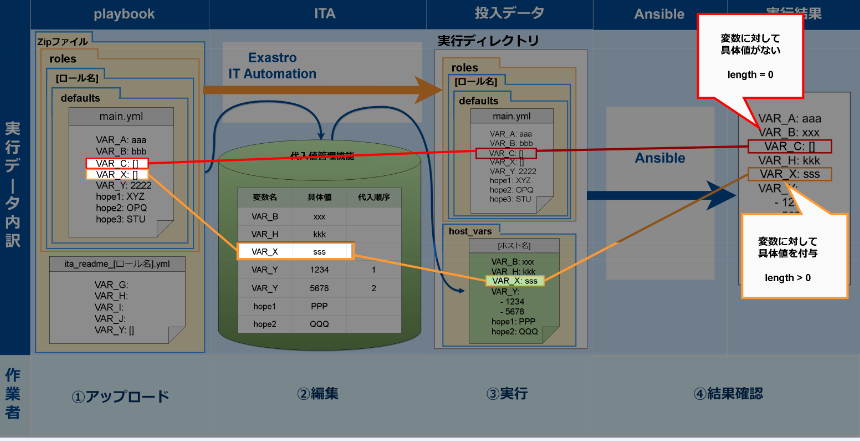
図 4.36 Case 6 figure
- Case 7:Applying Playbook Defined evaluationDepending on whether a variable has a concrete value or not, it can be used as a conditional branch for defined valuation.For example, first write a definition for the variables "VAR_G" and "VAR_H" in the "ita_readme" file. By doing so, they can be used by ITA parameter sheets.Running an operation without giving a specific value to "VAR_G" while it is not defined in "defaults/main.yml" or "host_vars" will turn "defined" to "false".On the other hand, if the specific value "kkk" is added to "VAR_H", "defined" will turn into "true".
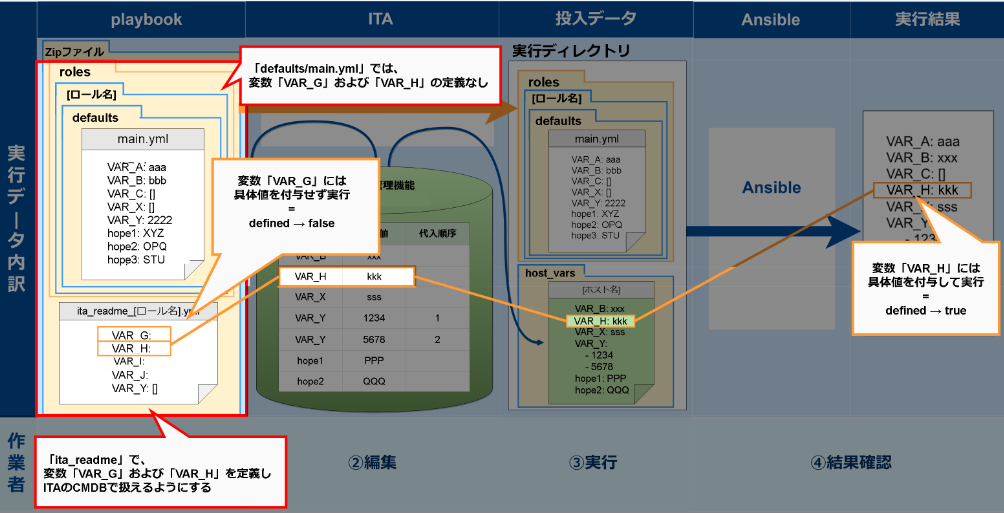
図 4.37 Case 7 figure
4.7. Appendix
4.7.2. Result data created when executing Ansible
Ansible-LegacyRole result data File list
File name |
Recorded contents |
Ansible Core |
Ansible Automation Controller |
Ansible Execution Agent |
|---|---|---|---|---|
result.txt |
Records Ansible execution result's execution results |
〇 |
||
error.log |
Error output file with Executing.
Ansible-playbbok command standard error output file.
Contents displayed in the Execute confirmation error log.
|
〇 |
〇 |
〇 |
exec.log.org |
xecution log output by Ansible-playbook |
〇 |
〇 |
〇 |
exec.log |
Edited Aexec.log.org
Contents displayed to the Execution confirmation execution log
|
〇 |
〇 |
〇 |
exec_<Execution number>_<group number> |
Divided execution log file
For more information regarding file name conventions, see the execution log in Confirm execution status .
|
〇 |
||
forced.txt |
Text file if stopped with Emergency stop |
〇 |
〇 |
|
user_files |
A directory where files are recorded when some file is output to ITA's original variable "__workflowdir__" in the playbook executed. |
〇 |
〇 |
〇 |
child_exec.log
child_error.log
|
ansible-builder execution log |
〇 |