
Exastro on Docker Compose - Offline
目的
特徴
前提条件
デプロイ環境
動作確認が取れているコンテナ環境の最小要求リソースとバージョンは下記のとおりです。表 54 ハードウェア要件(最小構成)¶ リソース種別
要求リソース
CPU
2 Cores (3.0 GHz, x86_64)
Memory
4GB
Storage (Container image size)
40GB
表 55 ハードウェア要件(推奨構成)¶ リソース種別
要求リソース
CPU
4 Cores (3.0 GHz, x86_64)
Memory
16GB
Storage (Container image size)
120GB
警告
最小構成における要求リソースは Exastro IT Automation のコア機能に対する値です。GitLab や Ansible Automation Platform などの外部システムをデプロイする場合は、その分のリソースが別途必要となります。データベースおよびファイルの永続化のために、別途ストレージ領域を用意する必要があります。Storage サイズは、ユーザーの利用状況によるためあくまで目安となります。必要に応じて容量を確保してください。通信要件
表 56 通信要件¶ 用途
説明
通信元
通信先
デフォルト
Exastro サービス用
Exastro サービスとの接続に利用
クライアント
Exastro システム
30080/tcp
Exastro システム管理用
Exastro システム管理機能に利用
クライアント
Exastro システム
30081/tcp
GitLab サービス用(オプション)
AAP連携時の GitLab サービス接続に利用
Ansible Automation Platform
Exastro システム
40080/tcp
GitLab サービス用(オプション)
GitLab サービス監視用
Exastro システム
Exastro システム
40080/tcp
資材取得
GitHub、コンテナイメージ、導入パッケージなど
Exastro システム
インターネット
443/tcp
動作確認済みオペレーティングシステム
以下は、動作確認済のバージョンとなります。
表 57 オペレーティングシステム¶ 種別
バージョン
Red Hat Enterprise Linux
バージョン 9.2
AlmaLinux
バージョン 8.9
動作確認済みコンテナプラットフォーム
手動でインストールする際には、下記のコンテナプラットフォームを準備してください。 以下は、動作確認済のバージョンとなります。
表 58 コンテナプラットフォーム¶ ソフトウェア
バージョン
Podman Engine ※Podman 利用時
バージョン 4.9
Docker Compose ※Podman 利用時
バージョン 2.28
Docker Engine ※Docker 利用時
バージョン 24
アプリケーション
curl と sudo コマンドが実行できる必要があります。
警告
事前準備
サービス |
URL |
|---|---|
Exastro サービス |
|
Exastro 管理用サービス |
|
GitLab サービス |
サービス |
URL |
|---|---|
Exastro サービス |
|
Exastro 管理用サービス |
|
GitLab サービス |
サービス |
URL |
|---|---|
Exastro サービス |
|
Exastro 管理用サービス |
|
GitLab サービス |
Tip
全体の流れ
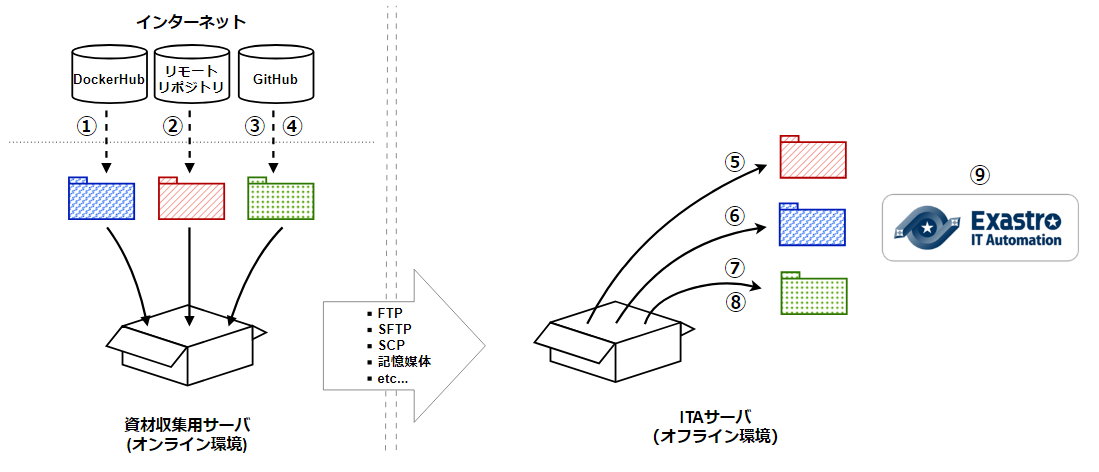
オンライン環境での手順
オフライン環境での手順
オンライン環境(インターネットに接続できる環境)での作業
①コンテナイメージのダウンロード
vi save.sh
#!/bin/bash

ITA_VERSION=$1
declare -A PF_VERSION=(
  ["x.x.x"]="x.x.x"
)
if [ ! -d $1 ]; then
  mkdir $ITA_VERSION
fi

readarray -t image_list < "./image.list"
for image in ${image_list[@]}
do
  image_fullname=$(echo ${image} | sed -e "s/#__ITA_VERSION__#/${ITA_VERSION}/" -e "s/#__PF_VERSION__#/${PF_VERSION[$ITA_VERSION]}/")
  image_name=$(basename ${image_fullname} | sed -e "s/:/-/")
  if [ ! -e ${ITA_VERSION}/${image_name}.tar.gz ]; then
    echo $image_fullname $image_name
    docker pull ${image_fullname}
    if [ $? -eq 0 ]; then
      docker save ${image_fullname} | gzip -c > ${ITA_VERSION}/${image_name}.tar.gz
    fi
  fi
done
vi image.list
docker.io/mariadb:10.9.8
docker.io/mariadb:10.11.4
docker.io/gitlab/gitlab-ce:15.11.13-ce.0
docker.io/mongo:6.0.7
docker.io/exastro/keycloak:#__PF_VERSION__#
docker.io/exastro/exastro-platform-auth:#__PF_VERSION__#
docker.io/exastro/exastro-platform-web:#__PF_VERSION__#
docker.io/exastro/exastro-platform-api:#__PF_VERSION__#
docker.io/exastro/exastro-platform-job:#__PF_VERSION__#
docker.io/exastro/exastro-platform-migration:#__PF_VERSION__#
docker.io/exastro/exastro-platform-migration:#__PF_VERSION__#
docker.io/exastro/exastro-it-automation-api-organization:#__ITA_VERSION__#
docker.io/exastro/exastro-it-automation-api-admin:#__ITA_VERSION__#
docker.io/exastro/exastro-it-automation-api-oase-receiver:#__ITA_VERSION__#
docker.io/exastro/exastro-it-automation-web-server:#__ITA_VERSION__#
docker.io/exastro/exastro-it-automation-by-ansible-agent:#__ITA_VERSION__#
docker.io/exastro/exastro-it-automation-by-ansible-execute:#__ITA_VERSION__#
docker.io/exastro/exastro-it-automation-by-ansible-execute-onpremises:#__ITA_VERSION__#
docker.io/exastro/exastro-it-automation-by-ansible-legacy-role-vars-listup:#__ITA_VERSION__#
docker.io/exastro/exastro-it-automation-by-ansible-legacy-vars-listup:#__ITA_VERSION__#
docker.io/exastro/exastro-it-automation-by-ansible-pioneer-vars-listup:#__ITA_VERSION__#
docker.io/exastro/exastro-it-automation-by-ansible-towermaster-sync:#__ITA_VERSION__#
docker.io/exastro/exastro-it-automation-by-collector:#__ITA_VERSION__#
docker.io/exastro/exastro-it-automation-by-conductor-synchronize:#__ITA_VERSION__#
docker.io/exastro/exastro-it-automation-by-conductor-regularly:#__ITA_VERSION__#
docker.io/exastro/exastro-it-automation-by-menu-create:#__ITA_VERSION__#
docker.io/exastro/exastro-it-automation-by-menu-export-import:#__ITA_VERSION__#
docker.io/exastro/exastro-it-automation-by-excel-export-import:#__ITA_VERSION__#
docker.io/exastro/exastro-it-automation-by-terraform-cloud-ep-execute:#__ITA_VERSION__#
docker.io/exastro/exastro-it-automation-by-terraform-cloud-ep-vars-listup:#__ITA_VERSION__#
docker.io/exastro/exastro-it-automation-by-terraform-cli-execute:#__ITA_VERSION__#
docker.io/exastro/exastro-it-automation-by-terraform-cli-vars-listup:#__ITA_VERSION__#
docker.io/exastro/exastro-it-automation-by-hostgroup-split:#__ITA_VERSION__#
docker.io/exastro/exastro-it-automation-by-cicd-for-iac:#__ITA_VERSION__#
docker.io/exastro/exastro-it-automation-by-oase-conclusion:#__ITA_VERSION__#
docker.io/exastro/exastro-it-automation-by-execinstance-dataautoclean:#__ITA_VERSION__#
docker.io/exastro/exastro-it-automation-by-file-autoclean:#__ITA_VERSION__#
docker.io/exastro/exastro-it-automation-migration:#__ITA_VERSION__#
docker.io/exastro/exastro-it-automation-by-ansible-agent:#__ITA_VERSION__#
ユーザがグループに追加されていない場合、パーミッションエラーとなることがあります。 事前に追加作業をしている場合は、ここでの実施は不要です。
cat /etc/group | grep docker
#ユーザーがグループに追加されていない場合は以下を実行します
sudo usermod -aG docker ${USER}
cat /etc/group | grep docker
#ユーザーがグループに追加されていることを確認し、サーバーを再起動します
sudo reboot
オンライン環境に接続後、シェルスクリプトを実行しコンテナイメージをダウンロードします。 引数にはITAのバージョンを指定します。 完了するまでに数十分程度の時間がかかります。(通信環境やサーバースペックによって状況は異なります。)
sudo systemctl start docker
sudo chmod a+x save.sh
sh ./save.sh x.x.x
シェルスクリプトを実行しコンテナイメージをダウンロードします。 引数にはITAのバージョンを指定します。 完了するまでに数十分程度の時間がかかります。(通信環境やサーバースペックによって状況は異なります。)
sudo chmod a+x save.sh
sh ./save.sh x.x.x
②RPMパッケージのダウンロード
#リポジトリを追加します
sudo dnf config-manager --add-repo=https://download.docker.com/linux/centos/docker-ce.repo
#現在のOSのバージョンを確認します
cat /etc/os-release
#--releasever=x.xは上記で得られたバージョンを指定します
sudo dnf install -y --downloadonly --downloaddir=/tmp/docker-repo --installroot=/tmp/docker-installroot --releasever=x.x docker-ce docker-ce-cli containerd.io git container-selinux
sudo dnf install -y createrepo
sudo createrepo /tmp/docker-repo
#現在のOSのバージョンを確認します
cat /etc/os-release
#--releasever=x.xは上記で得られたバージョンを指定します
sudo dnf install -y --downloadonly --downloaddir=/tmp/podman-repo --installroot=/tmp/podman-installroot --releasever=x.x container-selinux git podman podman-docker
sudo dnf install -y createrepo
sudo createrepo /tmp/podman-repo
③docker-composeリソースのダウンロード
curl -LO https://github.com/docker/compose/releases/download/v2.28.0/docker-compose-linux-x86_64
④Exastroリソースのダウンロード
cd /tmp
curl -OL https://github.com/exastro-suite/exastro-docker-compose/archive/main.tar.gz
資材の転送
コンテナイメージ:任意のディレクトリ
RPMパッケージ:/tmpの直下
Exastroリソース:一般ユーザーのホームディレクトリ直下
docker-compose-linux-x86_64:/usr/local/bin
オフライン環境(インターネットに接続できない環境)での作業
⑤RPMパッケージのインストール
sudo touch /etc/yum.repos.d/docker-repo.repo
sudo vi /etc/yum.repos.d/docker-repo.repo

[docker-repo]
name=AlmaLinux-$releaserver - docker
baseurl=file:///tmp/docker-repo
enabled=1
gpgcheck=0
gpgkey=file:///etc/pki/rpm-gpg/RPM-GPG-KEY-AlmaLinux
sudo dnf -y --disablerepo=\* --enablerepo=docker-repo install docker-ce docker-ce-cli containerd.io git container-selinux
No available modular metadata for modular package 'perl-Mozilla-CA-20160104-7.module_el8.5.0+2812+ed912d05.noarch', it cannot be installed on the system
No available modular metadata for modular package 'perl-Net-SSLeay-1.88-2.module_el8.6.0+2811+fe6c84b0.x86_64', it cannot be installed on the system
Error: No available modular metadata for modular package
#対象がperl-Mozilla-CA 及び perl-Net-SSLeayだった場合
cd /tmp/docker-repo
ls -l | grep -E "perl-Mozilla-CA|perl-Net-SSLeay"
sudo dnf -y --disablerepo=\* --enablerepo=docker-repo perl-Mozilla-CA-20160104-7.module_el8.5.0+2812+ed912d05.noarch.rmp perl-Net-SSLeay-1.88-2.module_el8.6.0+2811+fe6c84b0.x86_64.rpm
sudo dnf -y --disablerepo=\* --enablerepo=docker-repo install docker-ce docker-ce-cli containerd.io git container-selinux
sudo systemctl enable --now docker
cat /etc/group | grep docker
sudo usermod -aG docker ${USER}
#ユーザ名が表示されることを確認します。
cat /etc/group | grep docker
sudo  reboot
#再度オフライン環境に接続します。
sudo touch /etc/yum.repos.d/podman-repo.repo
sudo vi /etc/yum.repos.d/podman-repo.repo

[podman-repo]
name=RedHat-$releaserver - podman
baseurl=file:///tmp/podman-repo
enabled=1
gpgcheck=0
gpgkey=file:///etc/pki/rpm-gpg/RPM-GPG-KEY-redhat-release
sudo dnf -y --disablerepo=\* --enablerepo=podman-repo install container-selinux git podman podman-docker
⑥コンテナイメージのアップロード
vi load.sh
ITA_VERSION=$1
declare -A PF_VERSION=(
  ["x.x.x"]="x.x.x"
)

readarray -t image_list < "./image.list"
for image in ${image_list[@]}
do
  image_fullname=$(echo ${image} | sed -e "s/#__ITA_VERSION__#/${ITA_VERSION}/" -e "s/#__PF_VERSION__#/${PF_VERSION[$ITA_VERSION]}/")
  image_name=$(basename ${image_fullname} | sed -e "s/:/-/")
  docker load < ${ITA_VERSION}/${image_name}.tar.gz
done

wait
vi image.list
docker.io/mariadb:10.9.8
docker.io/mariadb:10.11.4
docker.io/gitlab/gitlab-ce:15.11.13-ce.0
docker.io/mongo:6.0.7
docker.io/exastro/keycloak:#__PF_VERSION__#
docker.io/exastro/exastro-platform-auth:#__PF_VERSION__#
docker.io/exastro/exastro-platform-web:#__PF_VERSION__#
docker.io/exastro/exastro-platform-api:#__PF_VERSION__#
docker.io/exastro/exastro-platform-job:#__PF_VERSION__#
docker.io/exastro/exastro-platform-migration:#__PF_VERSION__#
docker.io/exastro/exastro-platform-migration:#__PF_VERSION__#
docker.io/exastro/exastro-it-automation-api-organization:#__ITA_VERSION__#
docker.io/exastro/exastro-it-automation-api-admin:#__ITA_VERSION__#
docker.io/exastro/exastro-it-automation-api-oase-receiver:#__ITA_VERSION__#
docker.io/exastro/exastro-it-automation-web-server:#__ITA_VERSION__#
docker.io/exastro/exastro-it-automation-by-ansible-agent:#__ITA_VERSION__#
docker.io/exastro/exastro-it-automation-by-ansible-execute:#__ITA_VERSION__#
docker.io/exastro/exastro-it-automation-by-ansible-execute-onpremises:#__ITA_VERSION__#
docker.io/exastro/exastro-it-automation-by-ansible-legacy-role-vars-listup:#__ITA_VERSION__#
docker.io/exastro/exastro-it-automation-by-ansible-legacy-vars-listup:#__ITA_VERSION__#
docker.io/exastro/exastro-it-automation-by-ansible-pioneer-vars-listup:#__ITA_VERSION__#
docker.io/exastro/exastro-it-automation-by-ansible-towermaster-sync:#__ITA_VERSION__#
docker.io/exastro/exastro-it-automation-by-collector:#__ITA_VERSION__#
docker.io/exastro/exastro-it-automation-by-conductor-synchronize:#__ITA_VERSION__#
docker.io/exastro/exastro-it-automation-by-conductor-regularly:#__ITA_VERSION__#
docker.io/exastro/exastro-it-automation-by-menu-create:#__ITA_VERSION__#
docker.io/exastro/exastro-it-automation-by-menu-export-import:#__ITA_VERSION__#
docker.io/exastro/exastro-it-automation-by-excel-export-import:#__ITA_VERSION__#
docker.io/exastro/exastro-it-automation-by-terraform-cloud-ep-execute:#__ITA_VERSION__#
docker.io/exastro/exastro-it-automation-by-terraform-cloud-ep-vars-listup:#__ITA_VERSION__#
docker.io/exastro/exastro-it-automation-by-terraform-cli-execute:#__ITA_VERSION__#
docker.io/exastro/exastro-it-automation-by-terraform-cli-vars-listup:#__ITA_VERSION__#
docker.io/exastro/exastro-it-automation-by-hostgroup-split:#__ITA_VERSION__#
docker.io/exastro/exastro-it-automation-by-cicd-for-iac:#__ITA_VERSION__#
docker.io/exastro/exastro-it-automation-by-oase-conclusion:#__ITA_VERSION__#
docker.io/exastro/exastro-it-automation-by-execinstance-dataautoclean:#__ITA_VERSION__#
docker.io/exastro/exastro-it-automation-by-file-autoclean:#__ITA_VERSION__#
docker.io/exastro/exastro-it-automation-migration:#__ITA_VERSION__#
docker.io/exastro/exastro-it-automation-by-ansible-agent:#__ITA_VERSION__#
⑦docker-composeリソースのインストール
cd /usr/local/bin
sudo mv docker-compose-linux-x86_64 docker-compose
sudo chmod a+x /usr/local/bin/docker-compose
sudo ln -s /usr/local/bin/docker-compose /usr/bin/docker-compose
⑧Exastroリソースのインストール
tar -zxvf main.tar.gz
sudo mv exastro-docker-compose-main exastro-docker-compose
1sudo vi /etc/selinux/config
# This file controls the state of SELinux on the system.
# SELINUX= can take one of these three values:
#     enforcing - SELinux security policy is enforced.
#     permissive - SELinux prints warnings instead of enforcing.
#     disabled - No SELinux policy is loaded.
# See also:
# https://docs.fedoraproject.org/en-US/quick-docs/getting-started-with-selinux/#getting-started-with-selinux-selinux-states-and-modes
#
# NOTE: In earlier Fedora kernel builds, SELINUX=disabled would also
# fully disable SELinux during boot. If you need a system with SELinux
# fully disabled instead of SELinux running with no policy loaded, you
# need to pass selinux=0 to the kernel command line. You can use grubby
# to persistently set the bootloader to boot with selinux=0:
#
#    grubby --update-kernel ALL --args selinux=0
#
# To revert back to SELinux enabled:
#
#    grubby --update-kernel ALL --remove-args selinux
#
SELINUX=permissive
# SELINUXTYPE= can take one of these three values:
#     targeted - Targeted processes are protected,
#     minimum - Modification of targeted policy. Only selected processes are protected.
#     mls - Multi Level Security protection.
SELINUXTYPE=targeted
sudo reboot
#再度オフライン環境に接続します。
sed -i 's/sudo dnf config-manager/#sudo dnf config-manager/' setup.sh
cd ~/exastro-docker-compose && sh ./setup.sh install
Deploy OASE container ? (y/n) [default: y]:
Deploy Gitlab containser? (y/n) [default: n]:
Generate all password and token automatically? (y/n) [default: y]:
#ポート番号は、OSがRed Hat Enterprise Linuxの場合は30080、それ以外は80を指定してください。
Input the Exastro service URL?  [default: http://127.0.0.1:30080]: http://ita.example.com:30080
#ポート番号は、OSがRed Hat Enterprise Linuxの場合は30081、それ以外は81を指定してください。
Input the Exastro management URL?       [default: http://127.0.0.1:30081]: http://ita.example.com:30081
#ポート番号は40080を指定してください。
Input the external URL of Gitlab container  [default: (nothing)]:
System parametes are bellow.

System administrator password:    ********
Database password:                ********
OASE deployment                   true
MongoDB password                  ********
Service URL:                      http://ita.example.com:30080
Manegement URL:                   http://ita.example.com:30081
Docker GID:                       985
Docker Socket path:               /var/run/docker.sock
GitLab deployment:                false

Generate .env file with these settings? (y/n) [default: n]
sudo reboot
cd ~/exastro-docker-compose && sh ./setup.sh install
#何も入力せずにEnterを押下します。
Regenerate .env file? (y/n) [default: n]:
#yを入力します。
Deploy Exastro containers now? (y/n) [default: n]:
docker ps
1sudo vi /etc/selinux/config
# This file controls the state of SELinux on the system.
# SELINUX= can take one of these three values:
#     enforcing - SELinux security policy is enforced.
#     permissive - SELinux prints warnings instead of enforcing.
#     disabled - No SELinux policy is loaded.
# See also:
# https://docs.fedoraproject.org/en-US/quick-docs/getting-started-with-selinux/#getting-started-with-selinux-selinux-states-and-modes
#
# NOTE: In earlier Fedora kernel builds, SELINUX=disabled would also
# fully disable SELinux during boot. If you need a system with SELinux
# fully disabled instead of SELinux running with no policy loaded, you
# need to pass selinux=0 to the kernel command line. You can use grubby
# to persistently set the bootloader to boot with selinux=0:
#
#    grubby --update-kernel ALL --args selinux=0
#
# To revert back to SELinux enabled:
#
#    grubby --update-kernel ALL --remove-args selinux
#
SELINUX=permissive
# SELINUXTYPE= can take one of these three values:
#     targeted - Targeted processes are protected,
#     minimum - Modification of targeted policy. Only selected processes are protected.
#     mls - Multi Level Security protection.
SELINUXTYPE=targeted
sudo reboot
#再度オフライン環境に接続します。
cd ~/exastro-docker-compose && sh ./setup.sh install
Deploy OASE container URL? (y/n) [default: y]:
Deploy Gitlab containser? (y/n) [default: n]:
Generate all password and token automatically? (y/n) [default: y]:
#ポート番号は、OSがRed Hat Enterprise Linuxの場合は30080、それ以外は80を指定してください。
Input the Exastro service URL?  [default: http://127.0.0.1:30080]: http://ita.example.com:30080
#ポート番号は、OSがRed Hat Enterprise Linuxの場合は30081、それ以外は81を指定してください。
Input the Exastro management URL?       [default: http://127.0.0.1:30081]: http://ita.example.com:30081
#ポート番号は40080を指定してください。
Input the external URL of Gitlab container  [default: (nothing)]:
System parametes are bellow.

System administrator password:    ********
Database password:                ********
OASE deployment                   true
MongoDB password                  ********
Service URL:                      http://ita.example.com:30080
Manegement URL:                   http://ita.example.com:30081
Docker GID:                       1000
Docker Socket path:               /run/user/1000/podman/podman.sock
GitLab deployment:                false

Generate .env file with these settings? (y/n) [default: n]
sudo reboot
cd ~/exastro-docker-compose && sh ./setup.sh install
#何も入力せずにEnterを押下します。
Regenerate .env file? (y/n) [default: n]:
#yを入力します。
Deploy Exastro containers now? (y/n) [default: n]:
podman ps
ログイン
1cd ~/exastro-docker-compose
2cat .env
1### Initial account information for creating system administrators
2#### Specify the username and password
3# SYSTEM_ADMIN=<ユーザー名>
4SYSTEM_ADMIN_PASSWORD=<パスワード>