1. CI/CD For IaC function
1.1. Introdction
1.2. Terminology
Terminology | Contents |
|
|---|---|
ITA |
Abbreviation for "Exastro IT Automation". |
|
|
|
|
1.3. CI/CD For IaC function overview
1.3.1. Function overview
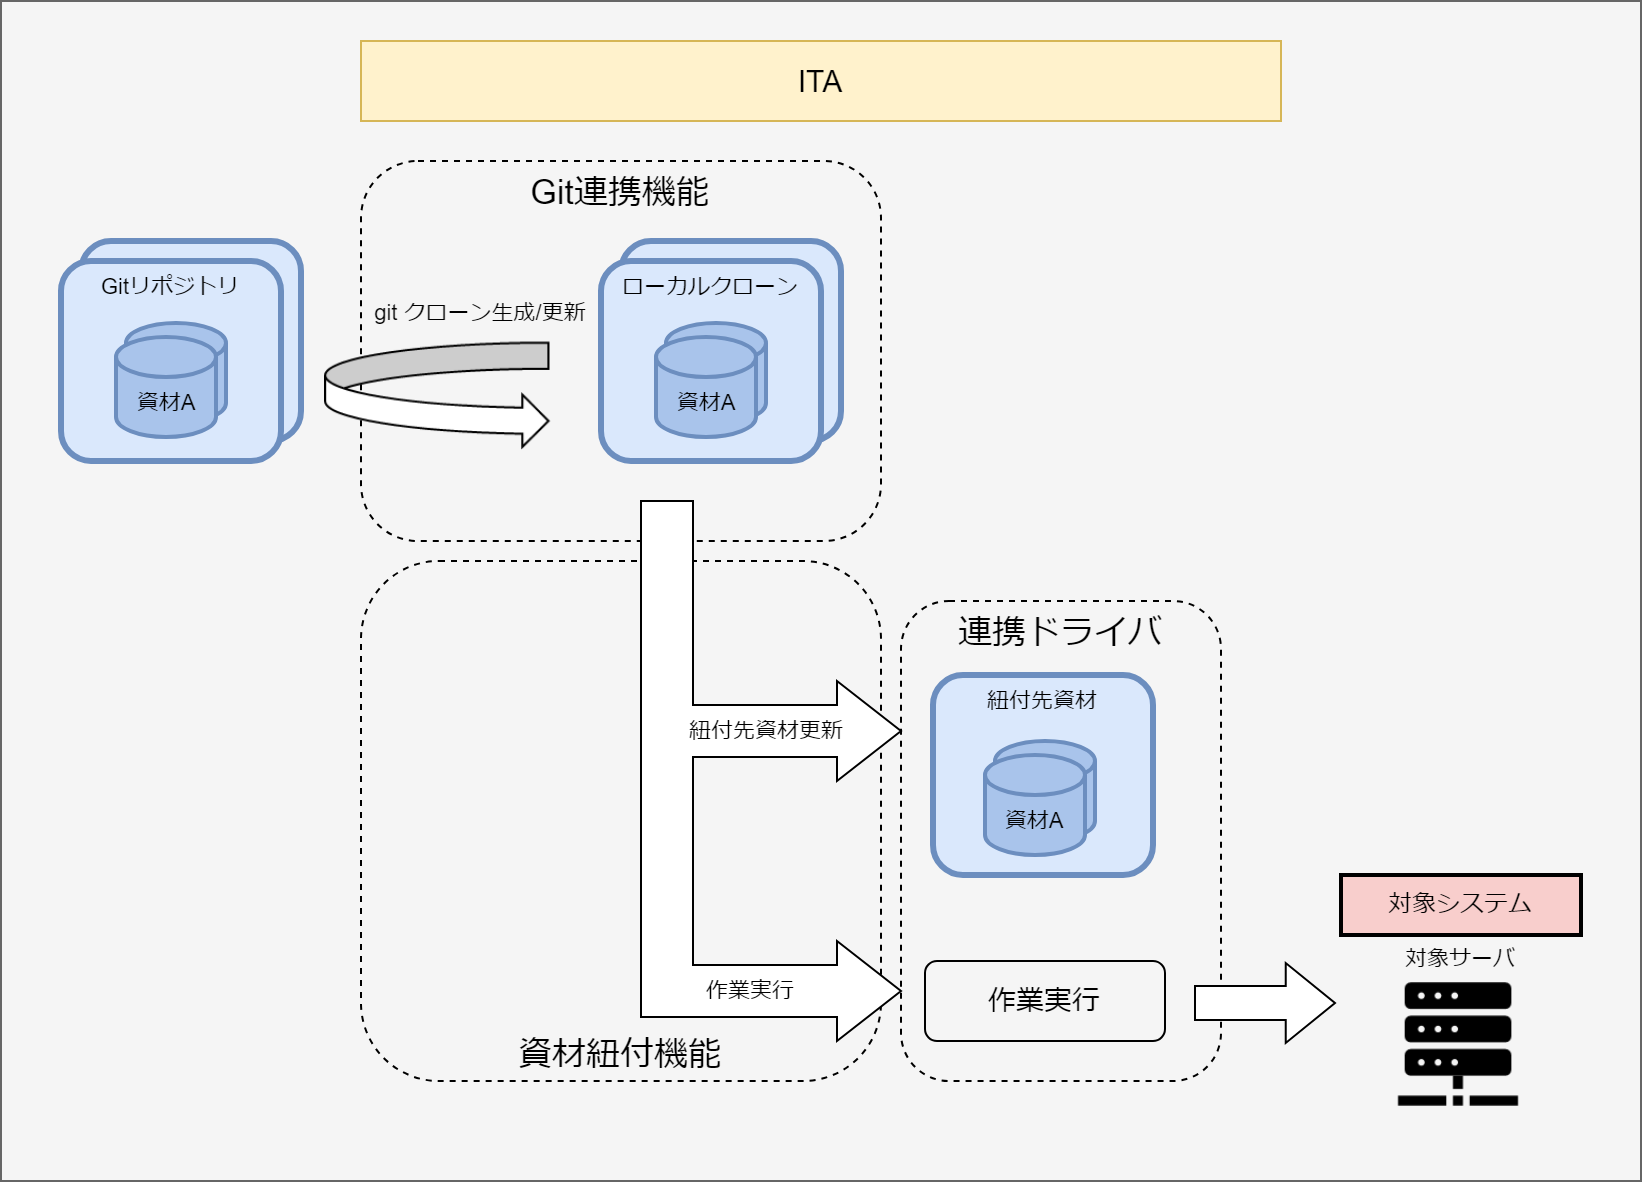
- Git link functionThis function clones the Git repository within ITA.It then uses the clone to periodicaly check for changes in the link source files and displays them in a list in the ITA "Remote repository file" menu.
- File link functionCreates a link between the source and destination files and registers an Operation and a movement for verifying the files.If the link source files are updated, the link destination files will automatically be updated and the previously created verifying movement and operation will be executed.
1.3.2. Function overview diagram
1.5. CI/CD For IaC function guide
1.5.1. Operation flow
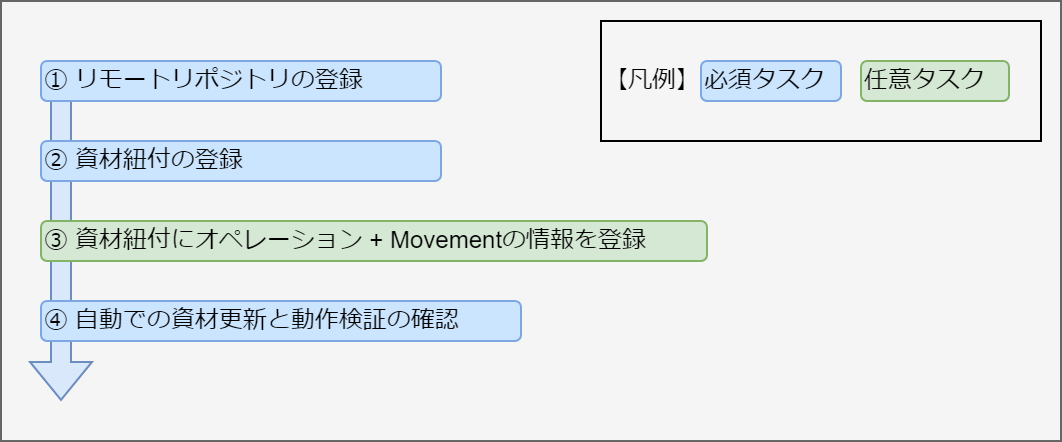
Operation flow details and references
- Register remote repositoryRegister the link Git repository information.For more information, see the "Remote repository" menu.
- Register file linkRegister a link between the source and destination files.For more information, see the "File link" menu.
- Register operation and movement to file linkRegister an operation and movement for veryfying updated link destination files.For more information, see the "File link" menu.
- Automatically check file update and function validation.Check that the Link destination files are automatically updated when the link source files are update.The user must also check that the movement and operation are automatically executed if they are registered.For more information, see the "File link" menu.
1.6. CI/CD For IaC function menu operation
1.6.1. CI/CD For IaC menu
Remote repository
- The "Remote repository" menu allows users to register information for the linking Git repository.
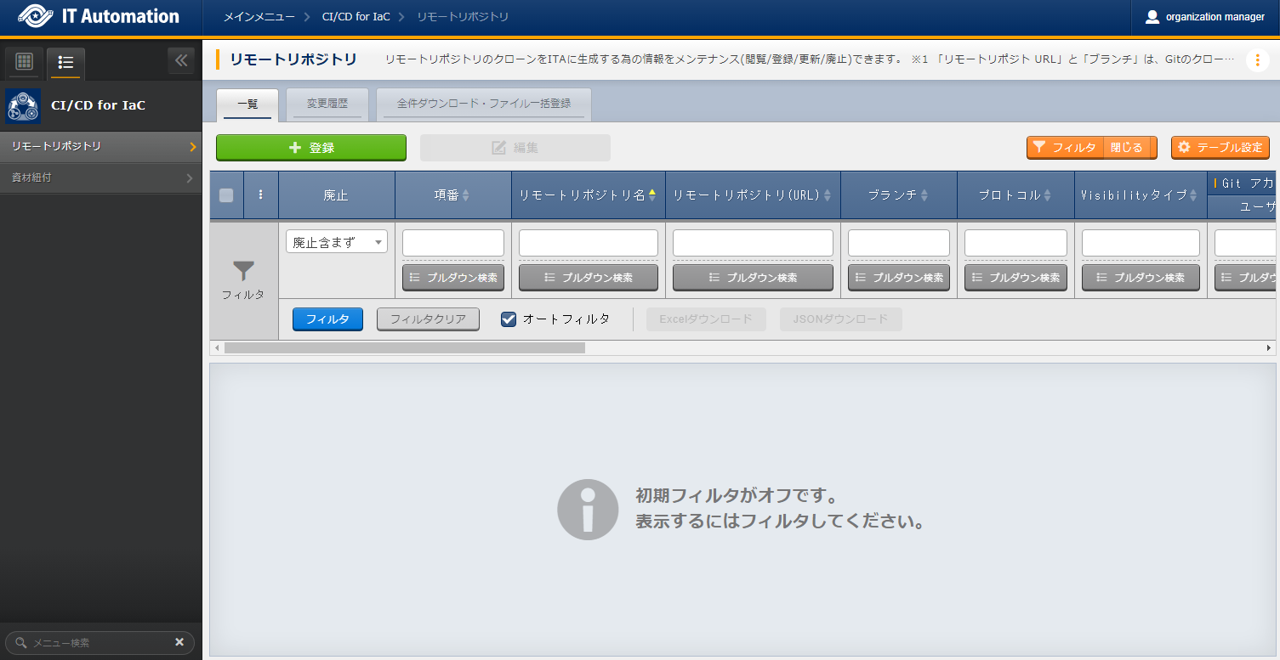
図 1.93 Submenu page(remote repository)
- The input items in the Remote repository page are as following.
- The items displaying the synchronization status of the remote repository are as following.
表 1.125 Remote repository page Synchronization status display items¶ Item
Description
Remarks
Status
The Git repository synchronization status displays one of the following statuses.Blank: Status when a record is newly registered, updated or restored.Success: Status when synchronization with Git repository was successful.Error: Status when synchronization with Git repository failed.Re-open: Status when the Re-open button was clicked.If the status changes to Error, the Git repository synchronization will stop.In order to re-open it, click the Re-open button or update the corresponding record.For more information, see "Notes regarding registering files to Git repositories."Detailed information
If the status changes to Error, the error log will be displayed.Click the Re-open button or update the corresponding record to clear the detailed information.Last updated date/time
Displays the last date/time the Git repository was synchronized.Click the Re-open button or update the corresponding record to clear the Last updated date/time.Re-open button
Re-activates records with an Error status.Clicking the Re-open button changes the status to "Re-open".
File link
- This menu allows users to create a link between the link source files and link destination files with each other and create Operations and Movements for validating the files.If the link source files are updated, an internal function will automatically update the link destination files and run an operation and Movement to validate the files before the processing results are displayed.
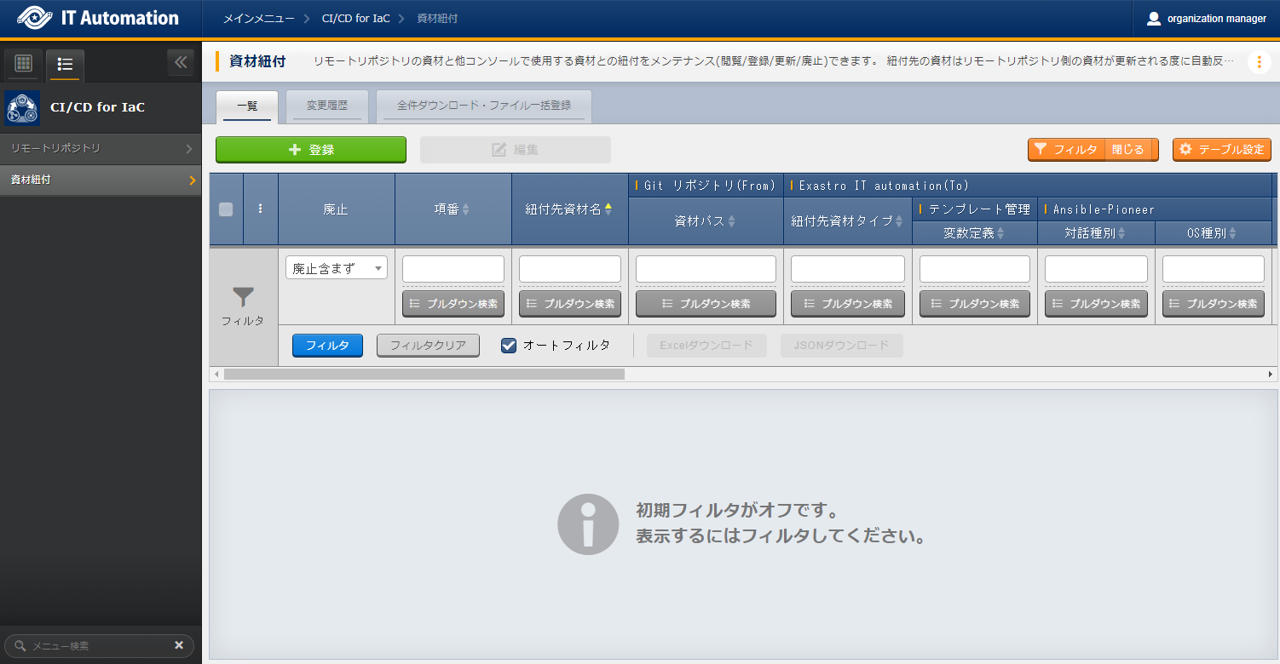
図 1.94 Submenu page( file link)
- The File link page's input items are as following.
表 1.126 File link page Input item list¶ Item
Description
Inputrequirement
Inputmethod
Restrictions
Link destination file name
Input the file name registered for the link destination file. This name is linked to one of the menus below
depending on the file type of the link destination file.
Note that the name must meet the same restrictions as the item they are input to. The restrictions applies to both the items and the file name.
Menu name
Item name
Ansible-Legacy/Playbook File collection
Paybook file name
Ansible-Pioneer/Inteactive File collection
No target item
Ansible-LegacyRole/Role package management
Role package name
Ansible common/Filemanagement
File embedded variable name
Ansible common/Template management
Template embedded variable name
Terraform-Cloud-EP/Module file collection
Module file name
Terraform-Cloud-EP/Policy management
Policy name
- Terraform-CLI/Module
file collection
Module file name
- The link process changes depending on if the
Link destination file name is registered or not.
- For more information, see
"4.Link destination file update process"
- For information regarding changing there
link list destination file name, see "5. Changing Link destination file name".
〇
Manual
Max length 255 bytes
Gitrepository(From)
- File path| Displays the remote repositories reigstered in
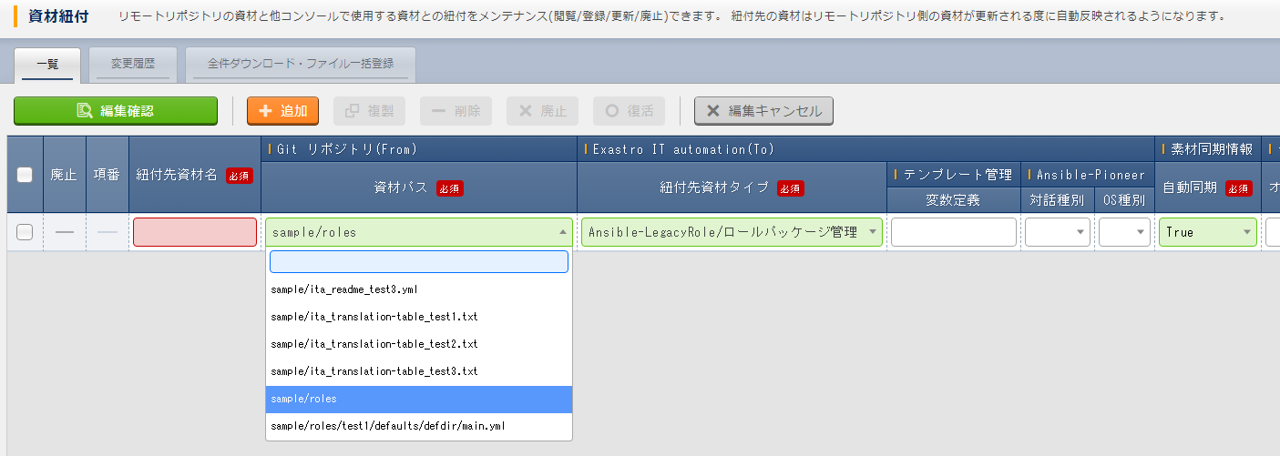
- the "Remote repository" menu.If the file tope for the Link destination file is"Ansible-LegacyRole/Role package management,see "":ref:`cicd_for_iac_role_package_notes`" for more information
〇
List selection
Exastro ITautmation (To)
Link destinationfile type
Select the link destination file type (menu). The available file types are listed below. Note that the different types must have theirdriver installed in order to be used.
Menu name
Install required
- Ansible-Legacy/Playbook
file collection
Ansible-Driver
Ansible-Pioneer/interactive file collection
Ansible-LegacyRole/rolepackage management
Ansible common/file management
- Ansible common/template
management
Terraform/Module file collection
Terraform-Cloud/
EP-Driver
Terraform/Policy management
Terraform-CLI/Modulefile collection
Terraform-CLI-Driver
〇
List selection
Tenplate
l
ist
Variable definition
If "Ansible common/Template management" is selected as the file type, make sure to input the variable definitions needed for the file This item is not required if the file type is not
"Ansible common/Template management
ー
Manual
- Max length 4000
bytes
Ansible-Pioneer
Interactive file type
- Displays the interactive file types registered in
the "Ansible-Pioneer/Interactive file type menu.
If the selected file type is the "Ansible-Pioneer/Interactive file collection" menu, select a interactive file type from the list This item is not required if the file type is not
"Ansible-Pionner/ Interactive file collecction".
ー
List selection
OStype
Displays the OS types registered in the "Ansible-Pioneer/OS type menu. If the selected file type is the "Ansible-Pioneer/Interactive file collection" menu, select an OS
type from the list.
- This item is not required if the file type is not
"Ansible-Pionner/ Interactive file collecction".
ー
List selection
File
s
nchronization information
Automatic synchronization
Select to automatically synchronize the Link destination files with the Git repository files when they change.
True: Will automatically synchronize the list destination file whenever the linked Git repository file is updated. False: Will not automatically synchronize the list destination file whenever the linked Git repository file is updated.
〇
List selection
- Default value:
active
Delivery
i
nformation
Operation
- Displays the Operations registered in the "Basic
console/Input operation list" menu.
Select the Operation that executes the Movementthat will be executed when the link destination file changes.
ー
List selection
Movement
Displays Movements registered in the "Basic console/Movement list" menu.
- Select the Movment that will be executed when the
link destination file changes.
ー
List selection
Dry run
Select the Movement execution mode.
True:Will execute the Movement in Dry run mode (Dry run for Ansible driver and Plan check for Terraform driver.
- If "False" or nothing is selected, the movement
will noe bt executed in Dry run mode
ー
List selection
Remarks
Free description field.
ー
Manual
Max length 4000 bytes
- The items that displays the synchronization status between Git repository and the link destination files are as following.
- Updating Link destination files
- Points regarding changing the Link destination file nameChanging the Link destination file name creates a new version of the same record with a new name. The old version will still be there.
1.7. Appendix
1.7.1. Notes regarding registering files to Git repositories.
- Registering Git repositories with file names exceeding 256 to the "Remote repository" menu will cause the Git clone command to end in an error.
- Registering Git repositories with file paths and file names exceeding 4096 bytes combined to the "Remote repository" menu will cause the Git clone command to end in an error.
1.7.2. Notes regarding registering files that are linked with the Role package management to Git repositories.
- Create a directory that contains a directory with the name "roles" and put all the files and directories required by the Role package function in there.Files compressed as Role packages are put under in the upper directory of the "roles" directory. However, creating a directory called "roles" directory under the Git repository route directory will not work, as it will not be recognized as such by the "Ansible-LegacyRole/Role package list" menu.Directories configured like the one in the example below will have its "sample/roles" recognized as a role directory. HOwever, the "roles" directory will not be recognized.Git repository route directory
|-  roles          ・・・・・・・Not recognized as roles directory.
|   |  ita_readme_test_role.yml
|   |- test_role
|      |-  defaults
|      |     main.yml
|      |-  tasks
|            main.yml
|
|- sample
    | ita_readme_test_role.yml
    |- roles       ・・・・・・・Recognized as roles directory.
        |- test_role
           |- defaults
           |     main.yml
           |- tasks
                 main.yml